Configure and build Qt5, tslib and evtest for ARM (Xilinx Zynq).

Just a short recipe on how to compile 'tslib' and use it with Qt5 on Xilinx Petalinux.

At the moment I'm using Ubuntu 14.04 64bit as a host machine, MicroZed 7020 as a target, Xilinx Vivado version 2014.2 and Petalinux vesion 2014.2.
My Vivado tools installed to default path '/opt/Xilinx' and I will install Qt5.3.2 and tslib to /opt/Qt/ and /opt/tslib directories.
Also, I'm using 'Project' folder in my home directory for Vivado and Petalinux projects. Now, after I set the scene, let's actually build it.

  1. Clone tslib into our Project folder:
  2. cd ~/Projects/
    git clone https://github.com/kergoth/tslib.git tslib
    cd ~/Projects/tslib

  3. To configure and build 'tslib' we have to setup a few enviroment variables: CROSS_COMPILE, CC, CXX and we have to source Vivado settings64.sh. So, I will create and use a small bash script:
  4. #!/bin/bash

    export CROSS_COMPILE=arm-xilinx-linux-gnueabi-
    source /opt/Xilinx/Vivado/2014.2/settings64.sh

    export CC=$(which arm-xilinx-linux-gnueabi-gcc)
    export CXX=$(which arm-xilinx-linux-gnueabi-g++)

    ./autogen.sh
    ./configure --host=arm-xilinx-linux-gnueabi --prefix /opt/tslib

    make
    sudo make install

  5. Next 'evtest'. This is a small, but very helpful utility when you trying to figure out what is wrong with your touchscreen or touchscreen controller.
  6. cd ~/Projects/
    git clone git://anongit.freedesktop.org/evtest evtest_util
    cd ~/Projects/evtest_util

    #!/bin/bash

    export CROSS_COMPILE=arm-xilinx-linux-gnueabi-
    source /opt/Xilinx/Vivado/2014.2/settings64.sh

    ./autogen.sh
    ./configure --host=arm-xilinx-linux-gnueabi prefix=/opt/evtest/
    make
    sudo make install

  7. Tslib generates 'ts.conf' file, which you can locate in /opt/tslib/etc/. We have to uncomment the module_raw for our touch controller. In my case it 'input'.
  8. Now when we got tslib, we can configure Qt5. I will build Qt5 from scratch using opensource Qt Everywhere Sources. So, lets download and unpack Qt5 sources.
  9. cd ~/Projects/
    wget http://download.qt-project.org/official_releases/qt/5.3/5.3.2/single/qt-everywhere-opensource-src-5.3.2.tar.gz
    tar -zxvf qt-everywhere-opensource-src-5.3.2.tar.gz

  10. Now, before we can configure Qt5 we must create 'mkspecs' for our Xilinx Zynq. So, create new device folder 'linux-arm-xilinx-zynq-g++' and two files in it. 'qplatformdefs' contains just an include, but second file 'qmake.conf' is quite important. This is the place where we set your CFLAGS/CXXFLAGS, some ENV variables which will be used by default by QMAKE and later by Qt5 libs.

    So, if you need to set something differently, this is the time!

  11. cd ~/Projects/qt-everywhere-opensource-src-5.3.2/qtbase/mkspecs/devices/
    create linux-arm-xilinx-zynq-g++

    'qmake.conf':

    #
    # qmake configuration for linux-g++ using arm-xilinx-g++ compiler
    #
    
    MAKEFILE_GENERATOR      = UNIX
    CONFIG                 += incremental gdb_dwarf_index
    QMAKE_INCREMENTAL_STYLE = sublib
    
    include(../../common/linux.conf)
    include(../../common/gcc-base-unix.conf)
    include(../../common/g++-unix.conf)
    
    load(device_config)
    
    QT_QPA_DEFAULT_PLATFORM = linuxfb
    
    # modifications to g++.conf
    QMAKE_CC                = $${CROSS_COMPILE}gcc
    QMAKE_CXX               = $${CROSS_COMPILE}g++
    QMAKE_LINK              = $${QMAKE_CXX}
    QMAKE_LINK_SHLIB        = $${QMAKE_CXX}
    
    # modifications to linux.conf
    QMAKE_AR                = $${CROSS_COMPILE}ar cqs
    QMAKE_OBJCOPY           = $${CROSS_COMPILE}objcopy
    QMAKE_NM                = $${CROSS_COMPILE}nm -P
    QMAKE_STRIP             = $${CROSS_COMPILE}strip
    
    QMAKE_CFLAGS           += -I$$[QT_SYSROOT]/include -DZYNQ
    QMAKE_CXXFLAGS         += -Wno-psabi -I$$[QT_SYSROOT]/include -DZYNQ
    QMAKE_LFLAGS           += -L$$[QT_SYSROOT]/lib
    
    QMAKE_CFLAGS           += -march=armv7-a -mtune=cortex-a9 -mcpu=cortex-a9 -mfpu=neon -pipe -fomit-frame-pointer
    QMAKE_CXXFLAGS         += $$QMAKE_CFLAGS
    
    deviceSanityCheckCompiler()
    
    load(qt_config)
    

    'qplatformdefs.h':

    /****************************************************************************
    **
    ** Copyright (C) 2013 Digia Plc and/or its subsidiary(-ies).
    ** Contact: http://www.qt-project.org/legal
    **
    ** This file is part of the qmake spec of the Qt Toolkit.
    **
    ** $QT_BEGIN_LICENSE:LGPL$
    ** Commercial License Usage
    ** Licensees holding valid commercial Qt licenses may use this file in
    ** accordance with the commercial license agreement provided with the
    ** Software or, alternatively, in accordance with the terms contained in
    ** a written agreement between you and Digia.  For licensing terms and
    ** conditions see http://qt.digia.com/licensing.  For further information
    ** use the contact form at http://qt.digia.com/contact-us.
    **
    ** GNU Lesser General Public License Usage
    ** Alternatively, this file may be used under the terms of the GNU Lesser
    ** General Public License version 2.1 as published by the Free Software
    ** Foundation and appearing in the file LICENSE.LGPL included in the
    ** packaging of this file.  Please review the following information to
    ** ensure the GNU Lesser General Public License version 2.1 requirements
    ** will be met: http://www.gnu.org/licenses/old-licenses/lgpl-2.1.html.
    **
    ** In addition, as a special exception, Digia gives you certain additional
    ** rights.  These rights are described in the Digia Qt LGPL Exception
    ** version 1.1, included in the file LGPL_EXCEPTION.txt in this package.
    **
    ** GNU General Public License Usage
    ** Alternatively, this file may be used under the terms of the GNU
    ** General Public License version 3.0 as published by the Free Software
    ** Foundation and appearing in the file LICENSE.GPL included in the
    ** packaging of this file.  Please review the following information to
    ** ensure the GNU General Public License version 3.0 requirements will be
    ** met: http://www.gnu.org/copyleft/gpl.html.
    **
    **
    ** $QT_END_LICENSE$
    **
    ****************************************************************************/
    
    #include "../../linux-g++/qplatformdefs.h"
    
  12. Next step is to configure Qt5 and below configuration I'm using. Again, this is critical step and if you have change something (compile with OpenGl support for example), you have to do it now. Also, if you want to reconfigure Qt, you have to clean using 'gmake clean' before running configuration script again.
  13. cd ~/Projects/qt-everywhere-opensource-src-5.3.2/
    ./build_qt5_3_2.sh
    gmake
    sudo gmake install

    'build_qt5_3_2.sh':

    #!/bin/bash
    
    export CROSS_COMPILE=arm-xilinx-linux-gnueabi-
    source /opt/Xilinx/Vivado/2014.2/settings64.sh
    
    read -p "Run 'confclean'? (y/n) "
    if [ "$REPLY" == "y" ]; then
            gmake clean
    fi 
    
    ./configure -prefix /opt/Qt/5.3.2 \
    	-device linux-arm-xilinx-zynq-g++ \
    	-device-option CROSS_COMPILE=arm-xilinx-linux-gnueabi- \
    	-release \
    	-confirm-license \
    	-opensource \
    	-optimized-qmake \
    	-no-qml-debug \
    	-qt-zlib \
    	-qt-libpng \
    	-qt-libjpeg \
    	-qt-freetype \
    	-qt-harfbuzz \
    	-qt-pcre \
    	-no-xcb \
    	-qt-xkbcommon \
    	-no-opengl \
    	-no-pch \
    	-verbose \
    	-no-kms \
    	-no-eglfs \
    	-no-icu \
    	-no-iconv \
    	-skip qtwebkit \
    	-tslib \
    	-no-gcc-sysroot \
    	-nomake tools \
    	-no-compile-examples \
    	-I /opt/tslib/include \
    	-L /opt/tslib/lib
    
    read -p "Run 'gmake'? (y/n) "
    if [ "$REPLY" == "y" ]; then
    	cd ~/Projects/$QtSrcName
    	gmake
    fi
    
    read -p "Run 'gmake install'? (y/n) "
    if [ "$REPLY" == "y" ]; then
    	cd ~/Projects/$QtSrcName
    	sudo gmake install
    fi
    
  14. After a few minutes(ha-ha) build will finish and we can build a couple of Qt examples for testing purposes. I created a small script to build each example individually. All I need to do is just copy it in project folder and run it. Examples I usually use is a 'Mainwindow' and a 'Pathstroke'.
  15. 'build_qt5_app.sh'

    #!/bin/bash
    
    export CROSS_COMPILE=arm-xilinx-linux-gnueabi-
    source /opt/Xilinx/Vivado/2014.3/settings64.sh
    
    export QTDIR=/opt/Qt/5.3.2
    export PATH=$QTDIR/bin:$PATH
    export LD_LIBRARY_PATH=/$QTDIR/lib:$LD_LIBRARY_PATH
    
    qmake
    
    make
    
    sudo make install
    
  16. Now, to install Qt5 libs and apps we will create Petalinux 'component'.
  17. cd ~/Projects/$PetalinuxProjectName
    petalinux-create -t libs -n qt-5.3.2 --enable
    cd components/libs/qt-5.3.2/
    rm libqt*
    cp -Pr /opt/Qt/5.3.2/lib .
    cp -Pr /opt/Qt/5.3.2/plugins/ ./lib/
    mkdir bin
    cp /opt/Qt/5.3.2/examples/widgets/painting/pathstroke/pathstroke bin/pathstroke
    cp /opt/Qt/5.3.2/examples/widgets/mainwindows/mainwindow/mainwindow bin/mainwindow

  18. Now, we have to make a few changes in our new 'component' in a Petalinux project( ~/Projects/$PetalinuxProjectName/components/libs/qt-5.3.2/): create 'Makefile' and some file with settings for Qt applications. Tet's call it 'profile.qt-5.3.2'.
  19. 'profile.qt-5.3.2':

    export QT_PLUGIN_PATH=/usr/lib/plugins
    export QT_QPA_FONTDIR=/usr/lib/fonts
    export QT_QPA_PLATFORM_PLUGIN_PATH=/usr/lib/plugins/platforms
    export QT_QPA_PLATFORM=linuxfb
    export QT_QPA_GENERIC_PLUGINS=tslib:/dev/input/event0
    

    Makefile(Don't forget to change username):

    ifndef PETALINUX
    $(error "Error: PETALINUX environment variable not set.  Change to the root of your PetaLinux install, and source the settings.sh file")
    endif
    
    include libs.common.mk
    
    LIB=libqt_5_3_2
    
    all: build install
    
    .PHONY: build
    build:
    
    install:
    	#Install libraries and fonts to the rootfs.
    
    	mkdir -p $(TARGETDIR)/usr/lib
    	USER=d9
    	GROUP=d9
    	rsync -rav ./bin/* $(TARGETDIR)/usr/bin/
    	rsync -rav ./lib/* $(TARGETDIR)/usr/lib/
    
    	#Install the script to ensure the font directory is properly specified.
    	mkdir -p $(TARGETDIR)/etc/profile.d
    	cp profile.qt-5.3.2 $(TARGETDIR)/etc/profile.d/profile.qt-5.3.2
    
    clean:
    
  20. We also need to add 'tslib' to our buildroot. So, I will create another Petalinux 'component', create and copy tslib configuration files:
  21. cd ~/Projects/$PetalinuxProjectName
    petalinux-create -t libs -n tslib --enable
    cd components/libs/tslib/
    rm libtslib*
    rm README
    cp -Pr /opt/tslib/bin .
    cp -Pr /opt/tslib/lib .
    cp -Pr /opt/etc/ts.conf .
    cp -Pr Makefile .
    cp -Pr profile.tslib .
    cp -Pr pointercal .

    My 'profile.tslib'. You may need to change it:

    export TSLIB_TSEVENTTYPE='INPUT'
    export TSLIB_CALIBFILE='/etc/pointercal'
    export TSLIB_CONFFILE='/etc/ts.conf'
    export TSLIB_CONSOLEDEVICE='none'
    export TSLIB_FBDEVICE='/dev/fb0'
    export TSLIB_PLUGINDIR='/usr/lib/ts'
    export TSLIB_TSDEVICE='/dev/input/event0'
    

    'pointercal' for my 800x600 touchscreen:

    94 -13605 53617952 -10567 205 40161292 65536 800 600
    

    'Makefile' (Don't forget to change username):

    ifndef PETALINUX
    $(error "Error: PETALINUX environment variable not set.  Change to the root of your PetaLinux install, and source the settings.sh file")
    endif
    
    include libs.common.mk
    
    LIB=tslib
    
    all: build install
    
    .PHONY: build
    build:
    
    install:
    	#Install libraries and fonts to the rootfs.
    
    	mkdir -p $(TARGETDIR)/usr/lib
    	USER=d9
    	GROUP=d9
    	rsync -rav ./bin/* $(TARGETDIR)/usr/bin/
    	rsync -rav ./lib/* $(TARGETDIR)/usr/lib/
    
    	cp ts.conf $(TARGETDIR)/etc/ts.conf
    	cp profile.tslib $(TARGETDIR)/etc/profile.d/tslib
    	cp pointercal $(TARGETDIR)/etc/pointercal
    
    clean:
    
  22. Qt is a C++ library and like any other C++ application or library it depend on standard c++ library. So, if you didn't include it in your rootfs yet you have to do it now.

    petalinux-config -c rootfs

    Then go to 'Filesystem Packages' -> 'Base' -> 'External-xilinx-toolchain' -> Enable 'libstdc++6'.

  23. This is basically it. Now we have rebuild our Petalinux project and start using it. Just a few notes:
    - After we add Qt5 libraries, our Linux image file will grow is size, so you may need to change U-boot settings to accomodate it.
    - If you need to recalibrate touchscreen - use 'ts_calibrate' utility.
    - If you want to keep it - you must save changes in '/etc/pointercal' file.
    - If you got not only touchscreen, but also mouse and/or keyboard you have to start your application with additional parameters: '-plugin EvdevMouse' '-plugin EvdevKeyboard'.

Howto create and package IP using Xilinx Vivado 2014.1

A small, step-by-step tutorial on how to create and package IP. Just as an example, I will create 3-to-8 decoder IP in Xilinx Vivado 2014.1 and connect it to Zynq SPI chip select pins. This is not a Verilog tutorial, so I will give a minimum information required to create Verilog sources.

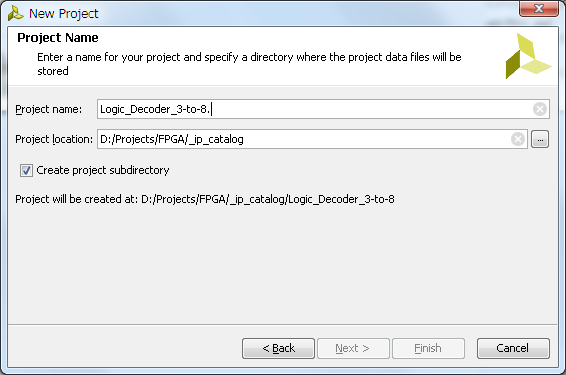
  1. Run Xilinx Vivado and create new RTL project - name it Logic_Decoder_3-to-8; Specify Verilog as target language; also specify Zynq-7000 for a part family.
  2. zynq14_1

  3. Next step to create IP source file. To do it click on 'Add Sources' in 'Project Manager' group in the Vivado project 'Flow Navigator'.
  4. In a 'Add Sources' dialog select 'Add or Create Design Sources'.
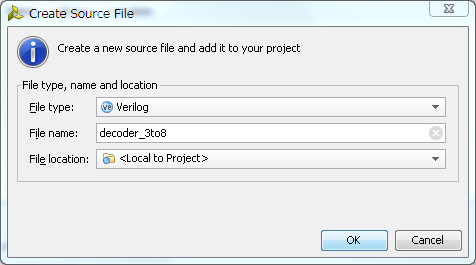
  5. Then 'Create File...', specify new 'File Name' and click 'Ok' and 'Finish' buttons to close dialogs.
  6. zynq14_2

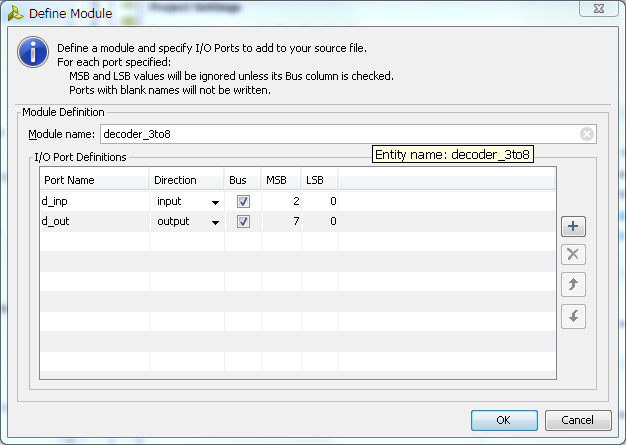
  7. Next, Vivado will open 'Define Module' dialog where we have to specify inputs and outputs. Since we are creating 3 to 8 decoder, set type of input and output as 'Bus' and set appropriate bus width. Set port names to whatever makes more sense to you, but remember that 'in' and 'out' are reserved words, so you have to be a little creative here. Click 'Ok' close dialog.
  8. zynq14_3

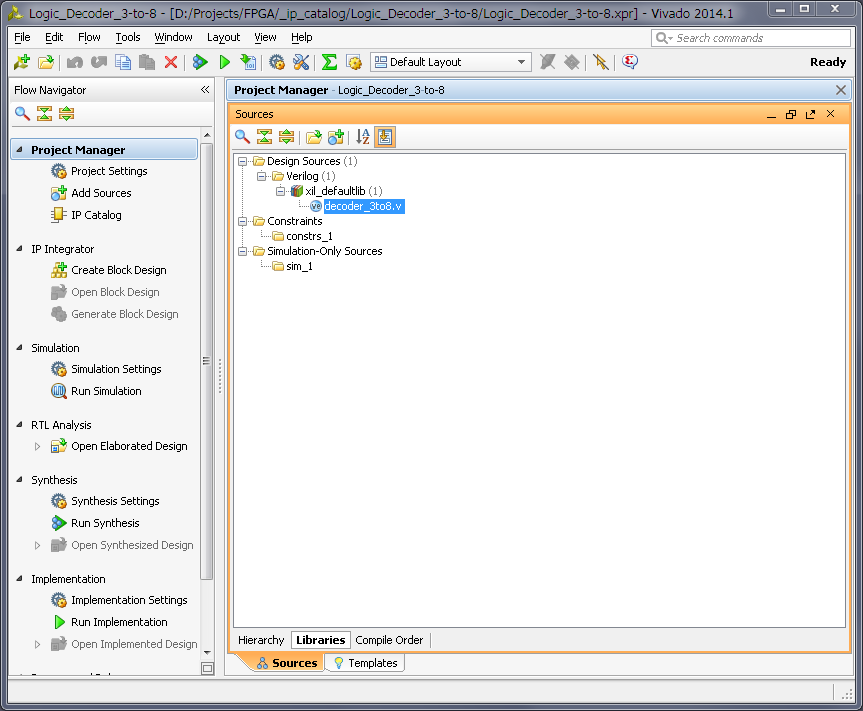
  9. Now, in a sources window of the Vivado, you can see Verilog source file we just created. Open it.
  10. zynq14_4

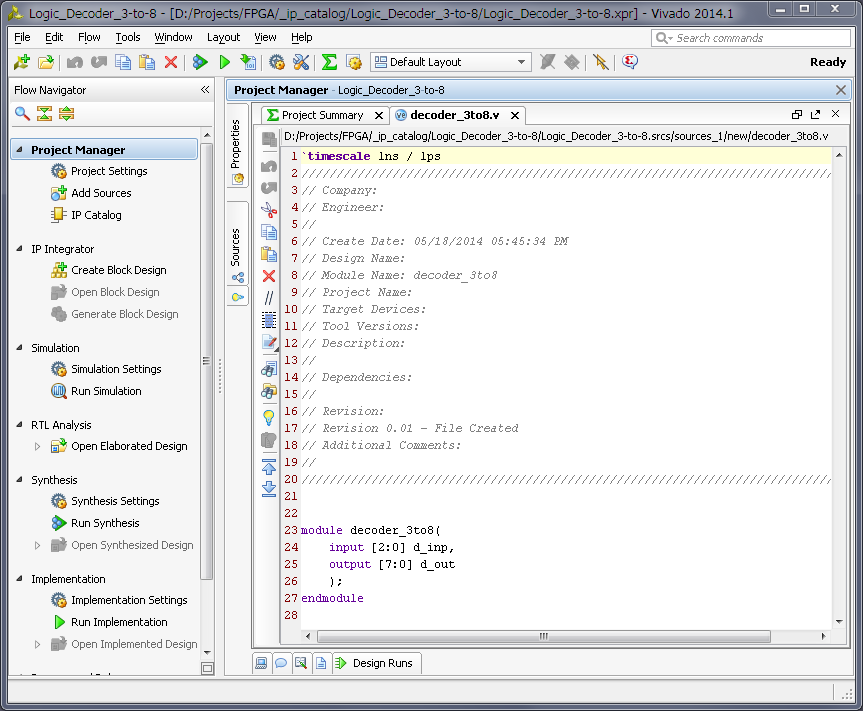
  11. This is just a empty source file created using template, but it already have our module input and output defined and all we need to do is to modify it to do an actual address decoding. Below is the one possible solution to such problem.
  12. zynq14_5

    module decoder_3to8(
        input [2:0] d_inp,
        output [7:0] d_out
        );
        
    assign d_out = (d_inp == 3'b000) ? 8'b00000001 :
                   (d_inp == 3'b001) ? 8'b00000010 :
                   (d_inp == 3'b010) ? 8'b00000100 :
                   (d_inp == 3'b011) ? 8'b00001000 :
                   (d_inp == 3'b100) ? 8'b00010000 :
                   (d_inp == 3'b101) ? 8'b00100000 :
                   (d_inp == 3'b110) ? 8'b01000000 :
                   8'b10000000;
        
    endmodule
    
  13. Make changes to the source and save it. Now you can run simulation and synthesis and analize the resulted design, but I will skip it to make this tutorial simpler. I also using this very simple verilog module and know it works, but still did verification on it so can just copy-paste it.
  14. Now, let's package it. In a 'Tools' menu of the Vivado select 'Create and Package IP...'. Later select 'Package your current project' option, include '.xci' files and 'Finish' new IP creation.
  15. Change IP identification information if you wish, as well as, any other property for new IP.
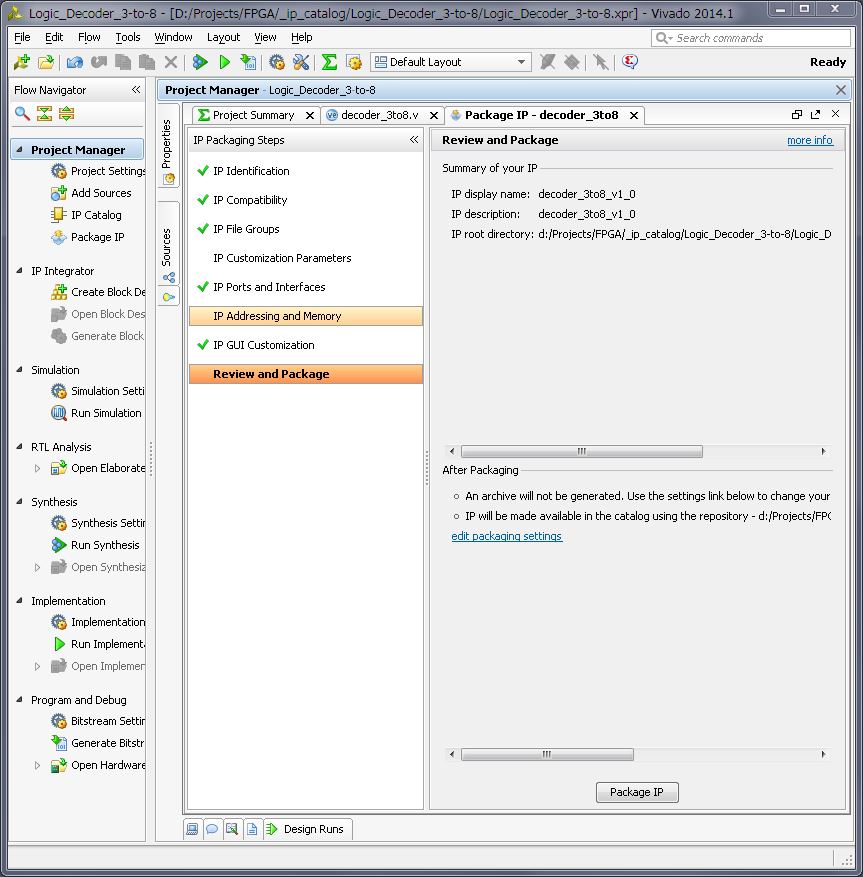
  16. After you done with changes, click on 'Review and Package' menu on the bottom of the list and then click in 'Package IP' button.
  17. zynq14_7

  18. We are done with this IP, close this project.
  19. Now lets use our new 3-to-8 decoder IP. Just for example, I will create new, very basic Zynq design for ZedBoard and will decode one of it's SPI port outputs to 8. And will make them external on one of the ZedBoard PMOD connector. I will not cover creation of the Zynq block design, since I did it in my previous posts.
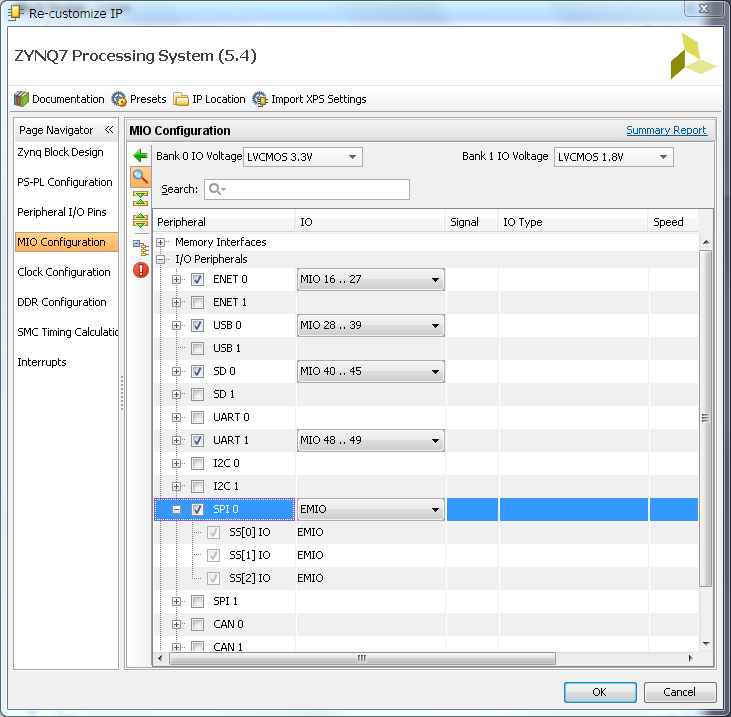
  20. So, below my simple Zynq block design. Now, I have to enable SPI port. Double click on 'Zynq processing system', go to 'MIO Configuration' and enable 'SPI0' port. As you can see it can only have maximum 3 Slave Select (or Chip Select) pin and sometimes its not enough.
  21. zynq14_8

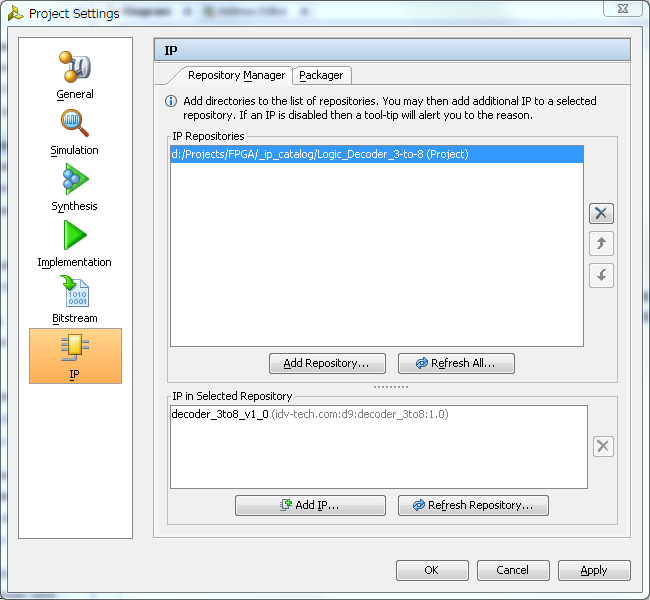
  22. Next we need to add our 3-to-8 decoder module to block diagram, but before we can do it, we must add it's repository to our project IP manager. So, in a 'Tools' menu select 'Project Settings' and then click on 'IP' icon.
  23. In 'IP' management dialog click on 'Add Repository...' button and specify our decoder IP project folder. Vivado will scan it, should find decoder IP and add it in found IP list. Click 'Apply' and then 'Ok' to close dialog.
  24. zynq14_9

  25. We can add decoder IP to our block diagram. Click on 'Add IP', typo decoder IP name and add it.
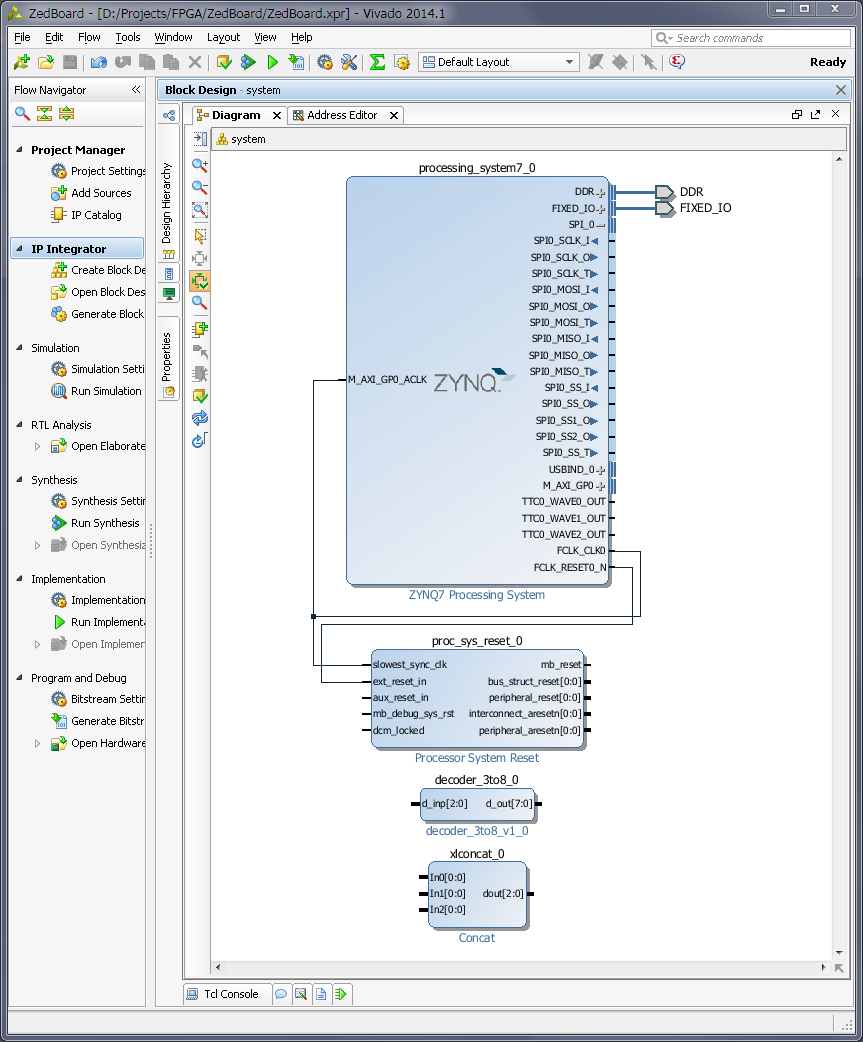
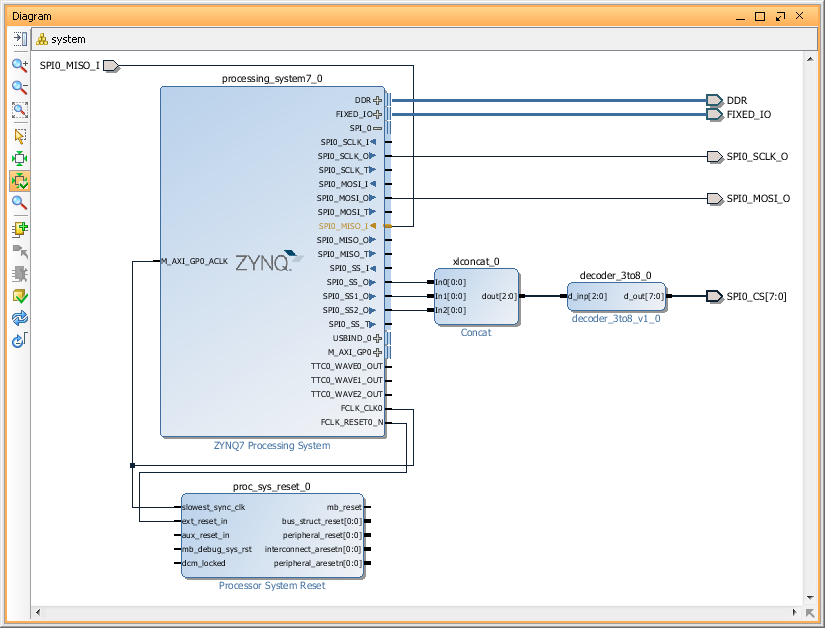
  26. Now we have to connect 3 SPI SS outputs to our decoder input, but we can't. Problem is that decoder inputs treated as a 'bus' and SPI SS outputs as individual 'wires'. One of the possible solution is to concatenate individual wires. In order to do it add Xilinx 'Concat' IP and modify it, so it will have 3 inputs.
  27. zynq14_10

  28. Now we should be able to connect all blocks together. Specifically, connect SPI0_SS0, SPI0_SS1 and SPI0_SS2 to 'Concat' block input 0,1 and 2. Them, connect 'Concat' output to our 3-to-8 decoder IP and finally make decoder outputs 'External'. I will also rename output port to 'SPI0_CS'.
  29. zynq14_11

  30. This is basically it. Now we have to create 'constraints' file and specify in it Zynq PACKAGE_PIN for some or all pins of the 'SPI_CS0' port. For example you may want to export only 4 CS pins. Something like this:
  31. set_property IOSTANDARD LVCMOS33 [get_ports SPI0_SCLK]
    set_property IOSTANDARD LVCMOS33 [get_ports SPI0_MISO]
    set_property IOSTANDARD LVCMOS33 [get_ports SPI0_MOSI]
    set_property IOSTANDARD LVCMOS33 [get_ports SPI0_CS[0]]
    set_property IOSTANDARD LVCMOS33 [get_ports SPI0_CS[1]]
    set_property IOSTANDARD LVCMOS33 [get_ports SPI0_CS[2]]
    set_property IOSTANDARD LVCMOS33 [get_ports SPI0_CS[3]]
    
    set_property PACKAGE_PIN AA9 [get_ports SPI0_SCLK]
    set_property PACKAGE_PIN Y10 [get_ports SPI0_MISO]
    set_property PACKAGE_PIN AA11 [get_ports SPI0_MOSI]
    set_property PACKAGE_PIN W12 [get_ports SPI0_CS[0]]
    set_property PACKAGE_PIN W11 [get_ports SPI0_CS[1]]
    set_property PACKAGE_PIN V10 [get_ports SPI0_CS[2]]
    set_property PACKAGE_PIN W8 [get_ports SPI0_CS[3]]
    
  32. Later, in a software project, you will need to enable special option for SPI driver to use 'Slave Select' pins as encoded address. But that is part of another tutorial, but this one finished. Good luck!

New Vivado 2014.1 released.

Exciting news! Yesterday Xilinx released Vivado 2014.1 - promise about 25% faster runtime and 1.5x overall speedup in compile+simulation! Also they added OpenCL kernels and some Linear algebra library to Vivado HLS! But for me more important changes is that now updated constraints file won't trigger 'out-of-date' for entire project. Also hope to see preset's for more Zynq boards, which already on a market.
Downloading it now and will try in a next hour.
SDK also got updated and now using GCC 4.8.1 instead of 4.7.3. This means almost all C++11 features supported!

Update: No additional board preset's and Avnet's board awareness files for MicroZed 7010 and 7020 for 2013.2 doesn't work anymore. Not sure yet how much effort will take to make them work.

Update 2: Changing board awareness files took 5 minutes. Not a big deal.

ZedBoard Linux-FreeRTOS AMP Board Bringup Guide.

One of the many nice features of Xilinx Zynq is ability to run it in Asymmetric MultiProcessing or AMP configuration. Xilinx released version v2013.10 of a UG980(Petalinux Board Bringup) and UG978(Zynq Linux-FreeRTOS AMP) guides for Xilinx ZC702 board. Today I will follow those guides to build Linux-FreeRTOS solution for ZedBoard.
I already have Vivado and Xilinx SDK packages installed along with required, but initially missing packages on my Ubuntu 13.10 64 bit Virtual Machine.

  1. First of all we will need so called Zynq 'Hardware Platform' which will satisfy both Linux and FreeRTOS minimum requirements.
    Linux requires one UART and at least one storage peripheral, for example SD Card. And FreeRTOS also requires one UART and also a Timer.
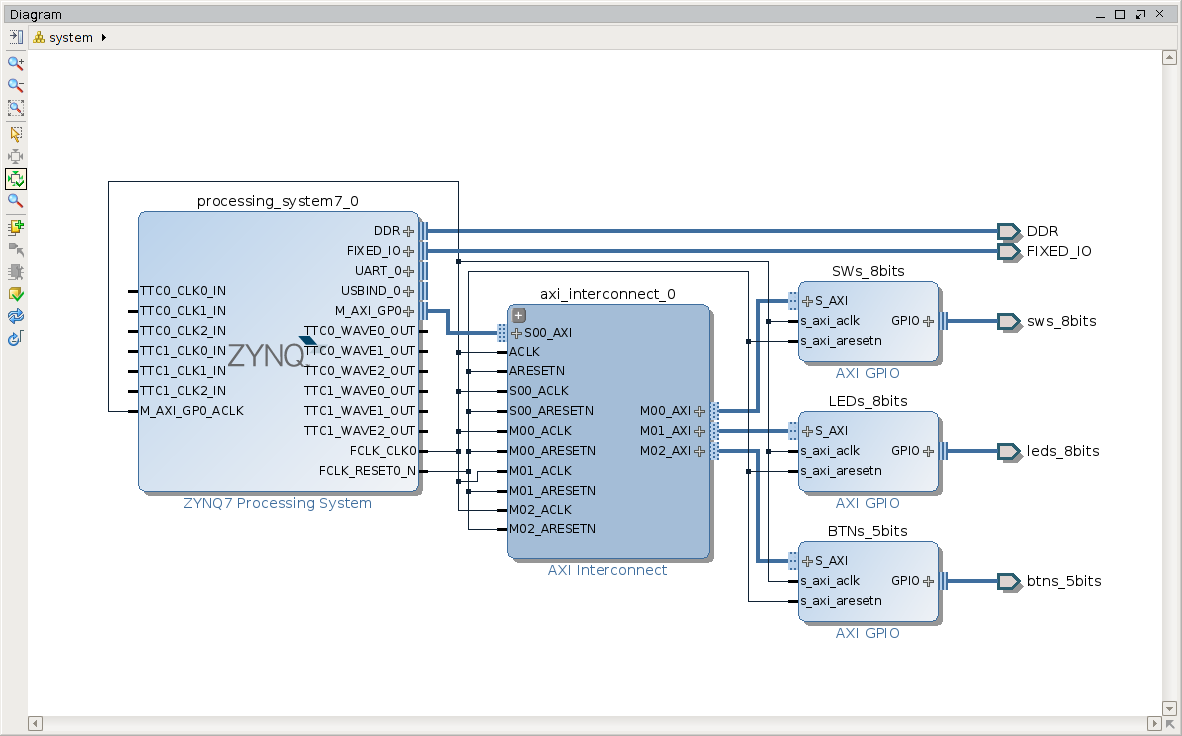
    So, I will modify ZedBoard CTT hardware design I created using ZedBoard_CTT_v2013_2_130807 tutorial. That 'Hardware Platform', in addition to base system, consist of 8 switches, 8 led's and 5 push buttons and I will activate 1 more UART and 1 more timer for FreeRTOS.

    Open Vivado ZedBoard CTT project or create it from scratch using ZedBoard CTT tutorial. I called my project 'ZedBoard-AMP' and made next 2 modifications to CTT design:

    • Zynq7 Processing System: MIO Configuration: I/O Peripherals: Enable UART0 and set its IO as 'EMIO'.
    • Zynq7 Processing System: MIO Configuration: Application Processor Unit: Enable Timer1 and set its IO as 'EMIO'.

    As a result I got the system with the such 'Block Diagram': zynq5_001

  2. Run Synthesis, Implementation, generate new BitStream and Export new 'Hardware' to SDK. I prefer not to lauch SDK right away for a good reason - you have to source Xilinx SDK settings and/or PetaLinux settings before running XSDK. After export finished we can close Vivado.
  3. Lets set required settings and run Xilinx SDK (XSDK). Set 'Eclipse' workspace to our ~/Projects/ directory.
  4. mkdir Projects
    cd Projects
    source /opt/Xilinx/Vivado/2013.4/settings64.sh
    xsdk

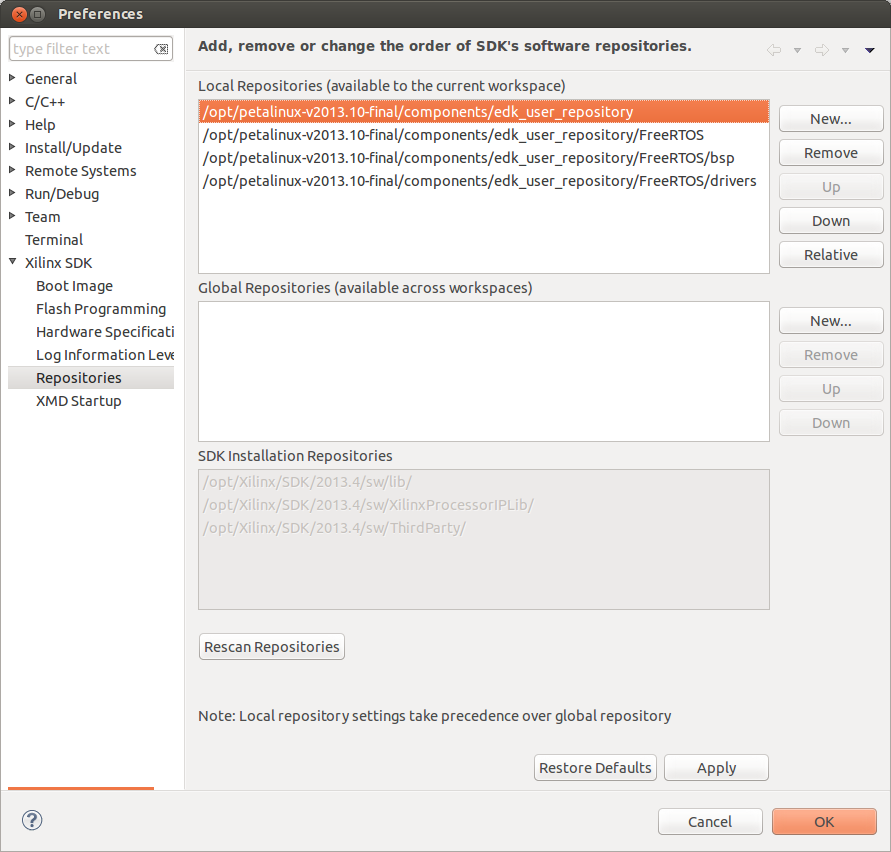
  5. We need to add PetaLinux and FreeRTOS repositories to XSDK. In XSDK -> Xilinx Tools -> 'Xilinx SDK' -> 'Repositories' -> add 'Local Repositories' from your PetaLinux 13.10 components folder. In my case PetaLinux installed into '/opt/petalinux-v2013.10-final/'. So added repo's are:
    • /opt/petalinux-v2013.10-final/components/edk_user_repository
    • /opt/petalinux-v2013.10-final/components/edk_user_repository/FreeRTOS
    • /opt/petalinux-v2013.10-final/components/edk_user_repository/FreeRTOS/bsp
    • /opt/petalinux-v2013.10-final/components/edk_user_repository/FreeRTOS/drivers

    zynq5_002

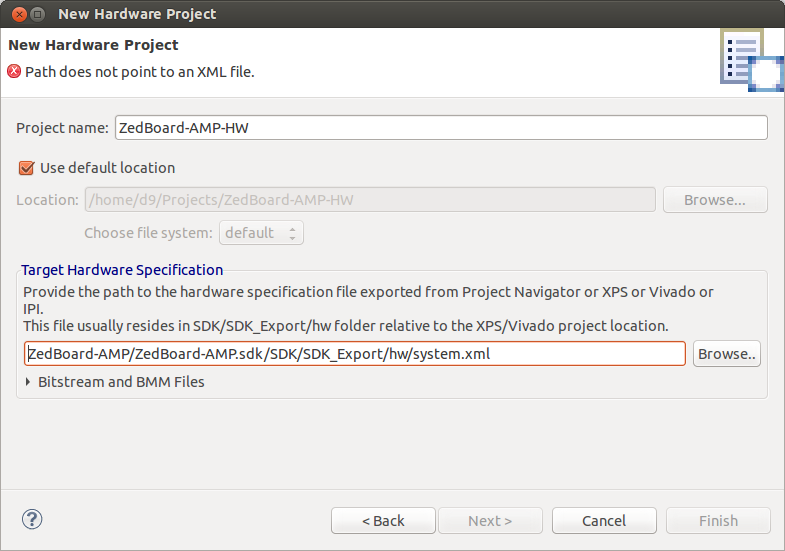
  6. Create 'Hardware Platform Specification' project using 'Hardware Platfrom' exported from our ZedBoard-AMP Vivado project. I named it 'ZedBoard-AMP-HW'.
  7. zynq5_003

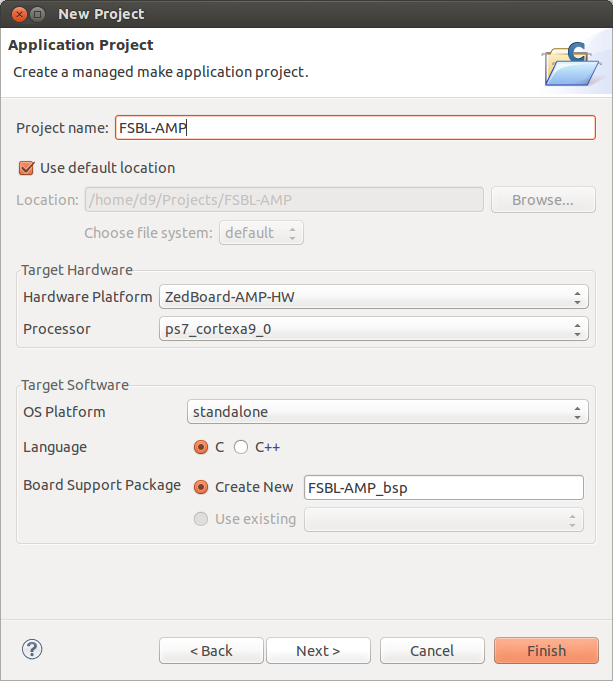
  8. Create FSBL for AMP configuration using File -> New Project -> Application Project. I named it FSBL-AMP and selected 'ZedBoard-AMP-HW' as Hardware Platform, 'ps7_cortex9_0' as a Processor, 'standalone 'OS Platfrom ', after clicking 'Next' select 'Zynq FSBL' template and finish project creation. Compile both 'FSBL-AMP_bsp' and 'FSBL-AMP' projects if it didnt autobuilt.
    zynq5_004
  9. Now we will need to build a few PetaLinux projects, but before we can do this, we have to quit XSDK and source some PetaLinux settings. So, close XSDK, apply settings in next order and launch XSDK again:
  10. export CROSS_COMPILE=arm-xilinx-linux-gnueabi-
    source /opt/Xilinx/Vivado/2013.4/settings64.sh
    source /opt/petalinux-v2013.10-final/settings.sh
    xsdk

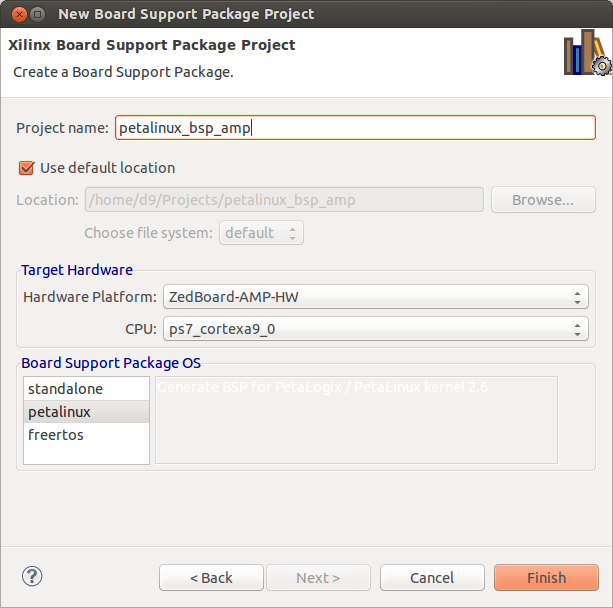
  11. Create PetaLinux BSP project. In SDK select File -> New -> Project -> 'Board Support Package'. Name it 'petalinux_bsp_amp'. Select 'ZedBoard-AMP-HW' as Hardware Platform, CPU 'ps7_cortexa9_0'. Board Support Package OS 'petalinux'. Then Finish.
    zynq5_005

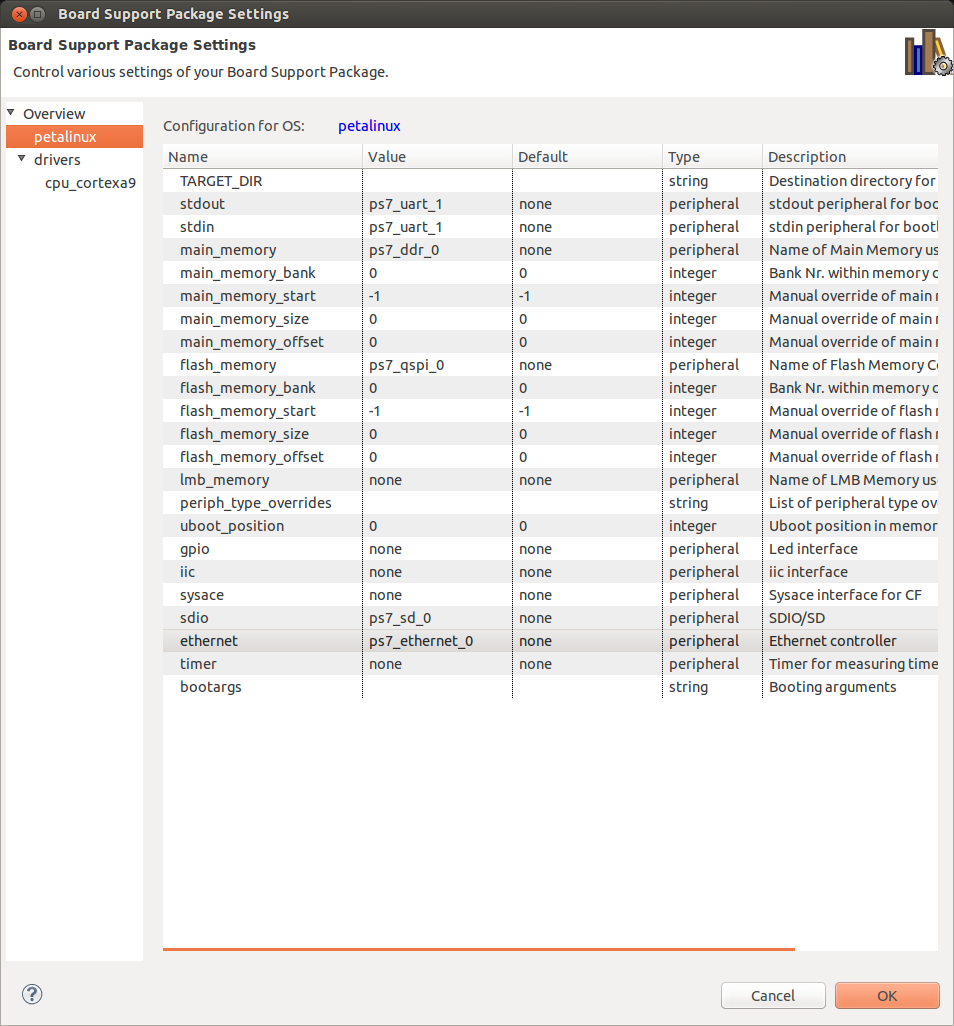
    XSDK should automatically open 'Board Support Package Settings' page. Go to 'Overview' -> 'petalinux' menu of that page and set:

    • 'ps7_uart_1' for stdout and stdin.
    • 'ps7_ddr_0' for main memory.
    • 'ps7_qspi' for flash memory.
    • 'ps7_sd_0' for sdio.
    • 'ps7_ethernet' for ethernet.

    zynq5_006
    Build this project.

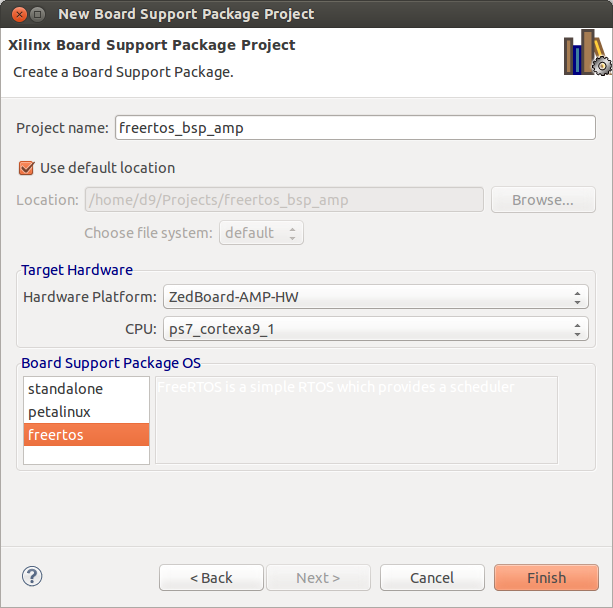
  12. Create FreeRTOS BSP project. In SDK select File -> New -> Project -> 'Board Support Package'. Name it 'freertos_bsp_amp'. Select 'ZedBoard-AMP-HW' as Hardware Platform, CPU 'ps7_cortexa9_1'. Board Support Package OS 'freertos'. Then Finish.
    zynq5_008

    XSDK will automatically open 'Board Support Package Settings' page now for FreeRTOS project. Then:

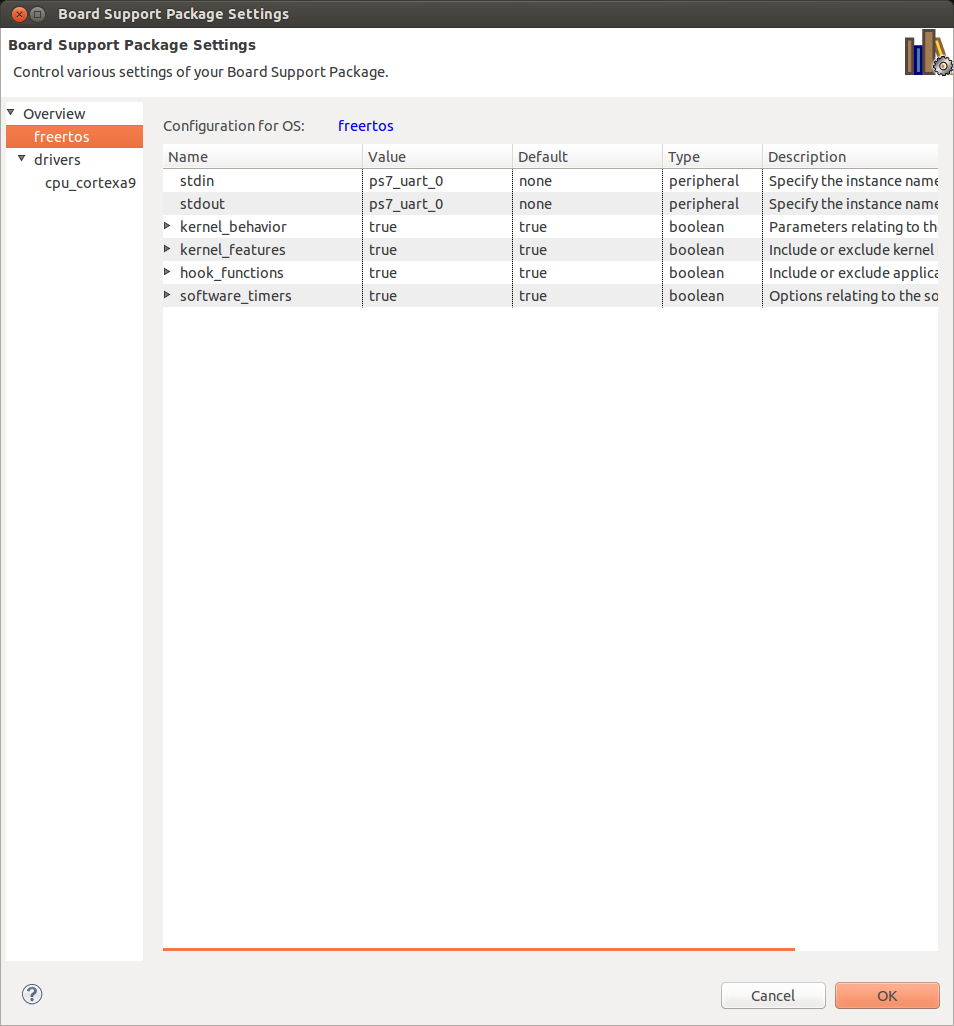
    • 'Overview' -> 'freertos' -> Set 'ps7_uart_0' for both stdin and stdout.
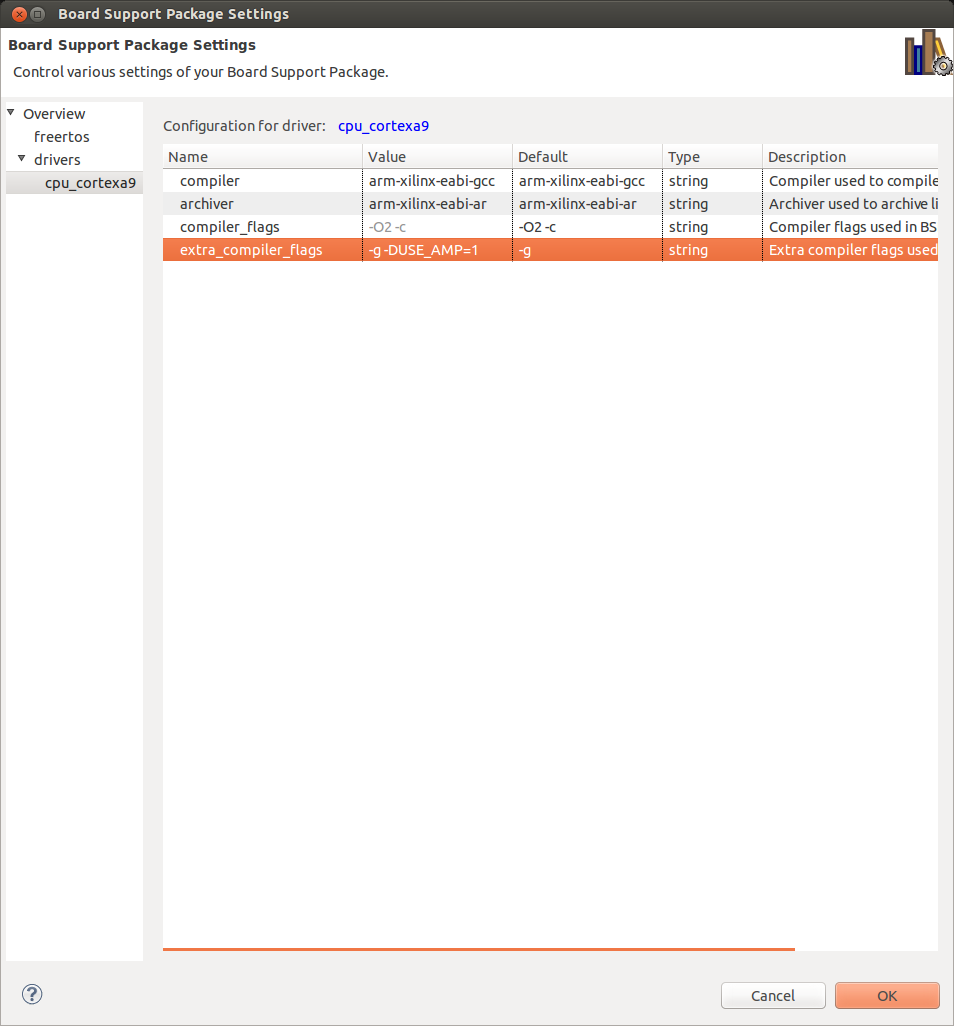
    • 'drivers' -> 'cpu_cortexa9' -> Set 'extra_compiler_flags' to '-g -DUSE_AMP=1'.

    zynq5_009

    zynq5_007
    This flag will enable AMP specific features in the FreeRTOS firmware. Hit Ok. And build this project too if it not built automatically.

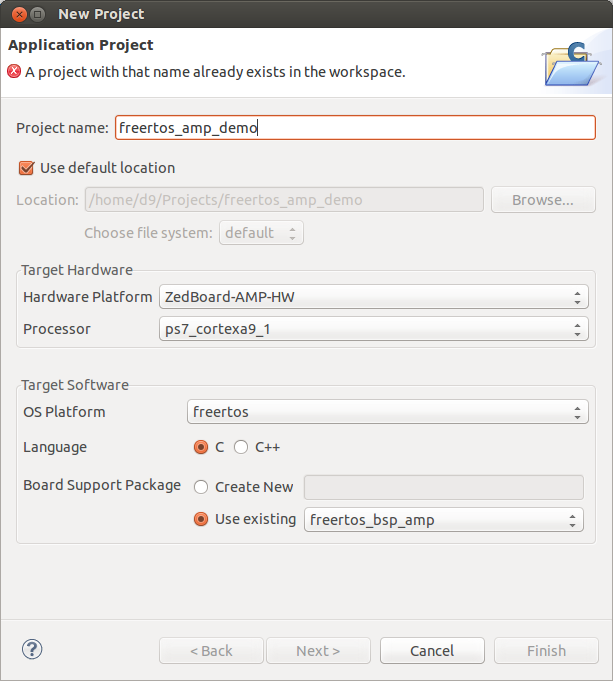
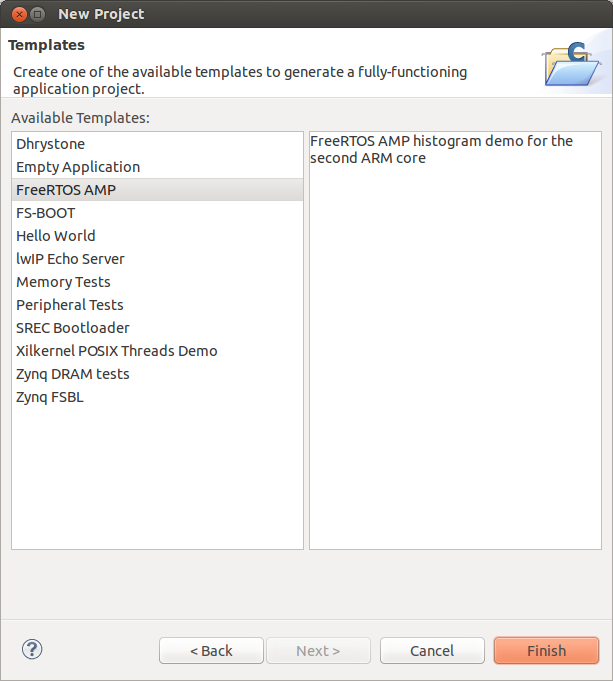
  13. Create FreeRTOS test applications project. In SDK select File -> New -> Project -> 'Application Project'. Name it 'freertos_amp_demo'. Select 'ZedBoard-AMP-HW' as Hardware Platform, Processor 'ps7_cortexa9_1', OS Platfrom 'freertos', for Board Support Package select 'Use existing' -> then our 'freertos_bsp_amp' project. Click 'Next' and select 'FreeRTOS AMP' template. Click 'Finish'. And build it.

    zynq5_12

    zynq5_14

  14. We are done with XSDK for now. Close it.
  15. Now we have to create PetaLinux 'project'. And I will name it 'AMP-Demo'.

    cd ~/Projects
    export CROSS_COMPILE=arm-xilinx-linux-gnueabi-
    source /opt/Xilinx/Vivado/2013.4/settings64.sh
    source /opt/petalinux-v2013.10-final/settings.sh
    petalinux-create -t project -n AMP-Demo

    INFO: Create project: AMP-Demo
    INFO: New project successfully created in /home/d9/Projects/AMP-Demo

  16. Next step is to adjust our PetaLinux configuration to match our unique 'Hardware Platform' we created using Vivado - 'ZedBoard-AMP'. But we have to do it using BSP we created for our 'Hardware Platform' - 'petalinux_bsp_amp'. So, in a ~/Projects directory:

    cd petalinux_bsp_amp/
    petalinux-config --get-hw-description -p ../AMP-Demo/

    INFO: Checking component...
    INFO: Getting hardware description...
    INFO: Using MSS file /home/d9/Projects/petalinux_bsp_amp/system.mss and XML file /home/d9/Projects/petalinux_bsp_amp/../ZedBoard-AMP-HW/system.xml
    INFO: Copy autoconfig for PetaLinux project: /home/d9/Projects/AMP-Demo
    INFO: Merging platform settings into kernel configuration
    Auto-config file successfully updated for PetaLinux project: /home/d9/Projects/AMP-Demo
    [INFO ] generate /home/d9/Projects/AMP-Demo/subsystems/linux/hw-description/system.dts

  17. Verify, that we got the right configuration. In particular, amount of DDR memory - it should be 512M or 0x20000000. Below 'subsystems/linux/hw-description/xparameters.h' file generated in my case:
    /*
     * (C) Copyright 2007-2008 Michal Simek
     *
     * Michal SIMEK <monstr@monstr.eu>
     *
     * CAUTION: This file is automatically generated by libgen.
     * Version: Xilinx EDK 2013.4 EDK_2013.4.20131205
     * Generate by U-BOOT v4.00.c
     * Project description at http://www.monstr.eu/uboot/
     */
    
    #define XILINX_BOARD_NAME "AMP-Demo"
    
    /* ARM is ps7_cortexa9_0 */
    #define XPAR_CPU_CORTEXA9_CORE_CLOCK_FREQ_HZ	666666687
    
    /* Interrupt controller is ps7_scugic_0 */
    #define XILINX_PS7_INTC_BASEADDR		0xf8f00100
    
    /* System Timer Clock Frequency */
    #define XILINX_PS7_CLOCK_FREQ	333333343
    
    /* Uart console is ps7_uart_1 */
    #define XILINX_PS7_UART
    #define XILINX_PS7_UART_BASEADDR	0xe0001000
    #define XILINX_PS7_UART_CLOCK_HZ	50000000
    
    /* IIC doesn't exist */
    
    /* GPIO doesn't exist */
    
    /* SDIO controller is ps7_sd_0 */
    #define XILINX_PS7_SDIO_BASEADDR		0xe0100000
    
    /* Main Memory is ps7_ddr_0 */
    #define XILINX_RAM_START	0x00000000
    #define XILINX_RAM_SIZE		0x20000000
    
    /* Flash Memory is ps7_qspi_0 */
    #define XILINX_PS7_QSPI_FLASH_BASEADDR	0xE000D000
    #define XILINX_SPI_FLASH_MAX_FREQ	50000000
    #define XILINX_SPI_FLASH_CS	0
    
    /* Sysace doesn't exist */
    
    /* Ethernet controller is ps7_ethernet_0 */
    #define XILINX_PS7_GEM_BASEADDR			0xe000b000
    
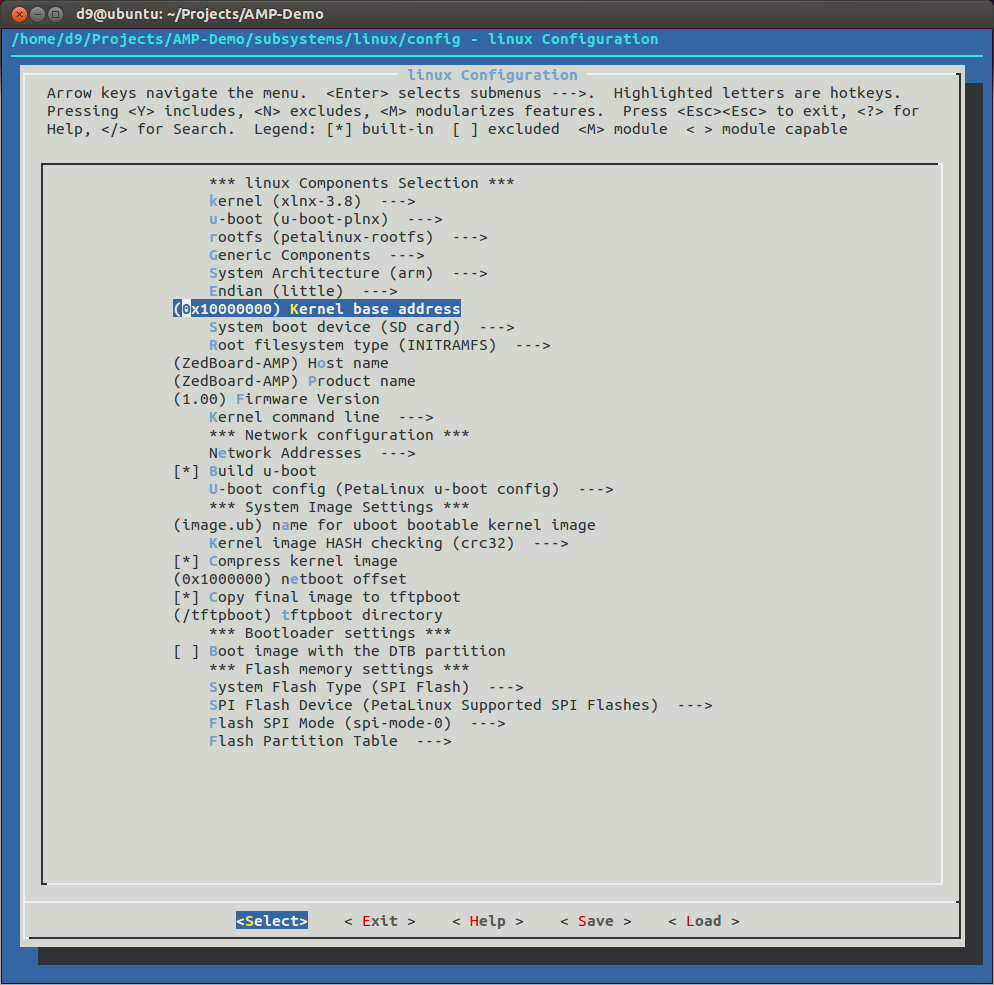
  18. Next step is to configure our PetaLinux project. AMP system share memory between Linux Kernel and FreeRTOS, so PetaLinux project must be configured to segment the memory and lets split it 256M/256M since our ZedBoard have 512M total of DDR3 memory. I will also change boot media type to SD Card, Host and Product names. So, run petalinux-config and make next this changes:

    cd ~/Projects/AMP-Demo/
    petalinux-config

    zynq5_010

  19. Time to configure Linux Kernel for AMP. In a project directory:

    petalinux-config -c kernel

    In a main page:

    • Make sure that 'Enable loadable module support' is selected.
    • In 'Kernel Features' -> make sure that 'High Memory Support' is enabled.
    • In 'Kernel Features' -> change 'Memory split' to '2G/2G'.
    • In 'Device Drivers' -> 'Generic Driver Options' -> make sure 'Userspace firmware loading support' is enabled.
    • In 'Device Drivers' -> 'Remoteproc drivers(EXPERIMENTAL)' -> change 'ZYNQ remoteproc' to (module) and disble Microblaze support.
    • In 'Device Drivers' -> 'Rpmsg drivers(EXPERIMENTAL)' -> set all three modules to ('An rpmsg server sample', 'rpmsg OMX driver' and 'An FreeRTOS statistic')

    Save changes and quit from menuconfig.

  20. Configure PetaLinux project ROOTFS. All we need to change now is to in 'Apps-->' menu add/enable 'latencystat' app.

    petalinux-config -c rootfs

  21. Next very important step is to update 'Device Tree Source'(DTS). We need it to do because 'remoteproc' driver instantianated and configured by its node in a device tree.
    DTS file we need to modify located in a our petalinux project 'AMP-Demo/subsystems/linux/hw-description/system.dts'. We have to add 'remoteproc' node to 'ps7_axi_interconnect_0' device. Below a portion of my system.dts file. More details regarding 'remoteproc' you can find in a Xilinx UG978 v2013.10:

    	ps7_axi_interconnect_0: amba@0 {
    		#address-cells = <1>;
    		#size-cells = <1>;
    		compatible = "xlnx,ps7-axi-interconnect-1.00.a", "simple-bus";
    		ranges ;
    		test: remoteproc-test@0 {
    			compatible = "xlnx,zynq_remoteproc";
    			reg = < 0x0 0x10000000 >;
    			interrupt-parent = <&ps7_scugic_0>;
    			interrupts = < 0 37 4 0 38 4>;
    			firmware = "freertos";
    			ipino = <6>;
    			vring0 = <2>;
    			vring1 = <3>;
    		} ;
    		ps7_spi_0: ps7-spi@e0006000 {
    			clock-names = "ref_clk", "aper_clk";
    			clocks = <&clkc 25>, <&clkc 34>;
    			compatible = "xlnx,ps7-spi-1.00.a";
    			interrupt-parent = <&ps7_scugic_0>;
    			interrupts = <0 26 4>;
    			num-chip-select = <3>;
    			reg = <0xe0006000 0x1000>;
    			bus-num = <0>;
    			speed-hz = <1000000>;			//1000kHz
    			xlnx,has-ss0 = <0x1>;
    			xlnx,has-ss1 = <0x1>;
    			xlnx,has-ss2 = <0x1>;
    			xlnx,spi-clk-freq-hz = <0xF4240>;
    			device@0{
    				compatible="linux,spidev";
    				reg =<0>;			//CS0
    				spi-max-frequency= <1000000>;
    			};
    			device@1{
    				compatible="linux,spidev";
    				reg =<1>;			//CS1
    				spi-max-frequency= <1000000>;
    			};
    		} ;
    		ps7_spi_1: ps7-spi@e0007000 {
    			clock-names = "ref_clk", "aper_clk";
    			clocks = <&clkc 26>, <&clkc 35>;
    			compatible = "xlnx,ps7-spi-1.00.a";
    			interrupt-parent = <&ps7_scugic_0>;
    			interrupts = <0 49 4>;
    			num-chip-select = <2>;
    			reg = <0xe0007000 0x1000>;
    			bus-num = <1>;
    			speed-hz = <1000000>;			//1000kHz
    			xlnx,has-ss0 = <0x1>;
    			xlnx,has-ss1 = <0x1>;
    			xlnx,spi-clk-freq-hz = <0xF4240>;
    			device@0{
    				compatible="linux,spidev";
    				reg =<0>;			//CS0
    				spi-max-frequency= <1000000>;
    			};
    			device@1{
    				compatible="linux,spidev";
    				reg =<1>;			//CS1
    				spi-max-frequency= <1000000>;
    			};
    		} ;
    		ps7_ethernet_0: ps7-ethernet@e000b000 {
    			#address-cells = <1>;
    			#size-cells = <0>;
    			clock-names = "ref_clk", "aper_clk";
    			clocks = <&clkc 13>, <&clkc 30>;
    			compatible = "xlnx,ps7-ethernet-1.00.a";
    			interrupt-parent = <&ps7_scugic_0>;
    			interrupts = <0 22 4>;
    			local-mac-address = [ 00 0a 35 00 18 e0 ];
    			phy-handle = <&phy0>;
    			phy-mode = "rgmii-id";
    			reg = <0xe000b000 0x1000>;
    			xlnx,enet-reset = "";
    			xlnx,eth-mode = <0x1>;
    			xlnx,has-mdio = <0x1>;
    			xlnx,ptp-enet-clock = <111111115>;
    			mdio {
    				#address-cells = <1>;
    				#size-cells = <0>;
    				phy0: phy@0 {
    					compatible = "marvell,88e1116r";
    					device_type = "ethernet-phy";
    					reg = <0>;
    				} ;
    			} ;
    		} ;
    
  22. Now, with PetaLinux configured, we can add our FreeRTOS demo app we created and compiled using XSDK into PetaLinux rootfs image. In order to do it we can create PetaLinux app using template.

    cd ~/Projects/AMP-Demo/
    petalinux-create -t apps --template install -n freertos_fw

    INFO: Create apps: freertos_fw
    INFO: New apps successfully created in /home/d9/Projects/AMP-Demo/components/apps/freertos_fw

  23. Copy our FreeRTOS compiled app into PetaLinux apps directory:

    cd ~/Projects/AMP-Demo/components/apps/freertos_fw/
    cp ../../../../freertos_amp_demo/Debug/freertos_amp_demo.elf data/freertos

  24. Modify 'install' section of Makefile in the app folder:
    ifndef PETALINUX
    $(error "Error: PETALINUX environment variable not set.  Change to the root of your PetaLinux install, and source the settings.sh file")
    endif
    
    include $(PETALINUX)/components/apps/apps.common.mk
    
    all: build install
    
    build:
    
    clean:
    
    .PHONY: install image
    
    install:
            $(TARGETINST) -d data/freertos /lib/firmware/freertos
    
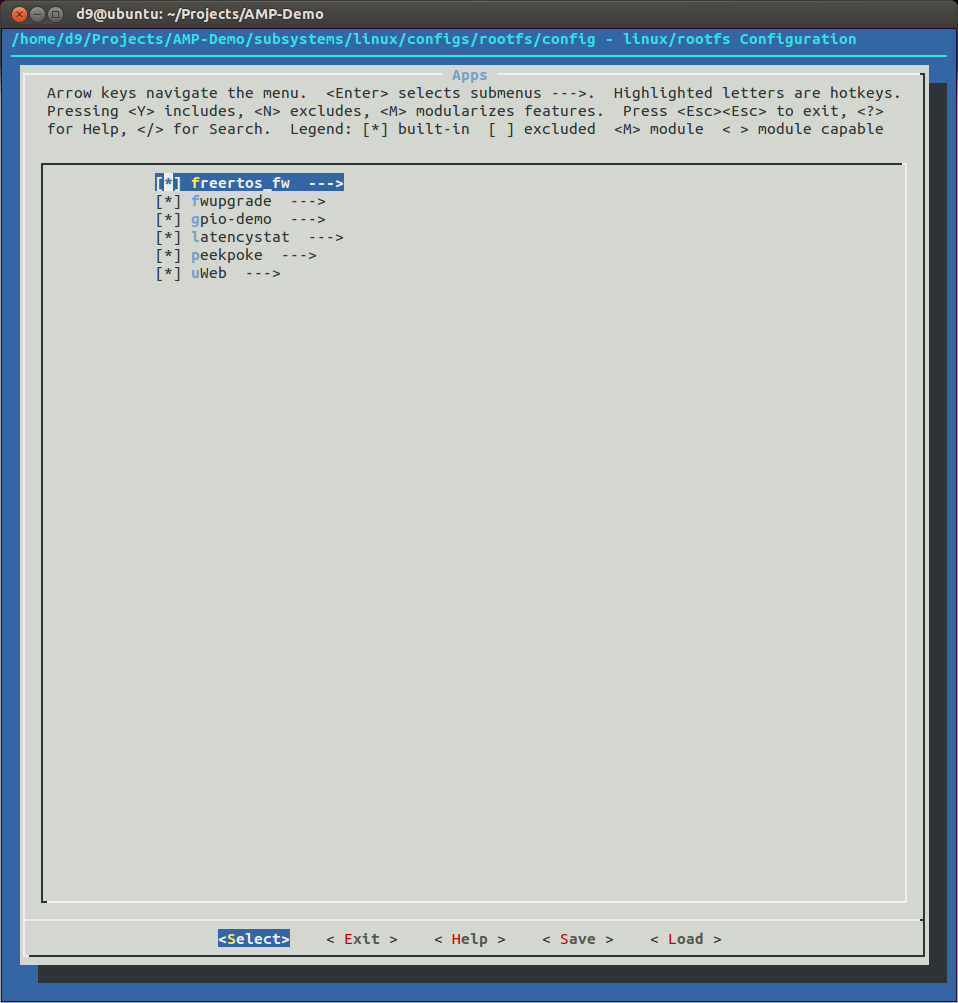
  25. Configure PetaLinux 'rootfs' to include this new 'freertos_fw' in 'Apps-->' menu:

    cd ~/Projects/AMP-Demo/
    petalinux-config -c rootfs

    zynq5_011

  26. Build PetaLinux project, create BOOT.BIN image using our 'FSBL-AMP' and 'ZedBoard-AMP' bitstream file. Create/update prebuilt configuration.

    cd ~/Projects/AMP-Demo/
    petalinux-build
    petalinux-package --boot --fsbl ../FSBL-AMP/Debug/FSBL-AMP.elf --fpga ../ZedBoard-AMP-HW/system_wrapper.bit --uboot --force -o images/linux/BOOT.BIN
    petalinux-package --prebuilt --fpga ../ZedBoard-AMP-HW/system_wrapper.bit --force

  27. Copy BOOT.BIN and image.ub to sd card, set ZedBoard MIO3, MIO4 and MIO5 to 'SD Boot' configuration and turn ZedBoard on.
  28. Login as 'root'/'root' and verify our kernel version and build timestamp.

    root@ZedBoard-AMP:~# uname -a
    Linux ZedBoard-AMP 3.8.11 #2 SMP PREEMPT Wed Feb 26 15:39:37 EST 2014 armv7l GNU/Linux
    root@ZedBoard-AMP:~#

  29. Because we included remoteproc as a module and it not loaded yet - Linux must be using both CPU's in a conventional SMP way. Lets verify it:

    more /proc/cpuinfo

    processor       : 0
    model name      : ARMv7 Processor rev 0 (v7l)
    BogoMIPS        : 1332.01
    Features        : swp half thumb fastmult vfp edsp neon vfpv3 tls 
    CPU implementer : 0x41
    CPU architecture: 7
    CPU variant     : 0x3
    CPU part        : 0xc09
    CPU revision    : 0
    
    processor       : 1
    model name      : ARMv7 Processor rev 0 (v7l)
    BogoMIPS        : 1332.01
    Features        : swp half thumb fastmult vfp edsp neon vfpv3 tls 
    CPU implementer : 0x41
    CPU architecture: 7
    CPU variant     : 0x3
    CPU part        : 0xc09
    CPU revision    : 0
    
    Hardware        : Xilinx Zynq Platform
    Revision        : 0000
    Serial          : 0000000000000000
    
  30. Now, lets load remoteproc driver:

    modprobe zynq_remoteproc

    CPU1: shutdown
     remoteproc0: 0.remoteproc-test is available
     remoteproc0: Note: remoteproc is still under development and considered experimental.
     remoteproc0: THE BINARY FORMAT IS NOT YET FINALIZED, and backward compatibility isn't yet guaranteed.
    

    modprobe rpmsg_freertos_statistic

     remoteproc0: powering up 0.remoteproc-test
     remoteproc0: Booting fw image freertos, size 2130820
     remoteproc0: remote processor 0.remoteproc-test is now up
    virtio_rpmsg_bus virtio0: rpmsg host is online
    virtio_rpmsg_bus virtio0: creating channel rpmsg-timer-statistic addr 0x50
    rpmsg_freertos_statistic rpmsg0: new channel: 0x400 -> 0x50!
    

    So, second Processor unloaded from Linux and is setup to execute the FreeRTOS firmware.

  31. Now, we can run 'latencystat' FreeRTOS demo app.

    latencystat -b

    Linux FreeRTOS AMP Demo.
       0: Command 0 ACKed
       1: Command 1 ACKed
    Waiting for samples...
       2: Command 2 ACKed
       3: Command 3 ACKed
       4: Command 4 ACKed
    -----------------------------------------------------------
    Histogram Buckvirtio_rpmsg_bus virtio0: msg received with no recepient
    et Values:
    	Bucket 341 ns (38 ticks) had 14813 frequency
    	Bucket 431 ns (48 ticks) had 1 frequency
    	Bucket 521 ns (58 ticks) had 1 frequency
    	Bucket 593 ns (66 ticks) had 1 frequency
    	Bucket 692 ns (77 ticks) had 1 frequency
    -----------------------------------------------------------
    Histogram Data:
    	min: 341 ns (38 ticks)
    	avg: 341 ns (38 ticks)
    	max: 692 ns (77 ticks)
    	out of range: 0
    	total samples: 14817
    -----------------------------------------------------------
    root@ZedBoard-AMP:~#
    
  32. Access the TraceBuffer - a section of shared memory which is only written to by the FreeRTOS application. This
    TraceBuffer used as a logging console to transfer information to Linux and 'latencystat' app uses it. So, lets check it out:

    more /sys/kernel/debug/remoteproc/remoteproc0/trace0

    Congratulation! We got Linux-FreeRTOS AMP configuration running on our ZedBoard.