Configure and build Qt5, tslib and evtest for ARM (Xilinx Zynq).

Just a short recipe on how to compile 'tslib' and use it with Qt5 on Xilinx Petalinux.

At the moment I'm using Ubuntu 14.04 64bit as a host machine, MicroZed 7020 as a target, Xilinx Vivado version 2014.2 and Petalinux vesion 2014.2.
My Vivado tools installed to default path '/opt/Xilinx' and I will install Qt5.3.2 and tslib to /opt/Qt/ and /opt/tslib directories.
Also, I'm using 'Project' folder in my home directory for Vivado and Petalinux projects. Now, after I set the scene, let's actually build it.

  1. Clone tslib into our Project folder:
  2. cd ~/Projects/
    git clone https://github.com/kergoth/tslib.git tslib
    cd ~/Projects/tslib

  3. To configure and build 'tslib' we have to setup a few enviroment variables: CROSS_COMPILE, CC, CXX and we have to source Vivado settings64.sh. So, I will create and use a small bash script:
  4. #!/bin/bash

    export CROSS_COMPILE=arm-xilinx-linux-gnueabi-
    source /opt/Xilinx/Vivado/2014.2/settings64.sh

    export CC=$(which arm-xilinx-linux-gnueabi-gcc)
    export CXX=$(which arm-xilinx-linux-gnueabi-g++)

    ./autogen.sh
    ./configure --host=arm-xilinx-linux-gnueabi --prefix /opt/tslib

    make
    sudo make install

  5. Next 'evtest'. This is a small, but very helpful utility when you trying to figure out what is wrong with your touchscreen or touchscreen controller.
  6. cd ~/Projects/
    git clone git://anongit.freedesktop.org/evtest evtest_util
    cd ~/Projects/evtest_util

    #!/bin/bash

    export CROSS_COMPILE=arm-xilinx-linux-gnueabi-
    source /opt/Xilinx/Vivado/2014.2/settings64.sh

    ./autogen.sh
    ./configure --host=arm-xilinx-linux-gnueabi prefix=/opt/evtest/
    make
    sudo make install

  7. Tslib generates 'ts.conf' file, which you can locate in /opt/tslib/etc/. We have to uncomment the module_raw for our touch controller. In my case it 'input'.
  8. Now when we got tslib, we can configure Qt5. I will build Qt5 from scratch using opensource Qt Everywhere Sources. So, lets download and unpack Qt5 sources.
  9. cd ~/Projects/
    wget http://download.qt-project.org/official_releases/qt/5.3/5.3.2/single/qt-everywhere-opensource-src-5.3.2.tar.gz
    tar -zxvf qt-everywhere-opensource-src-5.3.2.tar.gz

  10. Now, before we can configure Qt5 we must create 'mkspecs' for our Xilinx Zynq. So, create new device folder 'linux-arm-xilinx-zynq-g++' and two files in it. 'qplatformdefs' contains just an include, but second file 'qmake.conf' is quite important. This is the place where we set your CFLAGS/CXXFLAGS, some ENV variables which will be used by default by QMAKE and later by Qt5 libs.

    So, if you need to set something differently, this is the time!

  11. cd ~/Projects/qt-everywhere-opensource-src-5.3.2/qtbase/mkspecs/devices/
    create linux-arm-xilinx-zynq-g++

    'qmake.conf':

    #
    # qmake configuration for linux-g++ using arm-xilinx-g++ compiler
    #
    
    MAKEFILE_GENERATOR      = UNIX
    CONFIG                 += incremental gdb_dwarf_index
    QMAKE_INCREMENTAL_STYLE = sublib
    
    include(../../common/linux.conf)
    include(../../common/gcc-base-unix.conf)
    include(../../common/g++-unix.conf)
    
    load(device_config)
    
    QT_QPA_DEFAULT_PLATFORM = linuxfb
    
    # modifications to g++.conf
    QMAKE_CC                = $${CROSS_COMPILE}gcc
    QMAKE_CXX               = $${CROSS_COMPILE}g++
    QMAKE_LINK              = $${QMAKE_CXX}
    QMAKE_LINK_SHLIB        = $${QMAKE_CXX}
    
    # modifications to linux.conf
    QMAKE_AR                = $${CROSS_COMPILE}ar cqs
    QMAKE_OBJCOPY           = $${CROSS_COMPILE}objcopy
    QMAKE_NM                = $${CROSS_COMPILE}nm -P
    QMAKE_STRIP             = $${CROSS_COMPILE}strip
    
    QMAKE_CFLAGS           += -I$$[QT_SYSROOT]/include -DZYNQ
    QMAKE_CXXFLAGS         += -Wno-psabi -I$$[QT_SYSROOT]/include -DZYNQ
    QMAKE_LFLAGS           += -L$$[QT_SYSROOT]/lib
    
    QMAKE_CFLAGS           += -march=armv7-a -mtune=cortex-a9 -mcpu=cortex-a9 -mfpu=neon -pipe -fomit-frame-pointer
    QMAKE_CXXFLAGS         += $$QMAKE_CFLAGS
    
    deviceSanityCheckCompiler()
    
    load(qt_config)
    

    'qplatformdefs.h':

    /****************************************************************************
    **
    ** Copyright (C) 2013 Digia Plc and/or its subsidiary(-ies).
    ** Contact: http://www.qt-project.org/legal
    **
    ** This file is part of the qmake spec of the Qt Toolkit.
    **
    ** $QT_BEGIN_LICENSE:LGPL$
    ** Commercial License Usage
    ** Licensees holding valid commercial Qt licenses may use this file in
    ** accordance with the commercial license agreement provided with the
    ** Software or, alternatively, in accordance with the terms contained in
    ** a written agreement between you and Digia.  For licensing terms and
    ** conditions see http://qt.digia.com/licensing.  For further information
    ** use the contact form at http://qt.digia.com/contact-us.
    **
    ** GNU Lesser General Public License Usage
    ** Alternatively, this file may be used under the terms of the GNU Lesser
    ** General Public License version 2.1 as published by the Free Software
    ** Foundation and appearing in the file LICENSE.LGPL included in the
    ** packaging of this file.  Please review the following information to
    ** ensure the GNU Lesser General Public License version 2.1 requirements
    ** will be met: http://www.gnu.org/licenses/old-licenses/lgpl-2.1.html.
    **
    ** In addition, as a special exception, Digia gives you certain additional
    ** rights.  These rights are described in the Digia Qt LGPL Exception
    ** version 1.1, included in the file LGPL_EXCEPTION.txt in this package.
    **
    ** GNU General Public License Usage
    ** Alternatively, this file may be used under the terms of the GNU
    ** General Public License version 3.0 as published by the Free Software
    ** Foundation and appearing in the file LICENSE.GPL included in the
    ** packaging of this file.  Please review the following information to
    ** ensure the GNU General Public License version 3.0 requirements will be
    ** met: http://www.gnu.org/copyleft/gpl.html.
    **
    **
    ** $QT_END_LICENSE$
    **
    ****************************************************************************/
    
    #include "../../linux-g++/qplatformdefs.h"
    
  12. Next step is to configure Qt5 and below configuration I'm using. Again, this is critical step and if you have change something (compile with OpenGl support for example), you have to do it now. Also, if you want to reconfigure Qt, you have to clean using 'gmake clean' before running configuration script again.
  13. cd ~/Projects/qt-everywhere-opensource-src-5.3.2/
    ./build_qt5_3_2.sh
    gmake
    sudo gmake install

    'build_qt5_3_2.sh':

    #!/bin/bash
    
    export CROSS_COMPILE=arm-xilinx-linux-gnueabi-
    source /opt/Xilinx/Vivado/2014.2/settings64.sh
    
    read -p "Run 'confclean'? (y/n) "
    if [ "$REPLY" == "y" ]; then
            gmake clean
    fi 
    
    ./configure -prefix /opt/Qt/5.3.2 \
    	-device linux-arm-xilinx-zynq-g++ \
    	-device-option CROSS_COMPILE=arm-xilinx-linux-gnueabi- \
    	-release \
    	-confirm-license \
    	-opensource \
    	-optimized-qmake \
    	-no-qml-debug \
    	-qt-zlib \
    	-qt-libpng \
    	-qt-libjpeg \
    	-qt-freetype \
    	-qt-harfbuzz \
    	-qt-pcre \
    	-no-xcb \
    	-qt-xkbcommon \
    	-no-opengl \
    	-no-pch \
    	-verbose \
    	-no-kms \
    	-no-eglfs \
    	-no-icu \
    	-no-iconv \
    	-skip qtwebkit \
    	-tslib \
    	-no-gcc-sysroot \
    	-nomake tools \
    	-no-compile-examples \
    	-I /opt/tslib/include \
    	-L /opt/tslib/lib
    
    read -p "Run 'gmake'? (y/n) "
    if [ "$REPLY" == "y" ]; then
    	cd ~/Projects/$QtSrcName
    	gmake
    fi
    
    read -p "Run 'gmake install'? (y/n) "
    if [ "$REPLY" == "y" ]; then
    	cd ~/Projects/$QtSrcName
    	sudo gmake install
    fi
    
  14. After a few minutes(ha-ha) build will finish and we can build a couple of Qt examples for testing purposes. I created a small script to build each example individually. All I need to do is just copy it in project folder and run it. Examples I usually use is a 'Mainwindow' and a 'Pathstroke'.
  15. 'build_qt5_app.sh'

    #!/bin/bash
    
    export CROSS_COMPILE=arm-xilinx-linux-gnueabi-
    source /opt/Xilinx/Vivado/2014.3/settings64.sh
    
    export QTDIR=/opt/Qt/5.3.2
    export PATH=$QTDIR/bin:$PATH
    export LD_LIBRARY_PATH=/$QTDIR/lib:$LD_LIBRARY_PATH
    
    qmake
    
    make
    
    sudo make install
    
  16. Now, to install Qt5 libs and apps we will create Petalinux 'component'.
  17. cd ~/Projects/$PetalinuxProjectName
    petalinux-create -t libs -n qt-5.3.2 --enable
    cd components/libs/qt-5.3.2/
    rm libqt*
    cp -Pr /opt/Qt/5.3.2/lib .
    cp -Pr /opt/Qt/5.3.2/plugins/ ./lib/
    mkdir bin
    cp /opt/Qt/5.3.2/examples/widgets/painting/pathstroke/pathstroke bin/pathstroke
    cp /opt/Qt/5.3.2/examples/widgets/mainwindows/mainwindow/mainwindow bin/mainwindow

  18. Now, we have to make a few changes in our new 'component' in a Petalinux project( ~/Projects/$PetalinuxProjectName/components/libs/qt-5.3.2/): create 'Makefile' and some file with settings for Qt applications. Tet's call it 'profile.qt-5.3.2'.
  19. 'profile.qt-5.3.2':

    export QT_PLUGIN_PATH=/usr/lib/plugins
    export QT_QPA_FONTDIR=/usr/lib/fonts
    export QT_QPA_PLATFORM_PLUGIN_PATH=/usr/lib/plugins/platforms
    export QT_QPA_PLATFORM=linuxfb
    export QT_QPA_GENERIC_PLUGINS=tslib:/dev/input/event0
    

    Makefile(Don't forget to change username):

    ifndef PETALINUX
    $(error "Error: PETALINUX environment variable not set.  Change to the root of your PetaLinux install, and source the settings.sh file")
    endif
    
    include libs.common.mk
    
    LIB=libqt_5_3_2
    
    all: build install
    
    .PHONY: build
    build:
    
    install:
    	#Install libraries and fonts to the rootfs.
    
    	mkdir -p $(TARGETDIR)/usr/lib
    	USER=d9
    	GROUP=d9
    	rsync -rav ./bin/* $(TARGETDIR)/usr/bin/
    	rsync -rav ./lib/* $(TARGETDIR)/usr/lib/
    
    	#Install the script to ensure the font directory is properly specified.
    	mkdir -p $(TARGETDIR)/etc/profile.d
    	cp profile.qt-5.3.2 $(TARGETDIR)/etc/profile.d/profile.qt-5.3.2
    
    clean:
    
  20. We also need to add 'tslib' to our buildroot. So, I will create another Petalinux 'component', create and copy tslib configuration files:
  21. cd ~/Projects/$PetalinuxProjectName
    petalinux-create -t libs -n tslib --enable
    cd components/libs/tslib/
    rm libtslib*
    rm README
    cp -Pr /opt/tslib/bin .
    cp -Pr /opt/tslib/lib .
    cp -Pr /opt/etc/ts.conf .
    cp -Pr Makefile .
    cp -Pr profile.tslib .
    cp -Pr pointercal .

    My 'profile.tslib'. You may need to change it:

    export TSLIB_TSEVENTTYPE='INPUT'
    export TSLIB_CALIBFILE='/etc/pointercal'
    export TSLIB_CONFFILE='/etc/ts.conf'
    export TSLIB_CONSOLEDEVICE='none'
    export TSLIB_FBDEVICE='/dev/fb0'
    export TSLIB_PLUGINDIR='/usr/lib/ts'
    export TSLIB_TSDEVICE='/dev/input/event0'
    

    'pointercal' for my 800x600 touchscreen:

    94 -13605 53617952 -10567 205 40161292 65536 800 600
    

    'Makefile' (Don't forget to change username):

    ifndef PETALINUX
    $(error "Error: PETALINUX environment variable not set.  Change to the root of your PetaLinux install, and source the settings.sh file")
    endif
    
    include libs.common.mk
    
    LIB=tslib
    
    all: build install
    
    .PHONY: build
    build:
    
    install:
    	#Install libraries and fonts to the rootfs.
    
    	mkdir -p $(TARGETDIR)/usr/lib
    	USER=d9
    	GROUP=d9
    	rsync -rav ./bin/* $(TARGETDIR)/usr/bin/
    	rsync -rav ./lib/* $(TARGETDIR)/usr/lib/
    
    	cp ts.conf $(TARGETDIR)/etc/ts.conf
    	cp profile.tslib $(TARGETDIR)/etc/profile.d/tslib
    	cp pointercal $(TARGETDIR)/etc/pointercal
    
    clean:
    
  22. Qt is a C++ library and like any other C++ application or library it depend on standard c++ library. So, if you didn't include it in your rootfs yet you have to do it now.

    petalinux-config -c rootfs

    Then go to 'Filesystem Packages' -> 'Base' -> 'External-xilinx-toolchain' -> Enable 'libstdc++6'.

  23. This is basically it. Now we have rebuild our Petalinux project and start using it. Just a few notes:
    - After we add Qt5 libraries, our Linux image file will grow is size, so you may need to change U-boot settings to accomodate it.
    - If you need to recalibrate touchscreen - use 'ts_calibrate' utility.
    - If you want to keep it - you must save changes in '/etc/pointercal' file.
    - If you got not only touchscreen, but also mouse and/or keyboard you have to start your application with additional parameters: '-plugin EvdevMouse' '-plugin EvdevKeyboard'.

HDMI on ZedBoard with Petalinux update.

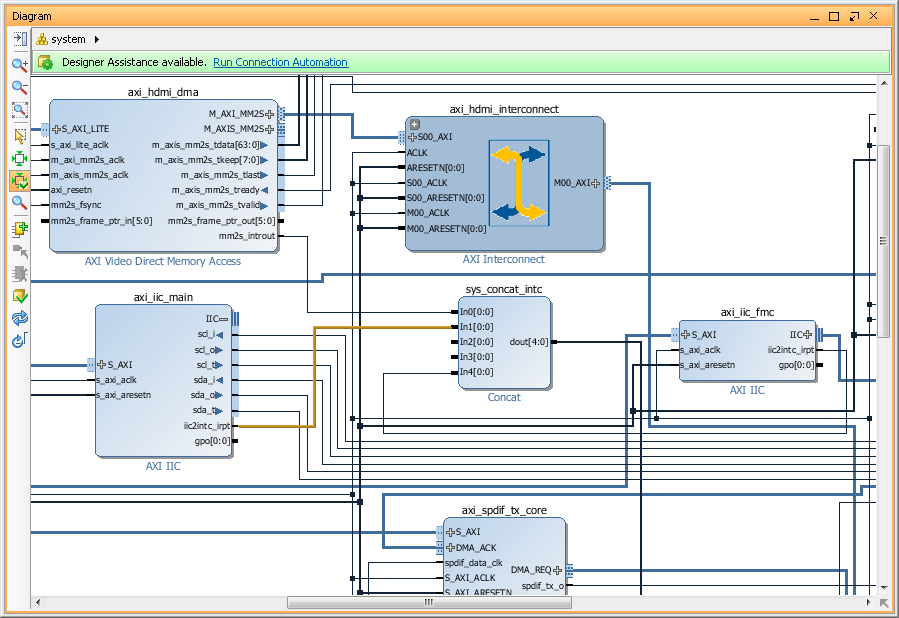
I finally figure it out why Analog Devices reference design create/generated in Vivado 2014 by script(obviously updated to use new IP's, otherwise it didn't assemble 'Block Design' at all) didn't work. Reason is changes in Xilinx Concat IP, which used in reference design to concatenate interrupt signals from VDMA and I2C IP blocks to Zynq's F2S interrupt bus.
So, now in 2014.1, we got version 2.0 of it and it preserve the order of input signals on the output. Which means we must either change inputs order or change interrupt numbers in DTS.

So, for AD reference design generated in Vivado2014.1 interrupts are:

  • AXI_IIC_MAIN - #56.
  • AXI_VDMA_0 - #55.
  • AXI_IIC_FMC - #59.

zynq16_001

HDMI on ZedBoard with Petalinux.

This is step-by-step tutorial on how to build reference design for Analog Devices ADV7511 HDMI encoder used on ZedBoard with PetaLinux 2013.10. It will be mostly based on AD HDL reference design http://wiki.analog.com/resources/fpga/xilinx/kc705/adv7511 and AD Linux drivers wiki page http://wiki.analog.com/resources/tools-software/linux-drivers/platforms/zynq and Xilinx PetaLinux documentation http://www.wiki.xilinx.com/PetaLinux.

As of today, 25 May 2014, to create HDL design for ADV7511 from scratch, we have to use Vivado 2013.4, even though Vivado 2014.1 is already available. The reason is some changes in a Xilinx IP's (which I didn't had a chance to figure out yet) prevent HDL design from build/work properly.

  1. First step is to download HDL libraries and projects from AnalogDevices repositories on a github: https://github.com/analogdevicesinc/hdl. You can clone it or download a ZIP. I will download a ZIP and extract 'hdl-master' in my Projects/FPGA/ folder on Windows7 machine.
  2. Second step is to build a few Analog Devices IP required to create ZedBoard HDMI design. Run Xilinx Vivado 2013.4, open a TCL console, change directories and 'source' a .tcl scripts. For example, to build AXI_CLKGEN IP:

    cd c:/Projects/FPGA/hdl-master/library/axi_clkgen
    source ./axi_clkgen_ip.tcl

    After script finish, close created project and build the next. For ZedBoard we have build the next IP's:

    • hdl-master/library/axi_clkgen
    • hdl-master/library/axi_hdmi_tx
    • hdl-master/library/axi_i2s_adi
    • hdl-master/library/axi_spdif_tx
    • hdl-master/library/util_i2c_mixer
  3. After we done with all required IP's, we can build ADV7511 reference design for ZedBoard. In a Tcl Console change directory to ADV7511 and run 'system_project' script.

    cd c:/Projects/FPGA/hdl-master/projects/adv7511/zed/
    source ./system_project.tcl

    Script will create block design, run synthesis and implementation, generate bitstream and even export software to SDK(without opening it). This was the case on my system - everything went smoothly. We are done with Vivado and can close it.

    We have to create HDL in Vivado 2013.4, but later we can import created project into Vivado 2014.1 and update it to use latest Xilinx IP's.

  4. Let's build a FSBL. We need very typical Zynq first stage boot loader and I covered creation of it before, so now just a short description:
    • Run XSDK.
    • Create new 'Hardware Platform Specification' project (I named it 'ZedBoard-HDMI-HW') and specify HW created in a previous step.
    • Create Application project (named 'ZedBoard-HDMI-FSBL') using our new 'Hardware Platform' and select to create new BSP for it. Don't forget to use 'Zynq FSBL' template. Build it if this not done automatically.
  5. Next step is to create PetaLinux BSP. This is also very typical PetaLinux BSP, just don't forget to change 'Configuration' to reflect ZedBoard configuration and name it 'ZedBoard-HDMI-petalinux_bsp'.

    zynq15_002

    We are done with Xilinx SDK. You can close it.

  6. Next step is to create PetaLinux project and set 'hardware description'. I will call it 'ZedBoard-HDMI' Petalinux project:

    petalinux-create -t project -n ZedBoard-HDMI
    cd ~/Projects/ZedBoard-HDMI-petalinux_bsp/
    petalinux-config --get-hw-description -p ../ZedBoard-HDMI/
    cd ~/Projects/ZedBoard-HDMI/
    rm -r hw-description

  7. Now, as of today, ADV7511 Linux driver not in a mainstream kernel. So, we need to get Kernel from Analog Devices repository with appropriate patches. Current version is 3.14.0. Let's clone it, and checkout 'xcomm_zynq' branch.

    cd ~/Projects/
    git clone https://github.com/analogdevicesinc/linux.git analogdevices-kernel
    cd analogdevices-kernel/
    git checkout xcomm_zynq

  8. Create necessary directories and copy 'xcomm_zynq' branch to our PetaLinux project directory.

    cd ~/Projects/
    mkdir ~/Projects/ZedBoard-HDMI/components
    mkdir ~/Projects/ZedBoard-HDMI/components/linux-kernel
    cp -a analogdevices-kernel ~/Projects/ZedBoard-HDMI/components/linux-kernel/

  9. Run 'petalinux-config' and change kernel to 'analogdevices-kernel' and system boot device to 'SD card'.
  10. cd ZedBoard-HDMI
    petalinux-config

  11. Next we need to configure Linux kernel for PetaLinux and we need to enable all options required by ADV7511. AnalogDevices kernel support special configuration option 'zynq_xcomm_adv7511_defconfig', but we cannot run it with PetaLinux. So, we have to pre-configure kernel separately ('make ARCH=arm zynq_xcomm_adv7511_defconfig') and just copy resulted config into 'ZedBoard-HDMI/subsystems/linux/configs/kernel'. So, I did it and also copied it into PetaLinux Kernel configs directory '/opt/petalinux-v2013.10-final/etc/template/project/template-zynq/subsystems/linux/configs/kernel'. So, I can later reuse it. Also notice that kernel default config file have dot in the front and PetaLinux files don't.
    Anyway, here is link to my resulted kernel config file: https://blog.idv-tech.com/wp-content/uploads/2014/05/config_hdmi_3_14.config
  12. We also, have to modify 'devices tree' generated by PetaLinux for our project. AnalogDecices Linux kernel have template for ZedBoard which you can find in 'arch/arm/boot/dts/zynq-zed-adv7511.dts', so we basically have to copy missing devices from AD into our tree.
    Link to my resulted DTS file for ZedBoard: https://blog.idv-tech.com/wp-content/uploads/2014/05/adv7511_dts.config.
  13. We are basically done. At this point you my want to modify PetaLinux project, for example, include Qt5 library and test app to check frame buffer device later. I covered this topics in my previous post, so I wont repeat it here.

    Build Petalinux project, create BOOT.BIN and copy it together with Linux image file 'image.ub' on SD card:

    petalinux-build
    petalinux-package --boot --fsbl ../ZedBoard-HDMI-FSBL/Release/ZedBoard-HDMI-FSBL.elf --fpga ../ZedBoard-HDMI-HW/system_top.bit --uboot --force -o images/linux/BOOT.BIN

  14. Insert SD card into slot of ZedBoard and turn it on. During boot kernel should detect ADV7511(hdmi) and ADAU1761(sound) devices and create '/dev/fb0' device.So, below partial bootlog from my ZedBoard:
  15. ...
    [drm] Initialized drm 1.1.0 20060810
    /analogdevices-kernel/drivers/gpu/drm/adi_axi_hdmi/axi_hdmi_drv.c:axi_hdmi_platform_probe[176]
    platform 70e00000.axi_hdmi: Driver axi-hdmi requests probe deferral
    ...
    adv7511-hdmi-snd adv7511_hdmi_snd.2: adv7511 <-> 75c00000.axi-spdif-tx mapping ok
    ...
    zed-adau1761-snd zed_sound.3: adau-hifi <-> 77600000.axi-i2s mapping ok
    ...
    Console: switching to colour frame buffer device 180x56
    axi-hdmi 70e00000.axi_hdmi: fb0:  frame buffer device
    axi-hdmi 70e00000.axi_hdmi: registered panic notifier
    [drm] Initialized axi_hdmi_drm 1.0.0 20120930 on minor 0
    /analogdevices-kernel/drivers/rtc/hctosys.c: unable to open rtc device (rtc0)
    ALSA device list:
      #0: HDMI monitor
      #1: ZED ADAU1761
    Freeing unused kernel memory: 23356K (c062b000 - c1cfa000)
    INIT: version 2.88 booting
    Starting Bootlog daemon: bootlogd.
    ...
    
     _____       _           _      _
    | ___ \     | |         | |    (_)
    | |_/ / ___ | |_   __ _ | |     _  _ __   _   _ __  __
    |  __/ / _ \| __| / _` || |    | || '_ \ | | | |\ \/ /
    | |   |  __/| |_ | (_| || |____| || | | || |_| | >  <
    \_|    \___| \__| \__,_|\_____/|_||_| |_| \__,_|/_/\_\
    
    PetaLinux v2013.10 (Yocto 1.4) ZedBoard ttyPS0
    
    ZedBoard login: root
    Password:
    login[923]: root login  on `ttyPS0'
    
    root@ZedBoard:~# ls /dev/fb0
    /dev/fb0
    root@ZedBoard:~# uname -a
    Linux ZedBoard 3.14.0-g681a2d8-dirty #2 SMP PREEMPT Sun May 25 22:46:28 EDT 2014 armv7l GNU/Linux
    root@ZedBoard:~#
    
  16. This is basically it - once you have a framebuffer device you can start using it. So I ran my Qt5 test app and it worked. We obviously don't have any hardware acceleration with this HDL design, but we got basic FB device and HDMI output. Congratulations!

The easiest way to add screen to ZedBoard.

While waiting for my custom TFT panel board to be build and Zynq IP created, I'm decided to go ahead and build Qt libraries and start porting application. In order to test my application I need linux video framebuffer of any sort and easiest way to add screen to ZedBoard is to use DisplayLink Video USB-to-DVI adaptor. I got first generation of DisplayLink adaptor from Kengsington model K33907.

I did use Xilinx PetaLinux 13.10 under Ubuntu 13.10 and kernel v3.12.0 from Xilinx git repo: and I did reuse PetaLinux project I created using ZedBoard CTT hardware design from ZedBoard_CTT_v2013_2_130807 tutorial. But it works just as good with PetaLinux 13.10 default linux kernel 3.8.11.

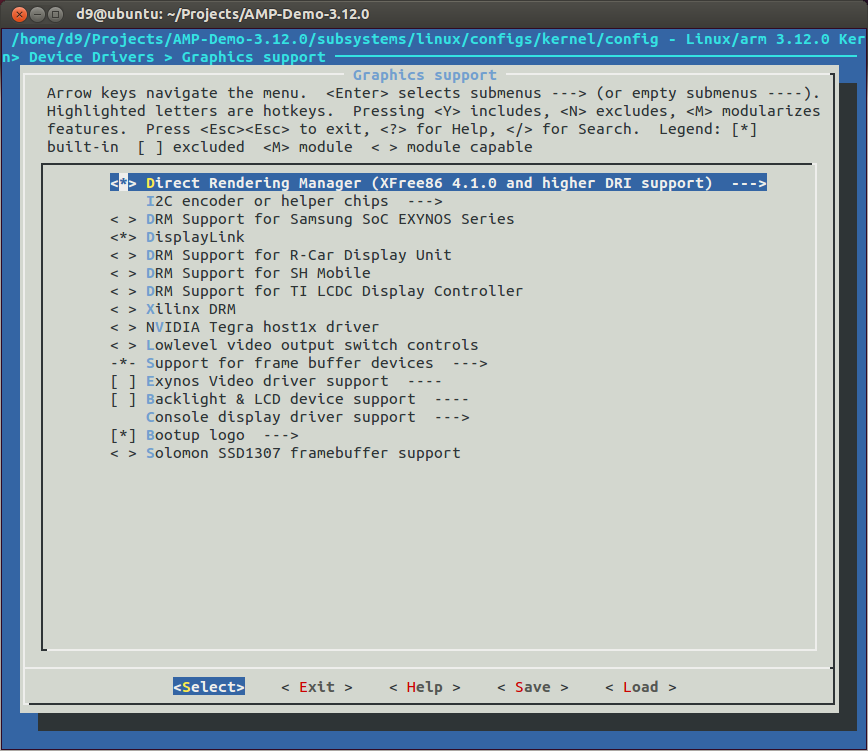
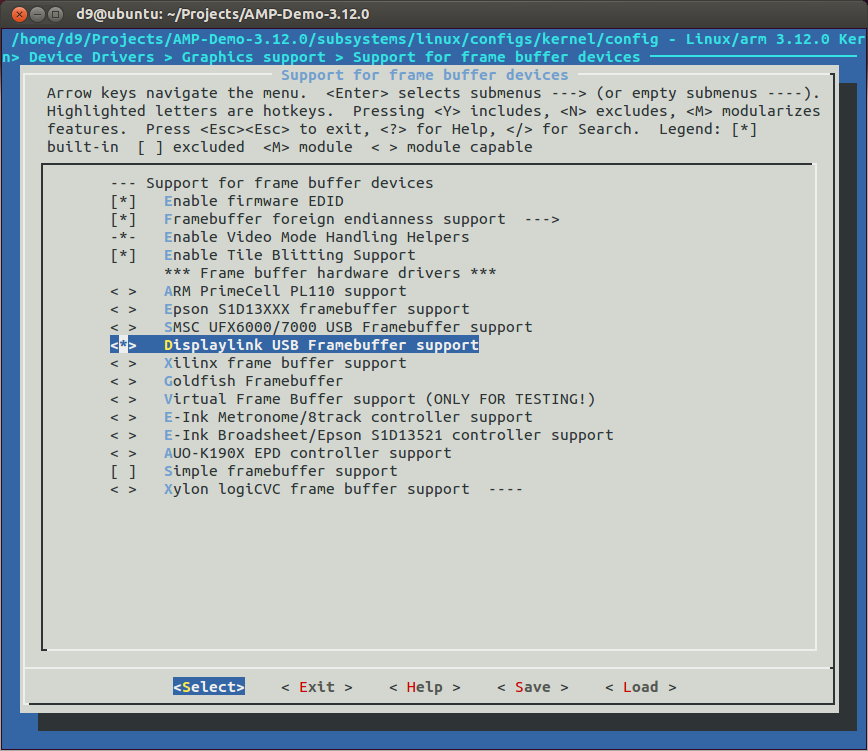
  1. First, we need to reconfigure linux kernel to include a driver and enable some framebuffer related options. So, run kernel config utility, go to 'Device Drivers' -> 'Graphics support' and make appropriate changes:

    cd ~/Projects/my_zedboard_petalinux_project/
    petalinux-config -c kernel

    zynq6_001

    zynq6_002

  2. Clean PetaLinux project from previous build and rebuild it:

    petalinux-build -x mrproper
    petalinux-build

  3. Connect DisplayLink USB adaptor to USB OTG port of ZedBoard.
  4. Check JP2 and JP3 jumpers on the ZedBoard - both must be shorted to set USB in a Host mode.
  5. Now transfer new image.ub to SD card if you using SD card. Or if you using 'tftp' to load kernel - just reset ZedBoard.
  6. During boot process you should see something similar to the code below and if you do this means DisplayLink driver works, it found video adapter connected to USB, got EDID with modes from monitor and set appropriate mode. In my case it 1440x900 59Hz:

    usb 1-1: new high-speed USB device number 2 using xusbps-ehci
    usb 1-1: New USB device found, idVendor=17e9, idProduct=0033
    usb 1-1: New USB device strings: Mfr=1, Product=2, SerialNumber=3
    usb 1-1: Product: K33907
    usb 1-1: Manufacturer: DisplayLink
    usb 1-1: SerialNumber: 0033-105190
    udlfb: DisplayLink K33907 - serial #0033-105190
    udlfb: vid_17e9&pid_0033&rev_0002 driver's dlfb_data struct at ceb5b000
    udlfb: console enable=1
    udlfb: fb_defio enable=1
    udlfb: shadow enable=1
    udlfb: vendor descriptor not available (-32)
    udlfb: allocated 4 65024 byte urbs
    udlfb: 1440x900 @ 59 Hz valid mode
    udlfb: 720x400 @ 70 Hz valid mode
    udlfb: 640x480 @ 60 Hz valid mode
    udlfb: 640x480 @ 67 Hz valid mode
    udlfb: 640x480 @ 72 Hz valid mode
    udlfb: 640x480 @ 75 Hz valid mode
    udlfb: 800x600 @ 56 Hz valid mode
    udlfb: 800x600 @ 60 Hz valid mode
    udlfb: 800x600 @ 72 Hz valid mode
    udlfb: 800x600 @ 75 Hz valid mode
    udlfb: 832x624 @ 75 Hz valid mode
    udlfb: 1024x768 @ 60 Hz valid mode
    udlfb: 1024x768 @ 70 Hz valid mode
    udlfb: 1024x768 @ 75 Hz valid mode
    udlfb: 1280x1024 @ 75 Hz valid mode
    udlfb: 1152x864 @ 75 Hz valid mode
    udlfb: 1440x900 @ 60 Hz valid mode
    udlfb: 1440x900 @ 75 Hz valid mode
    udlfb: 1280x1024 @ 60 Hz valid mode
    udlfb: 1280x960 @ 60 Hz valid mode
    udlfb: 1152x864 @ 75 Hz valid mode
    udlfb: Reallocating framebuffer. Addresses will change!
    udlfb: 1440x900 @ 59 Hz valid mode
    udlfb: set_par mode 1440x900
    udlfb: open /dev/fb0 user=0 fb_info=c0889400 count=1
    udlfb: set_par mode 1440x900
    Console: switching to colour frame buffer device 180x56
    udlfb: set_par mode 1440x900
    udlfb: DisplayLink USB device /dev/fb0 attached. 1440x900 resolution. Using 5064K framebuffer memory

  7. One of the monitors I tried - didn't send EDID data to the adapter, so I endup creating /etc/fb.modes file with all the modes supported by my monitor.
  8. Now, just verify we got linux framebuffer device in your "/dev/" - it should be "/dev/fb0" and send some random data to it to see if it really works.
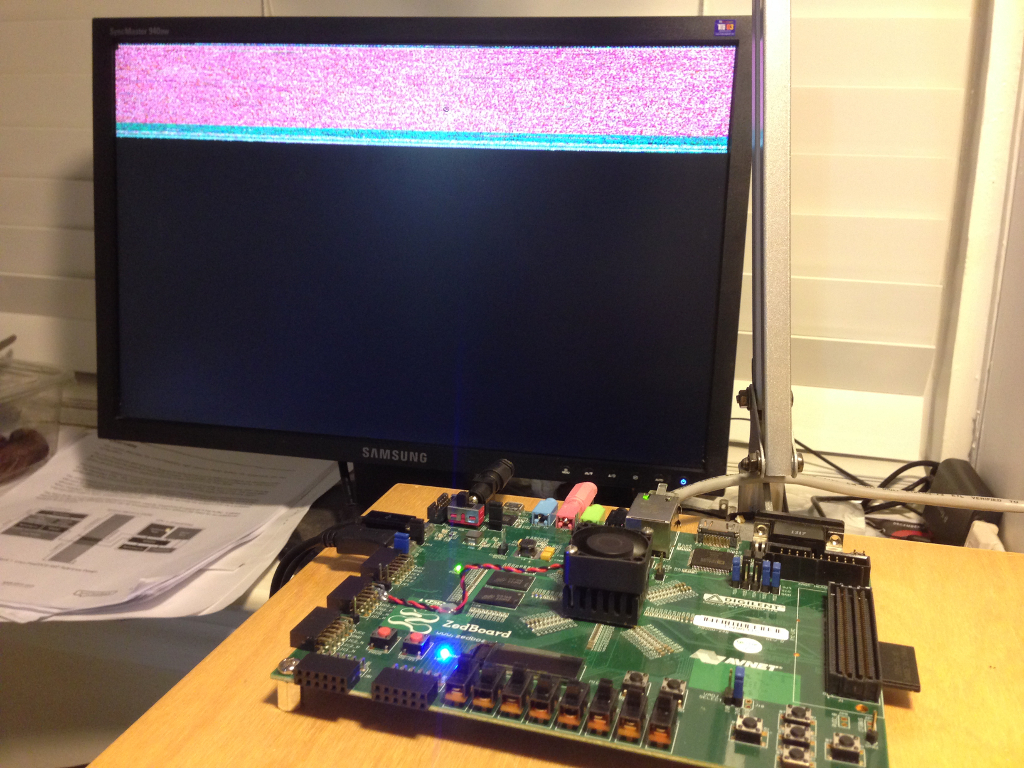
  9. cat /bin/busybox > /dev/fb0
    udlfb: open /dev/fb0 user=1 fb_info=cebc5400 count=2
    udlfb: released /dev/fb0 user=1 count=1

  10. If you see random data on screen, similar to the screenshot below - congratulations! Your adapter now works with ZedBoard!
  11. zynq6_005