ZedBoard Linux-FreeRTOS AMP Board Bringup Guide.

One of the many nice features of Xilinx Zynq is ability to run it in Asymmetric MultiProcessing or AMP configuration. Xilinx released version v2013.10 of a UG980(Petalinux Board Bringup) and UG978(Zynq Linux-FreeRTOS AMP) guides for Xilinx ZC702 board. Today I will follow those guides to build Linux-FreeRTOS solution for ZedBoard.
I already have Vivado and Xilinx SDK packages installed along with required, but initially missing packages on my Ubuntu 13.10 64 bit Virtual Machine.

  1. First of all we will need so called Zynq 'Hardware Platform' which will satisfy both Linux and FreeRTOS minimum requirements.
    Linux requires one UART and at least one storage peripheral, for example SD Card. And FreeRTOS also requires one UART and also a Timer.
    So, I will modify ZedBoard CTT hardware design I created using ZedBoard_CTT_v2013_2_130807 tutorial. That 'Hardware Platform', in addition to base system, consist of 8 switches, 8 led's and 5 push buttons and I will activate 1 more UART and 1 more timer for FreeRTOS.

    Open Vivado ZedBoard CTT project or create it from scratch using ZedBoard CTT tutorial. I called my project 'ZedBoard-AMP' and made next 2 modifications to CTT design:

    • Zynq7 Processing System: MIO Configuration: I/O Peripherals: Enable UART0 and set its IO as 'EMIO'.
    • Zynq7 Processing System: MIO Configuration: Application Processor Unit: Enable Timer1 and set its IO as 'EMIO'.

    As a result I got the system with the such 'Block Diagram': zynq5_001

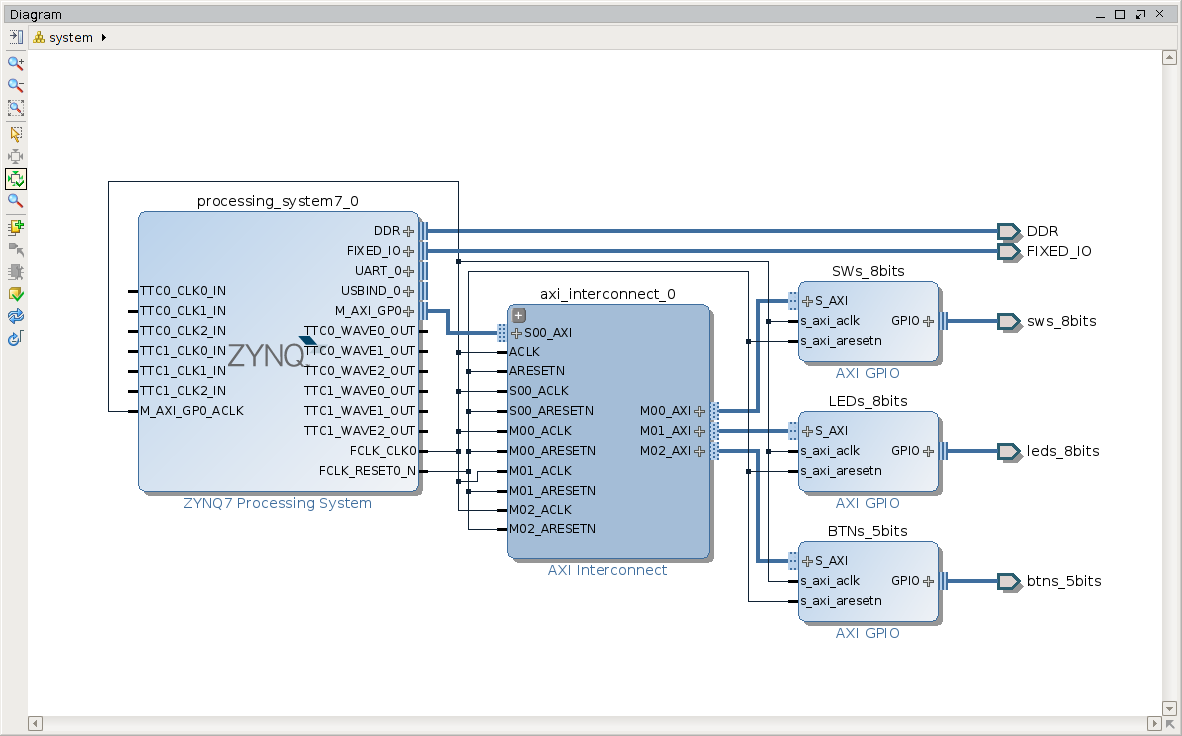
  2. Run Synthesis, Implementation, generate new BitStream and Export new 'Hardware' to SDK. I prefer not to lauch SDK right away for a good reason - you have to source Xilinx SDK settings and/or PetaLinux settings before running XSDK. After export finished we can close Vivado.
  3. Lets set required settings and run Xilinx SDK (XSDK). Set 'Eclipse' workspace to our ~/Projects/ directory.
  4. mkdir Projects
    cd Projects
    source /opt/Xilinx/Vivado/2013.4/settings64.sh
    xsdk

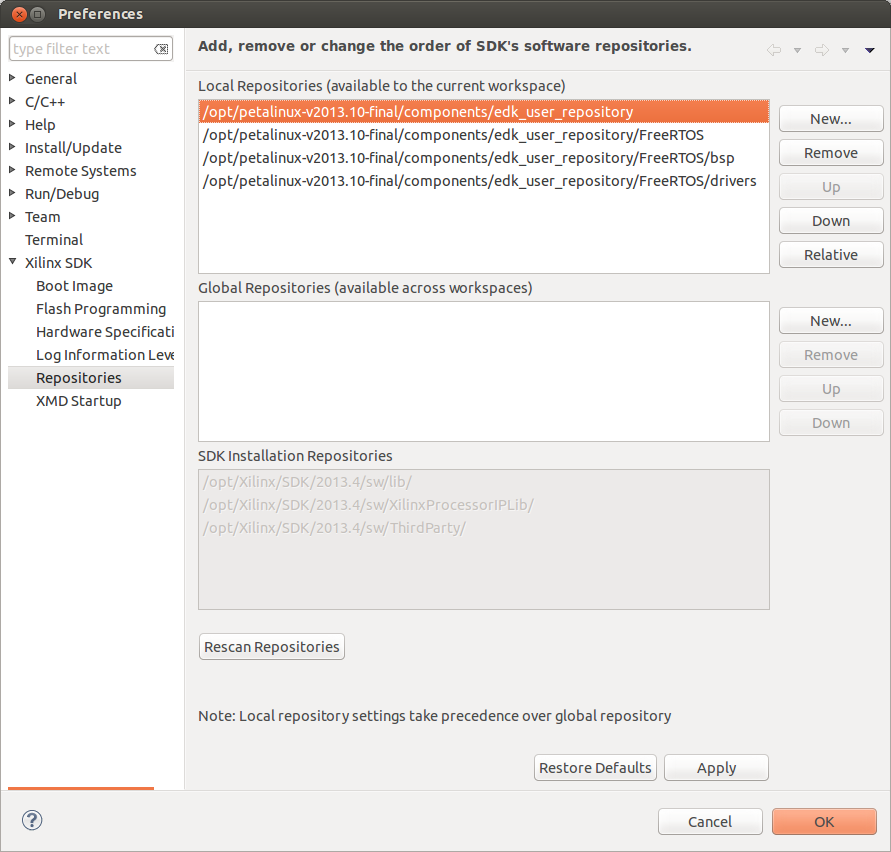
  5. We need to add PetaLinux and FreeRTOS repositories to XSDK. In XSDK -> Xilinx Tools -> 'Xilinx SDK' -> 'Repositories' -> add 'Local Repositories' from your PetaLinux 13.10 components folder. In my case PetaLinux installed into '/opt/petalinux-v2013.10-final/'. So added repo's are:
    • /opt/petalinux-v2013.10-final/components/edk_user_repository
    • /opt/petalinux-v2013.10-final/components/edk_user_repository/FreeRTOS
    • /opt/petalinux-v2013.10-final/components/edk_user_repository/FreeRTOS/bsp
    • /opt/petalinux-v2013.10-final/components/edk_user_repository/FreeRTOS/drivers

    zynq5_002

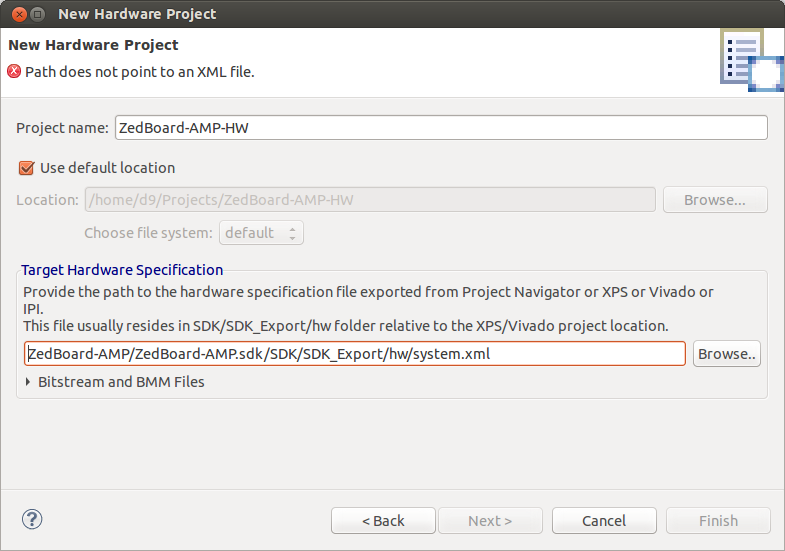
  6. Create 'Hardware Platform Specification' project using 'Hardware Platfrom' exported from our ZedBoard-AMP Vivado project. I named it 'ZedBoard-AMP-HW'.
  7. zynq5_003

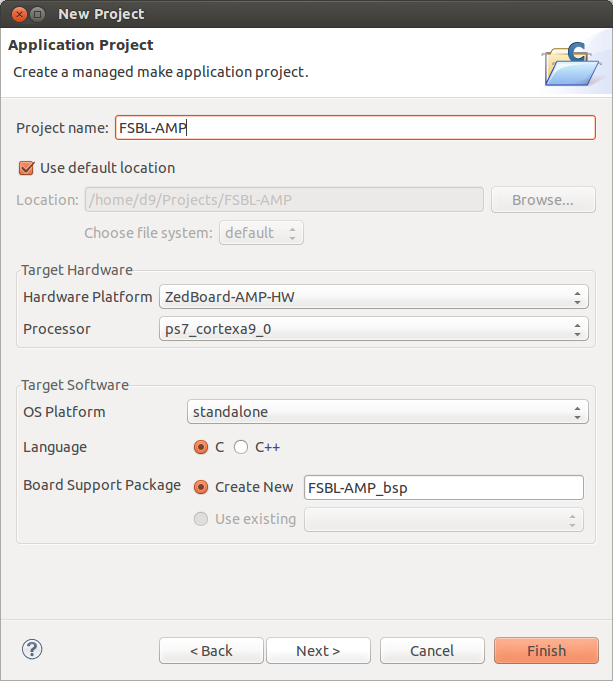
  8. Create FSBL for AMP configuration using File -> New Project -> Application Project. I named it FSBL-AMP and selected 'ZedBoard-AMP-HW' as Hardware Platform, 'ps7_cortex9_0' as a Processor, 'standalone 'OS Platfrom ', after clicking 'Next' select 'Zynq FSBL' template and finish project creation. Compile both 'FSBL-AMP_bsp' and 'FSBL-AMP' projects if it didnt autobuilt.
    zynq5_004
  9. Now we will need to build a few PetaLinux projects, but before we can do this, we have to quit XSDK and source some PetaLinux settings. So, close XSDK, apply settings in next order and launch XSDK again:
  10. export CROSS_COMPILE=arm-xilinx-linux-gnueabi-
    source /opt/Xilinx/Vivado/2013.4/settings64.sh
    source /opt/petalinux-v2013.10-final/settings.sh
    xsdk

  11. Create PetaLinux BSP project. In SDK select File -> New -> Project -> 'Board Support Package'. Name it 'petalinux_bsp_amp'. Select 'ZedBoard-AMP-HW' as Hardware Platform, CPU 'ps7_cortexa9_0'. Board Support Package OS 'petalinux'. Then Finish.
    zynq5_005

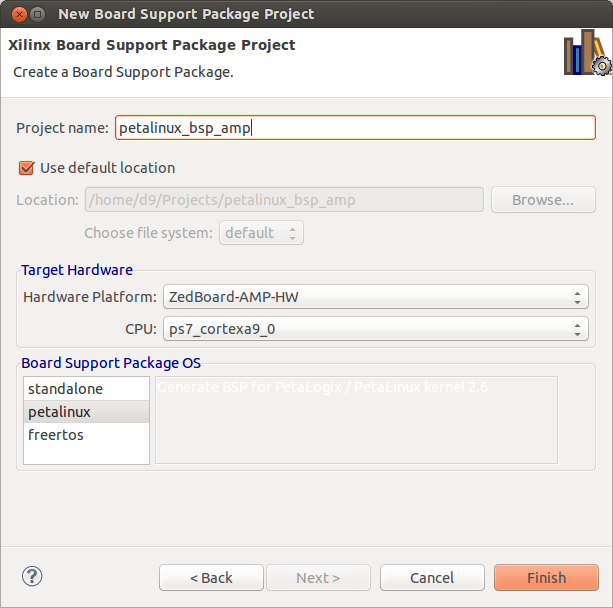
    XSDK should automatically open 'Board Support Package Settings' page. Go to 'Overview' -> 'petalinux' menu of that page and set:

    • 'ps7_uart_1' for stdout and stdin.
    • 'ps7_ddr_0' for main memory.
    • 'ps7_qspi' for flash memory.
    • 'ps7_sd_0' for sdio.
    • 'ps7_ethernet' for ethernet.
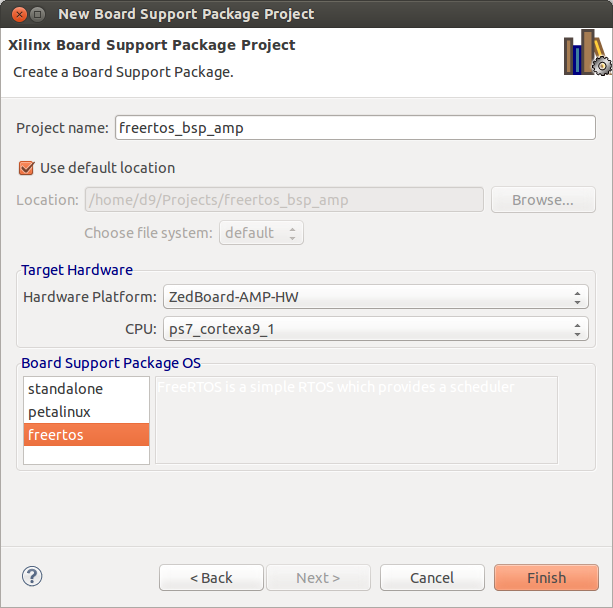
    zynq5_006
    Build this project.

  12. Create FreeRTOS BSP project. In SDK select File -> New -> Project -> 'Board Support Package'. Name it 'freertos_bsp_amp'. Select 'ZedBoard-AMP-HW' as Hardware Platform, CPU 'ps7_cortexa9_1'. Board Support Package OS 'freertos'. Then Finish.
    zynq5_008

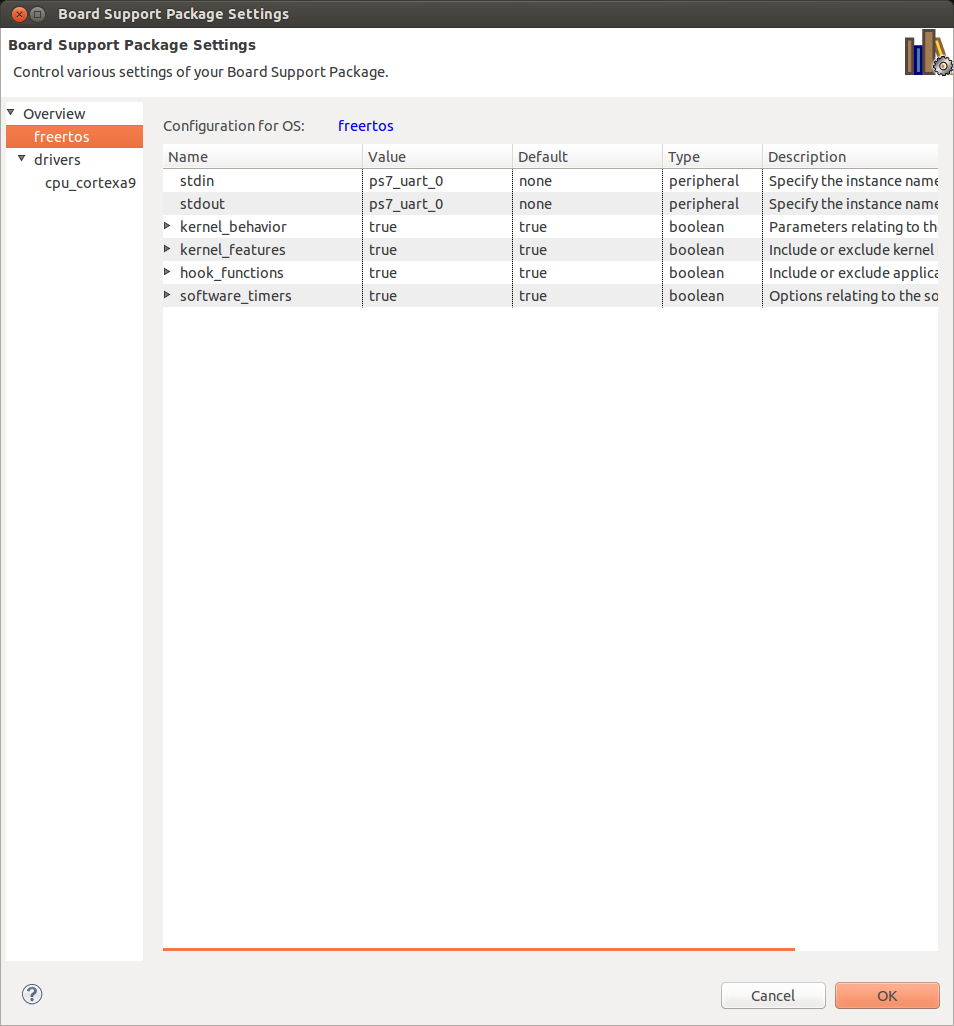
    XSDK will automatically open 'Board Support Package Settings' page now for FreeRTOS project. Then:

    • 'Overview' -> 'freertos' -> Set 'ps7_uart_0' for both stdin and stdout.
    • 'drivers' -> 'cpu_cortexa9' -> Set 'extra_compiler_flags' to '-g -DUSE_AMP=1'.

    zynq5_009

    zynq5_007
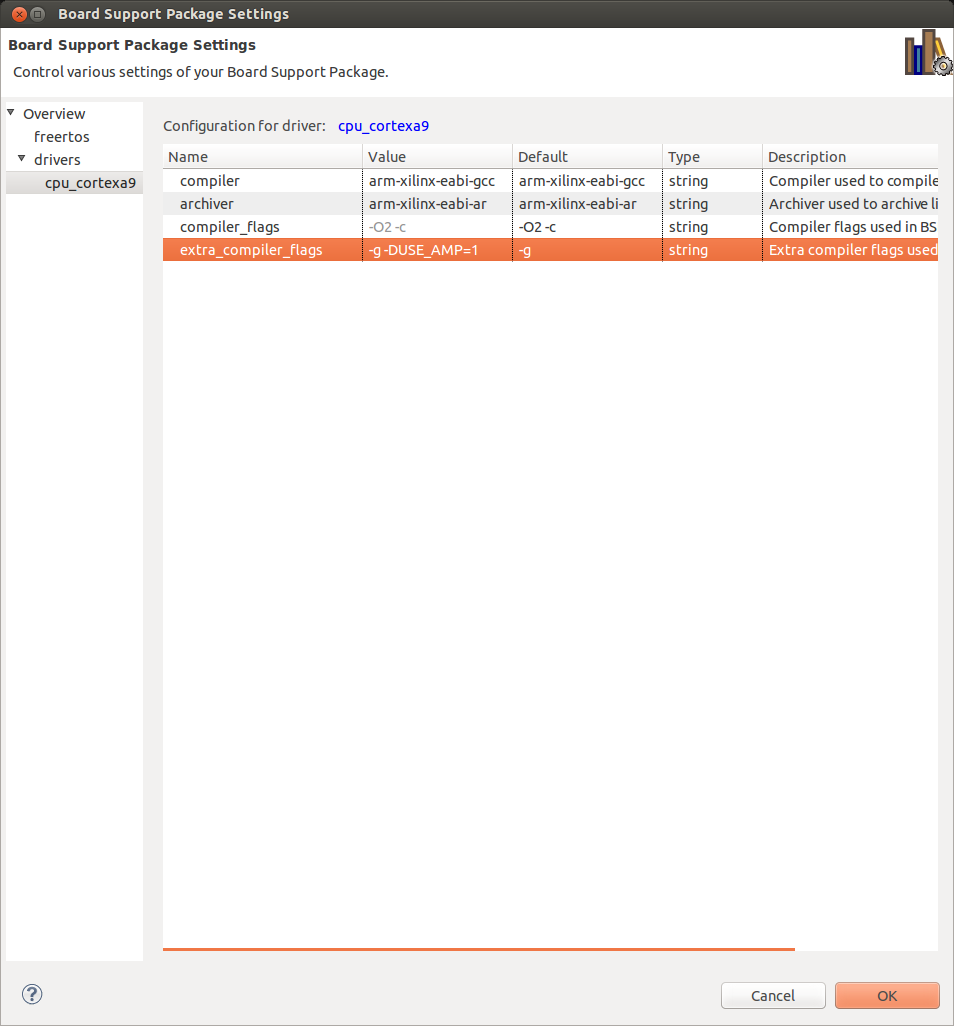
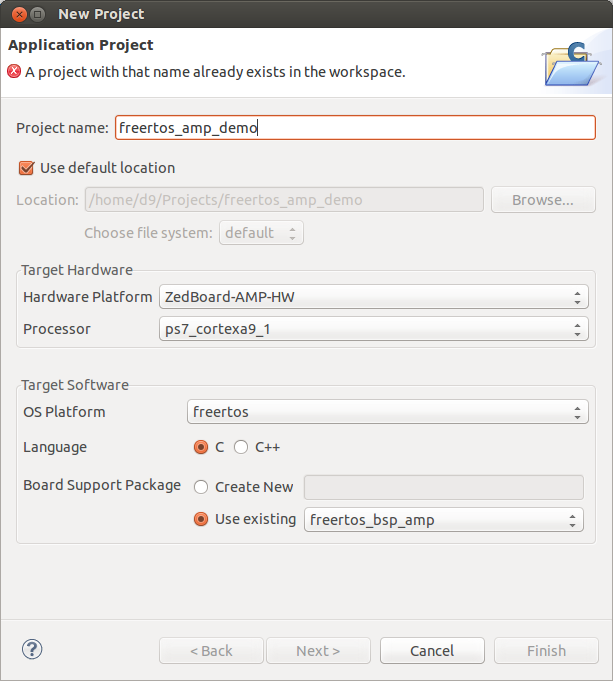
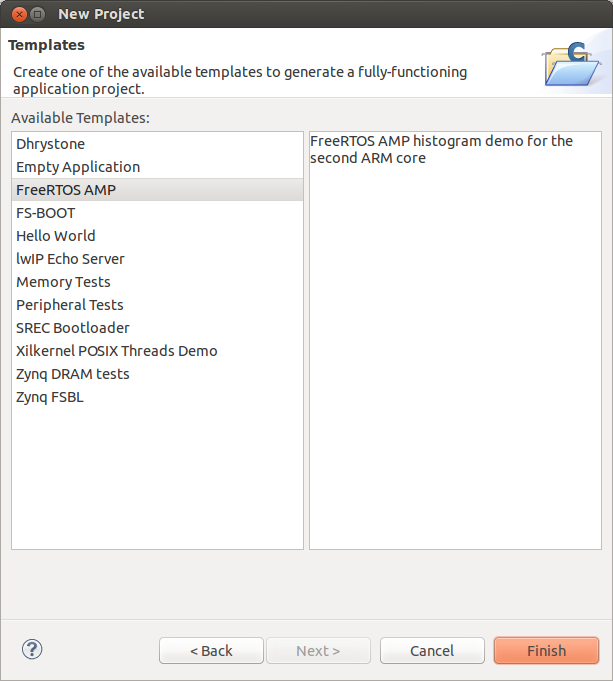
    This flag will enable AMP specific features in the FreeRTOS firmware. Hit Ok. And build this project too if it not built automatically.

  13. Create FreeRTOS test applications project. In SDK select File -> New -> Project -> 'Application Project'. Name it 'freertos_amp_demo'. Select 'ZedBoard-AMP-HW' as Hardware Platform, Processor 'ps7_cortexa9_1', OS Platfrom 'freertos', for Board Support Package select 'Use existing' -> then our 'freertos_bsp_amp' project. Click 'Next' and select 'FreeRTOS AMP' template. Click 'Finish'. And build it.

    zynq5_12

    zynq5_14

  14. We are done with XSDK for now. Close it.
  15. Now we have to create PetaLinux 'project'. And I will name it 'AMP-Demo'.

    cd ~/Projects
    export CROSS_COMPILE=arm-xilinx-linux-gnueabi-
    source /opt/Xilinx/Vivado/2013.4/settings64.sh
    source /opt/petalinux-v2013.10-final/settings.sh
    petalinux-create -t project -n AMP-Demo

    INFO: Create project: AMP-Demo
    INFO: New project successfully created in /home/d9/Projects/AMP-Demo

  16. Next step is to adjust our PetaLinux configuration to match our unique 'Hardware Platform' we created using Vivado - 'ZedBoard-AMP'. But we have to do it using BSP we created for our 'Hardware Platform' - 'petalinux_bsp_amp'. So, in a ~/Projects directory:

    cd petalinux_bsp_amp/
    petalinux-config --get-hw-description -p ../AMP-Demo/

    INFO: Checking component...
    INFO: Getting hardware description...
    INFO: Using MSS file /home/d9/Projects/petalinux_bsp_amp/system.mss and XML file /home/d9/Projects/petalinux_bsp_amp/../ZedBoard-AMP-HW/system.xml
    INFO: Copy autoconfig for PetaLinux project: /home/d9/Projects/AMP-Demo
    INFO: Merging platform settings into kernel configuration
    Auto-config file successfully updated for PetaLinux project: /home/d9/Projects/AMP-Demo
    [INFO ] generate /home/d9/Projects/AMP-Demo/subsystems/linux/hw-description/system.dts

  17. Verify, that we got the right configuration. In particular, amount of DDR memory - it should be 512M or 0x20000000. Below 'subsystems/linux/hw-description/xparameters.h' file generated in my case:
    /*
     * (C) Copyright 2007-2008 Michal Simek
     *
     * Michal SIMEK <monstr@monstr.eu>
     *
     * CAUTION: This file is automatically generated by libgen.
     * Version: Xilinx EDK 2013.4 EDK_2013.4.20131205
     * Generate by U-BOOT v4.00.c
     * Project description at http://www.monstr.eu/uboot/
     */
    
    #define XILINX_BOARD_NAME "AMP-Demo"
    
    /* ARM is ps7_cortexa9_0 */
    #define XPAR_CPU_CORTEXA9_CORE_CLOCK_FREQ_HZ	666666687
    
    /* Interrupt controller is ps7_scugic_0 */
    #define XILINX_PS7_INTC_BASEADDR		0xf8f00100
    
    /* System Timer Clock Frequency */
    #define XILINX_PS7_CLOCK_FREQ	333333343
    
    /* Uart console is ps7_uart_1 */
    #define XILINX_PS7_UART
    #define XILINX_PS7_UART_BASEADDR	0xe0001000
    #define XILINX_PS7_UART_CLOCK_HZ	50000000
    
    /* IIC doesn't exist */
    
    /* GPIO doesn't exist */
    
    /* SDIO controller is ps7_sd_0 */
    #define XILINX_PS7_SDIO_BASEADDR		0xe0100000
    
    /* Main Memory is ps7_ddr_0 */
    #define XILINX_RAM_START	0x00000000
    #define XILINX_RAM_SIZE		0x20000000
    
    /* Flash Memory is ps7_qspi_0 */
    #define XILINX_PS7_QSPI_FLASH_BASEADDR	0xE000D000
    #define XILINX_SPI_FLASH_MAX_FREQ	50000000
    #define XILINX_SPI_FLASH_CS	0
    
    /* Sysace doesn't exist */
    
    /* Ethernet controller is ps7_ethernet_0 */
    #define XILINX_PS7_GEM_BASEADDR			0xe000b000
    
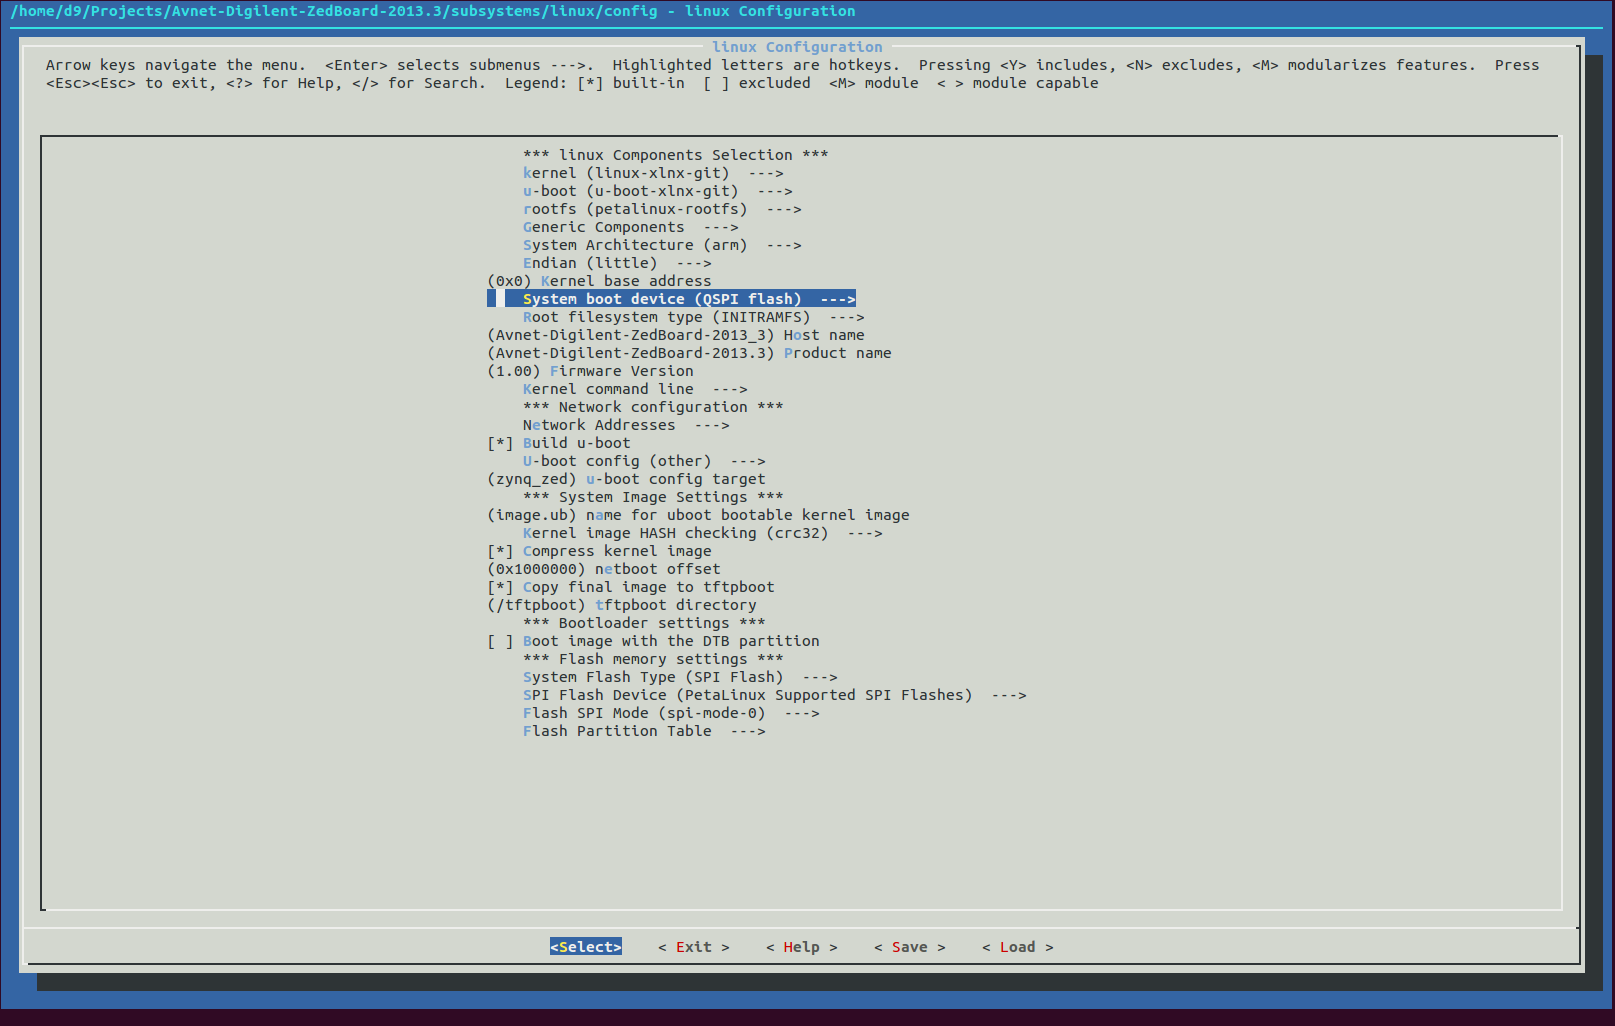
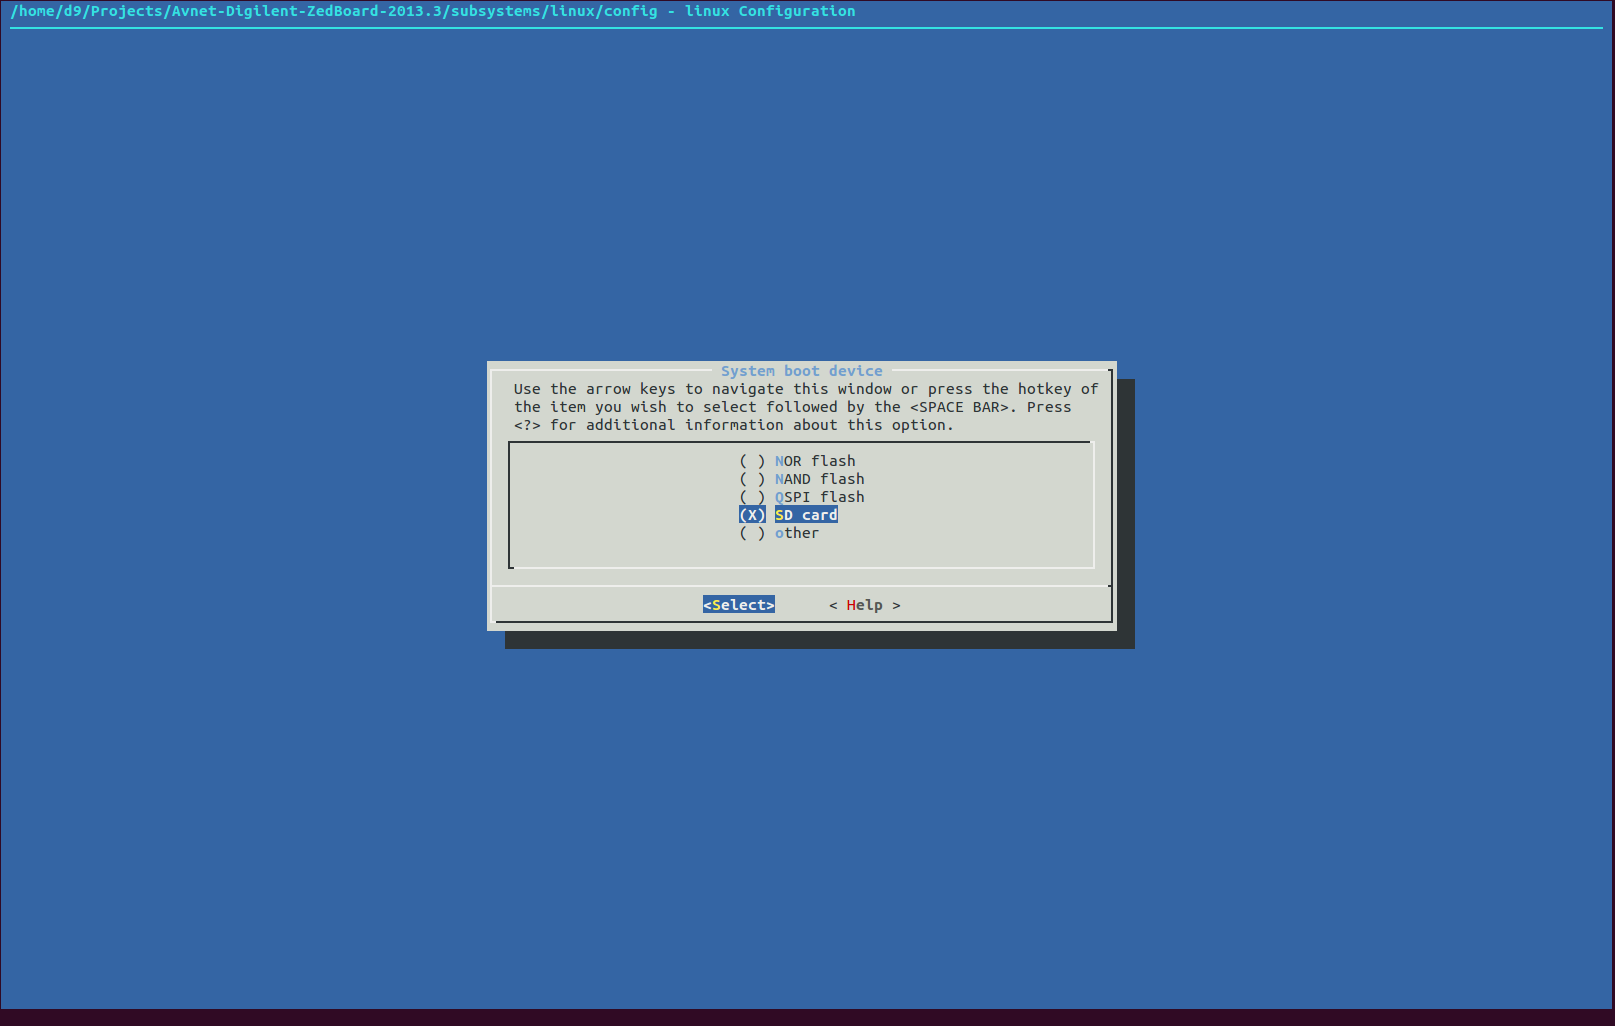
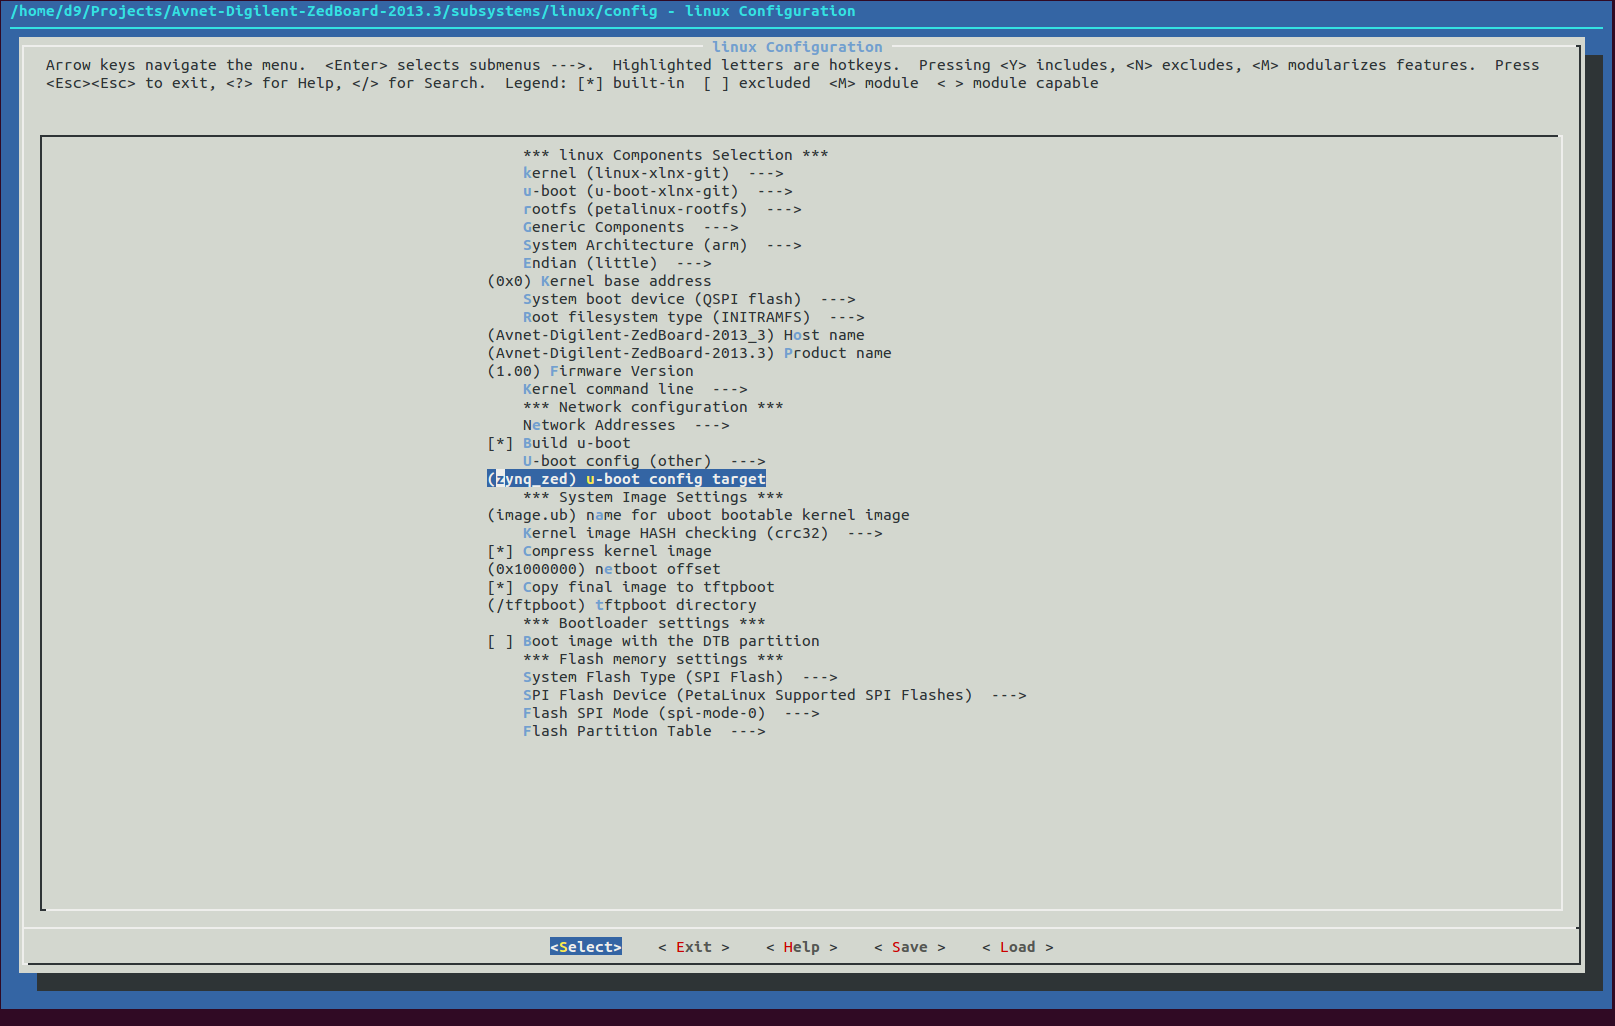
  18. Next step is to configure our PetaLinux project. AMP system share memory between Linux Kernel and FreeRTOS, so PetaLinux project must be configured to segment the memory and lets split it 256M/256M since our ZedBoard have 512M total of DDR3 memory. I will also change boot media type to SD Card, Host and Product names. So, run petalinux-config and make next this changes:

    cd ~/Projects/AMP-Demo/
    petalinux-config

    zynq5_010

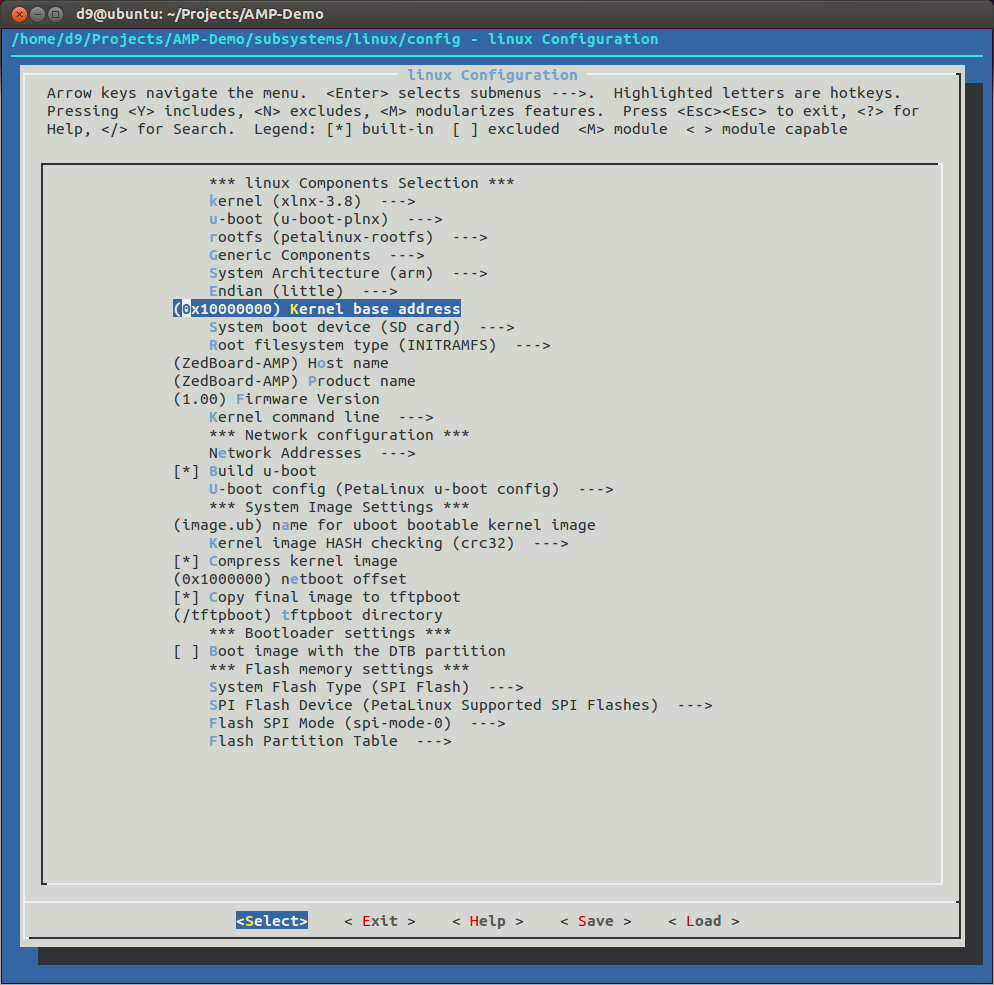
  19. Time to configure Linux Kernel for AMP. In a project directory:

    petalinux-config -c kernel

    In a main page:

    • Make sure that 'Enable loadable module support' is selected.
    • In 'Kernel Features' -> make sure that 'High Memory Support' is enabled.
    • In 'Kernel Features' -> change 'Memory split' to '2G/2G'.
    • In 'Device Drivers' -> 'Generic Driver Options' -> make sure 'Userspace firmware loading support' is enabled.
    • In 'Device Drivers' -> 'Remoteproc drivers(EXPERIMENTAL)' -> change 'ZYNQ remoteproc' to (module) and disble Microblaze support.
    • In 'Device Drivers' -> 'Rpmsg drivers(EXPERIMENTAL)' -> set all three modules to ('An rpmsg server sample', 'rpmsg OMX driver' and 'An FreeRTOS statistic')

    Save changes and quit from menuconfig.

  20. Configure PetaLinux project ROOTFS. All we need to change now is to in 'Apps-->' menu add/enable 'latencystat' app.

    petalinux-config -c rootfs

  21. Next very important step is to update 'Device Tree Source'(DTS). We need it to do because 'remoteproc' driver instantianated and configured by its node in a device tree.
    DTS file we need to modify located in a our petalinux project 'AMP-Demo/subsystems/linux/hw-description/system.dts'. We have to add 'remoteproc' node to 'ps7_axi_interconnect_0' device. Below a portion of my system.dts file. More details regarding 'remoteproc' you can find in a Xilinx UG978 v2013.10:

    	ps7_axi_interconnect_0: amba@0 {
    		#address-cells = <1>;
    		#size-cells = <1>;
    		compatible = "xlnx,ps7-axi-interconnect-1.00.a", "simple-bus";
    		ranges ;
    		test: remoteproc-test@0 {
    			compatible = "xlnx,zynq_remoteproc";
    			reg = < 0x0 0x10000000 >;
    			interrupt-parent = <&ps7_scugic_0>;
    			interrupts = < 0 37 4 0 38 4>;
    			firmware = "freertos";
    			ipino = <6>;
    			vring0 = <2>;
    			vring1 = <3>;
    		} ;
    		ps7_spi_0: ps7-spi@e0006000 {
    			clock-names = "ref_clk", "aper_clk";
    			clocks = <&clkc 25>, <&clkc 34>;
    			compatible = "xlnx,ps7-spi-1.00.a";
    			interrupt-parent = <&ps7_scugic_0>;
    			interrupts = <0 26 4>;
    			num-chip-select = <3>;
    			reg = <0xe0006000 0x1000>;
    			bus-num = <0>;
    			speed-hz = <1000000>;			//1000kHz
    			xlnx,has-ss0 = <0x1>;
    			xlnx,has-ss1 = <0x1>;
    			xlnx,has-ss2 = <0x1>;
    			xlnx,spi-clk-freq-hz = <0xF4240>;
    			device@0{
    				compatible="linux,spidev";
    				reg =<0>;			//CS0
    				spi-max-frequency= <1000000>;
    			};
    			device@1{
    				compatible="linux,spidev";
    				reg =<1>;			//CS1
    				spi-max-frequency= <1000000>;
    			};
    		} ;
    		ps7_spi_1: ps7-spi@e0007000 {
    			clock-names = "ref_clk", "aper_clk";
    			clocks = <&clkc 26>, <&clkc 35>;
    			compatible = "xlnx,ps7-spi-1.00.a";
    			interrupt-parent = <&ps7_scugic_0>;
    			interrupts = <0 49 4>;
    			num-chip-select = <2>;
    			reg = <0xe0007000 0x1000>;
    			bus-num = <1>;
    			speed-hz = <1000000>;			//1000kHz
    			xlnx,has-ss0 = <0x1>;
    			xlnx,has-ss1 = <0x1>;
    			xlnx,spi-clk-freq-hz = <0xF4240>;
    			device@0{
    				compatible="linux,spidev";
    				reg =<0>;			//CS0
    				spi-max-frequency= <1000000>;
    			};
    			device@1{
    				compatible="linux,spidev";
    				reg =<1>;			//CS1
    				spi-max-frequency= <1000000>;
    			};
    		} ;
    		ps7_ethernet_0: ps7-ethernet@e000b000 {
    			#address-cells = <1>;
    			#size-cells = <0>;
    			clock-names = "ref_clk", "aper_clk";
    			clocks = <&clkc 13>, <&clkc 30>;
    			compatible = "xlnx,ps7-ethernet-1.00.a";
    			interrupt-parent = <&ps7_scugic_0>;
    			interrupts = <0 22 4>;
    			local-mac-address = [ 00 0a 35 00 18 e0 ];
    			phy-handle = <&phy0>;
    			phy-mode = "rgmii-id";
    			reg = <0xe000b000 0x1000>;
    			xlnx,enet-reset = "";
    			xlnx,eth-mode = <0x1>;
    			xlnx,has-mdio = <0x1>;
    			xlnx,ptp-enet-clock = <111111115>;
    			mdio {
    				#address-cells = <1>;
    				#size-cells = <0>;
    				phy0: phy@0 {
    					compatible = "marvell,88e1116r";
    					device_type = "ethernet-phy";
    					reg = <0>;
    				} ;
    			} ;
    		} ;
    
  22. Now, with PetaLinux configured, we can add our FreeRTOS demo app we created and compiled using XSDK into PetaLinux rootfs image. In order to do it we can create PetaLinux app using template.

    cd ~/Projects/AMP-Demo/
    petalinux-create -t apps --template install -n freertos_fw

    INFO: Create apps: freertos_fw
    INFO: New apps successfully created in /home/d9/Projects/AMP-Demo/components/apps/freertos_fw

  23. Copy our FreeRTOS compiled app into PetaLinux apps directory:

    cd ~/Projects/AMP-Demo/components/apps/freertos_fw/
    cp ../../../../freertos_amp_demo/Debug/freertos_amp_demo.elf data/freertos

  24. Modify 'install' section of Makefile in the app folder:
    ifndef PETALINUX
    $(error "Error: PETALINUX environment variable not set.  Change to the root of your PetaLinux install, and source the settings.sh file")
    endif
    
    include $(PETALINUX)/components/apps/apps.common.mk
    
    all: build install
    
    build:
    
    clean:
    
    .PHONY: install image
    
    install:
            $(TARGETINST) -d data/freertos /lib/firmware/freertos
    
  25. Configure PetaLinux 'rootfs' to include this new 'freertos_fw' in 'Apps-->' menu:

    cd ~/Projects/AMP-Demo/
    petalinux-config -c rootfs

    zynq5_011

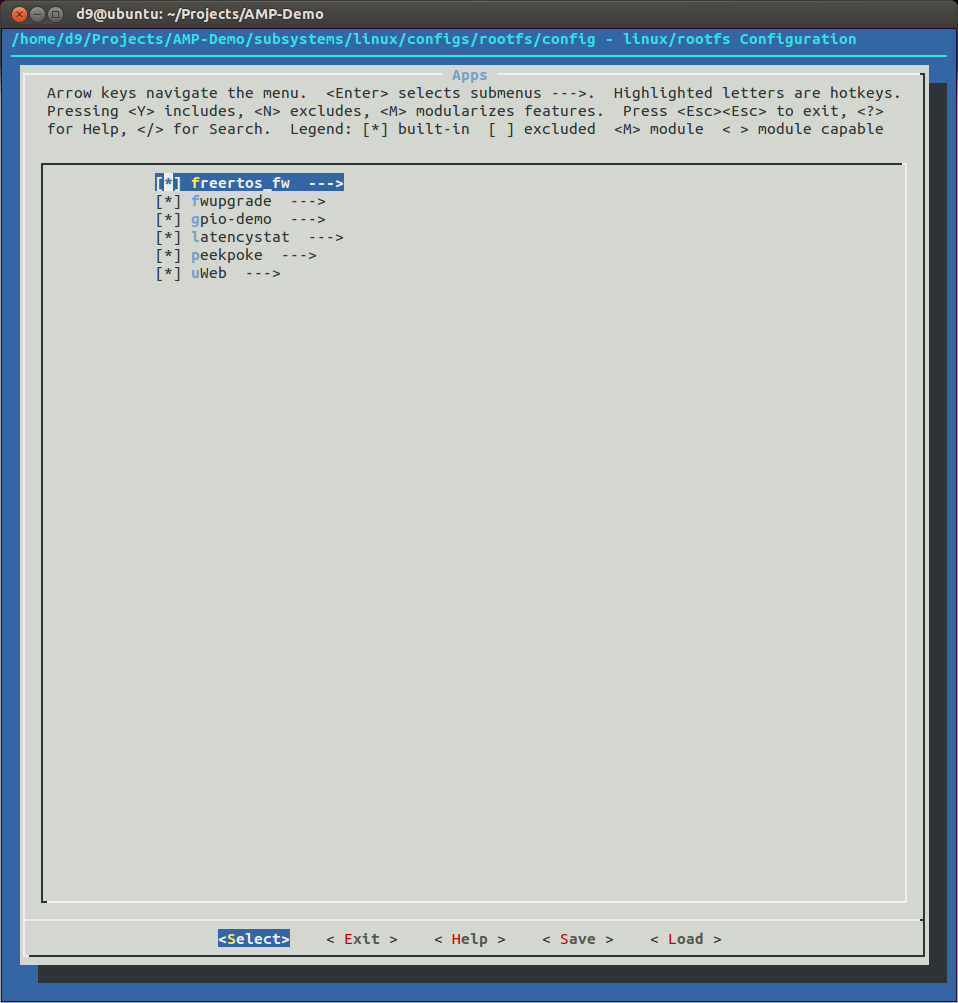
  26. Build PetaLinux project, create BOOT.BIN image using our 'FSBL-AMP' and 'ZedBoard-AMP' bitstream file. Create/update prebuilt configuration.

    cd ~/Projects/AMP-Demo/
    petalinux-build
    petalinux-package --boot --fsbl ../FSBL-AMP/Debug/FSBL-AMP.elf --fpga ../ZedBoard-AMP-HW/system_wrapper.bit --uboot --force -o images/linux/BOOT.BIN
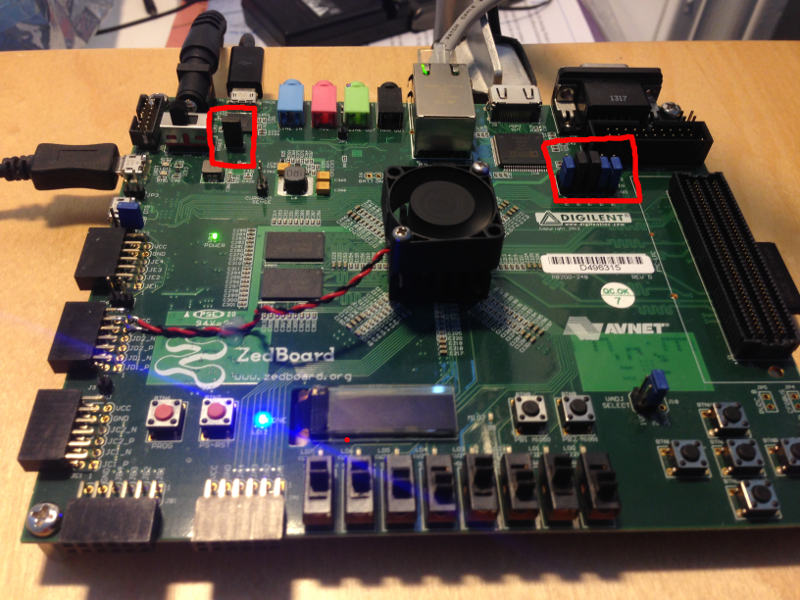
    petalinux-package --prebuilt --fpga ../ZedBoard-AMP-HW/system_wrapper.bit --force

  27. Copy BOOT.BIN and image.ub to sd card, set ZedBoard MIO3, MIO4 and MIO5 to 'SD Boot' configuration and turn ZedBoard on.
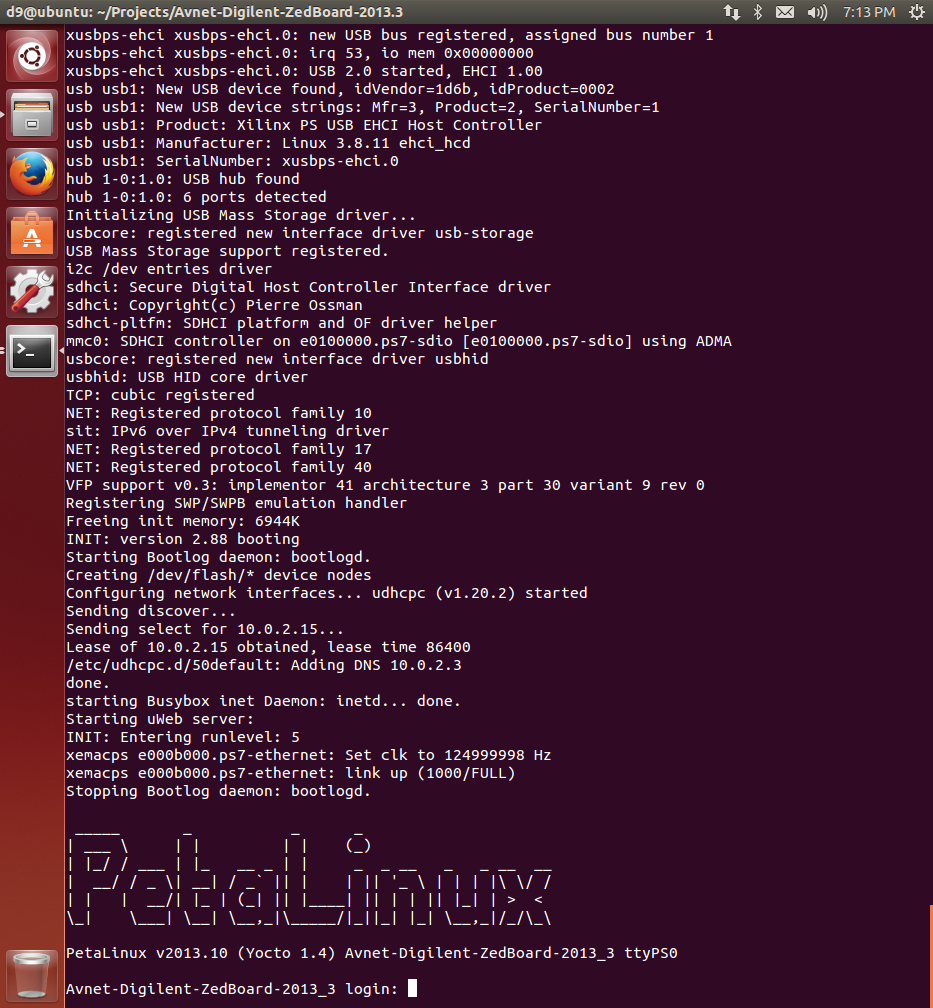
  28. Login as 'root'/'root' and verify our kernel version and build timestamp.

    root@ZedBoard-AMP:~# uname -a
    Linux ZedBoard-AMP 3.8.11 #2 SMP PREEMPT Wed Feb 26 15:39:37 EST 2014 armv7l GNU/Linux
    root@ZedBoard-AMP:~#

  29. Because we included remoteproc as a module and it not loaded yet - Linux must be using both CPU's in a conventional SMP way. Lets verify it:

    more /proc/cpuinfo

    processor       : 0
    model name      : ARMv7 Processor rev 0 (v7l)
    BogoMIPS        : 1332.01
    Features        : swp half thumb fastmult vfp edsp neon vfpv3 tls 
    CPU implementer : 0x41
    CPU architecture: 7
    CPU variant     : 0x3
    CPU part        : 0xc09
    CPU revision    : 0
    
    processor       : 1
    model name      : ARMv7 Processor rev 0 (v7l)
    BogoMIPS        : 1332.01
    Features        : swp half thumb fastmult vfp edsp neon vfpv3 tls 
    CPU implementer : 0x41
    CPU architecture: 7
    CPU variant     : 0x3
    CPU part        : 0xc09
    CPU revision    : 0
    
    Hardware        : Xilinx Zynq Platform
    Revision        : 0000
    Serial          : 0000000000000000
    
  30. Now, lets load remoteproc driver:

    modprobe zynq_remoteproc

    CPU1: shutdown
     remoteproc0: 0.remoteproc-test is available
     remoteproc0: Note: remoteproc is still under development and considered experimental.
     remoteproc0: THE BINARY FORMAT IS NOT YET FINALIZED, and backward compatibility isn't yet guaranteed.
    

    modprobe rpmsg_freertos_statistic

     remoteproc0: powering up 0.remoteproc-test
     remoteproc0: Booting fw image freertos, size 2130820
     remoteproc0: remote processor 0.remoteproc-test is now up
    virtio_rpmsg_bus virtio0: rpmsg host is online
    virtio_rpmsg_bus virtio0: creating channel rpmsg-timer-statistic addr 0x50
    rpmsg_freertos_statistic rpmsg0: new channel: 0x400 -> 0x50!
    

    So, second Processor unloaded from Linux and is setup to execute the FreeRTOS firmware.

  31. Now, we can run 'latencystat' FreeRTOS demo app.

    latencystat -b

    Linux FreeRTOS AMP Demo.
       0: Command 0 ACKed
       1: Command 1 ACKed
    Waiting for samples...
       2: Command 2 ACKed
       3: Command 3 ACKed
       4: Command 4 ACKed
    -----------------------------------------------------------
    Histogram Buckvirtio_rpmsg_bus virtio0: msg received with no recepient
    et Values:
    	Bucket 341 ns (38 ticks) had 14813 frequency
    	Bucket 431 ns (48 ticks) had 1 frequency
    	Bucket 521 ns (58 ticks) had 1 frequency
    	Bucket 593 ns (66 ticks) had 1 frequency
    	Bucket 692 ns (77 ticks) had 1 frequency
    -----------------------------------------------------------
    Histogram Data:
    	min: 341 ns (38 ticks)
    	avg: 341 ns (38 ticks)
    	max: 692 ns (77 ticks)
    	out of range: 0
    	total samples: 14817
    -----------------------------------------------------------
    root@ZedBoard-AMP:~#
    
  32. Access the TraceBuffer - a section of shared memory which is only written to by the FreeRTOS application. This
    TraceBuffer used as a logging console to transfer information to Linux and 'latencystat' app uses it. So, lets check it out:

    more /sys/kernel/debug/remoteproc/remoteproc0/trace0

    Congratulation! We got Linux-FreeRTOS AMP configuration running on our ZedBoard.

Use SDCard to boot ZedBoard using PetaLinux 13.10

Up until now, I was using JTAG to boot my ZedBoard using PetaLinux builds. But at some point we will neet to switch to QSPI or SDCard. This post will be about using SD Card. And PetaLinux 13.10 made this process very easy. For default U-boot 2013.07 all we need to do is to change boot device in PetaLinux configurations.

I will use Avnet-Digilent-ZedBoard-2013.3 project I used before. See here for more details about how to install it:

  1. First, go to your project directory and run petalinux-config tool
  2. d9@ubuntu:~$ cd Projects/Avnet-Digilent-ZedBoard-2013.3/
    d9@ubuntu:~/Projects/Avnet-Digilent-ZedBoard-2013.3$ petalinux-config

  3. In a main manu select 'System boot device' submenu.
  4. zynq4_001

  5. Inside 'System boot device' menu switch to 'SD card' option.
  6. zynq4_002

  7. Save configuration and exit.
  8. Now, lets clean and rebuild images - in our project directory:
  9. petalinux-build -x mrproper
    petalinux-build

  10. To Re-generate BOOT.BIN in our project directory run:
  11. petalinux-package --boot --fsbl pre-built/linux/images/zynq_fsbl.elf --fpga pre-built/linux/implementation/download.bit --uboot --force -o images/linux/BOOT.BIN

    INFO: Generating zynq binary package BOOT.BIN...
    INFO: Binary is ready.

  12. Copy BOOT.BIN and image.ub from our project Avnet-Digilent-ZedBoard-2013.3/images/linux directory to SD card. And we done. Umount SD card, install it into ZedBoard, set jumpers to SDCard boot mode (MIO3 to ground position, MIO4 and MIO5 to high) and power board.
  13. Run gtkterm to monitor the process.
    Btw, if you expireince 20-40 seconds delay before you can access port with error "cannot open /dev/ttyACM0: Device or resource busy" and/or sometimes U-boot process stopped without any error and will continue to boot when you type 'boot' command - you may want to uninstall Ubuntu's ModemManager which cause all this things by trying to access/control our port once it powered.
  14. sudo apt-get purge modemmanager

Update U-boot and Linux Kernel for PetaLinux 13.10.

PetaLinux 13.10 coming with U-boot vesrion 2013.07 and Linux Kernel 3.8.1. If for some reason you need to change U-boot and/or Linux kernel with newer one - u can do it manually(configure, compile and include to BOOT.BIN image) or using PetaLinux tools to automate it. This post will be about later.
I will do it on virtual machine (VMWare Workstation 10) running Ubuntu 13.10 64 bit version with PetaLinux 13.10 already installed. I will also use fresh installation of prebuilt Avnet-Digilent BSP for ZedBoard, but this recipe works for my custom "hardware design" for ZedBoard too.

  1. So, since I'm using 64 bit Ubuntu, I'm missing quite a few packages, especially 32bit versions. Below the list, but some package uninstalled my 64 version of GCC, so I re-install it as a last step.
  2. sudo apt-get install gawk
    sudo apt-get install build-essential
    sudo apt-get install automake
    sudo apt-get install libtool
    sudo apt-get install lib32ncurses5
    sudo apt-get install lib32ncurses5-dev
    sudo apt-get install lib32ncursesw5
    sudo apt-get install ncurses-dev:i386
    sudo apt-get install libstdc++6:i386
    sudo apt-get install libselinux1:i386
    sudo apt-get install gcc

  3. Also, gmake package for Ubuntu not exist, but some Xilinx tools relay on it, so lets gmake symlink to make:

    sudo ln -s /usr/bin/make /usr/bin/gmake

  4. We also have to source PetaLinux settings, but because I'm always forget to do it - I will change my .bashrc so it will be done automatically, each time I log in. SO, in home directory, add next instructions to the end of the ~/.bashrc file.

    export CROSS_COMPILE=arm-xilinx-linux-gnueabi-
    source /opt/petalinux-v2013.10-final/settings.sh
    source /opt/Xilinx/Vivado/2013.4/settings64.sh

  5. Next, download 'petalinux-v2013.10-final-installer.run' from Xilinx website and put in ~/Downloads directory.
  6. Now, let's create 'Projects' forlder for our PetaLinux projects and install Avnet-Digilent BSP project into it. It will create 2 projects for us: Vivado 13.3 and ISE-14.7. I will use Vivado one and we can delete 14.7.
  7. d9@ubuntu:~$ mkdir Projects
    d9@ubuntu:~$ cd Projects
    d9@ubuntu:~/Projects$ petalinux-create -t project -s ../Downloads/Avnet-Digilent-ZedBoard-v2013.10-final.bsp

    INFO: Create project:
    INFO: Projects:
    INFO: * Avnet-Digilent-ZedBoard-14.7
    INFO: * Avnet-Digilent-ZedBoard-2013.3
    INFO: has been successfully installed to /home/d9/Projects/
    INFO: New project successfully created in /home/d9/Projects/

    d9@ubuntu:~/Projects$ cd Avnet-Digilent-ZedBoard-2013.3/

  8. Let's test prebuilt packages using JTAG on our ZedBoard. Set MIO3, MIO4 and MIO5 jumpers on ZedBoard to JTAG boot(all to GND), turn board on, run 'gtkterm' (use ZedBoard USB-to-Serial port) and boot using petalinux-boot. Below output I got on my ZedBoard:
  9. d9@ubuntu:~/Projects/Avnet-Digilent-ZedBoard-2013.3$ petalinux-boot --jtag --prebuilt 3

    U-Boot 2013.07 (Nov 21 2013 - 18:27:09)
    
    Memory: ECC disabled
    DRAM:  512 MiB
    MMC:   zynq_sdhci: 0
    SF: Detected S25FL256S_64K with page size 64 KiB, total 32 MiB
    *** Warning - bad CRC, using default environment
    
    In:    serial
    Out:   serial
    Err:   serial
    Net:   Gem.e000b000
    U-BOOT for Avnet-Digilent-ZedBoard-2013.3
    
    Gem.e000b000 Waiting for PHY auto negotiation to complete...Booting Linux on physical CPU 0x0
    Linux version 3.8.11 (xbrbbot@xbrlab02) (gcc version 4.7.3 (Sourcery CodeBench Lite 2013.05-40) ) 
    #2 SMP PREEMPT Thu Nov 21 18:30:11 EST 2013
    CPU: ARMv7 Processor [413fc090] revision 0 (ARMv7), cr=18c5387d
    CPU: PIPT / VIPT nonaliasing data cache, VIPT aliasing instruction cache
    Machine: Xilinx Zynq Platform, model: .
    Memory policy: ECC disabled, Data cache writealloc
    PERCPU: Embedded 7 pages/cpu @c1004000 s6592 r8192 d13888 u32768
    Built 1 zonelists in Zone order, mobility grouping on.  Total pages: 130048
    Kernel command line: console=ttyPS0,115200
    PID hash table entries: 2048 (order: 1, 8192 bytes)
    Dentry cache hash table entries: 65536 (order: 6, 262144 bytes)
    Inode-cache hash table entries: 32768 (order: 5, 131072 bytes)
    __ex_table already sorted, skipping sort
    Memory: 512MB = 512MB total
    Memory: 507392k/507392k available, 16896k reserved, 0K highmem
    Virtual kernel memory layout:
        vector  : 0xffff0000 - 0xffff1000   (   4 kB)
        fixmap  : 0xfff00000 - 0xfffe0000   ( 896 kB)
        vmalloc : 0xe0800000 - 0xff000000   ( 488 MB)
        lowmem  : 0xc0000000 - 0xe0000000   ( 512 MB)
        pkmap   : 0xbfe00000 - 0xc0000000   (   2 MB)
        modules : 0xbf000000 - 0xbfe00000   (  14 MB)
          .text : 0xc0008000 - 0xc04eafd4   (5004 kB)
          .init : 0xc04eb000 - 0xc0bb39c0   (6947 kB)
          .data : 0xc0bb4000 - 0xc0be1900   ( 183 kB)
           .bss : 0xc0be1900 - 0xc0bfcff0   ( 110 kB)
    Preemptible hierarchical RCU implementation.
    NR_IRQS:16 nr_irqs:16 16
    xslcr mapped to e0802000
    Zynq clock init
    sched_clock: 16 bits at 54kHz, resolution 18432ns, wraps every 1207ms
    ps7-ttc #0 at e0804000, irq=43
    Console: colour dummy device 80x30
    Calibrating delay loop... 1332.01 BogoMIPS (lpj=6660096)
    pid_max: default: 32768 minimum: 301
    Mount-cache hash table entries: 512
    CPU: Testing write buffer coherency: ok
    Setting up static identity map for 0x359180 - 0x3591b4
    L310 cache controller enabled
    l2x0: 8 ways, CACHE_ID 0x000000c0, AUX_CTRL 0x72360000, Cache size: 524288 B
    CPU1: Booted secondary processor
    Brought up 2 CPUs
    SMP: Total of 2 processors activated (2664.03 BogoMIPS).
    devtmpfs: initialized
    NET: Registered protocol family 16
    DMA: preallocated 256 KiB pool for atomic coherent allocations
    xgpiops e000a000.ps7-gpio: gpio at 0xe000a000 mapped to 0xe084e000
    bio: create slab <bio-0> at 0
    GPIO IRQ not connected
    XGpio: /amba@0/gpio@41200000: registered, base is 251
    GPIO IRQ not connected
    XGpio: /amba@0/gpio@41210000: registered, base is 243
    GPIO IRQ not connected
    XGpio: /amba@0/gpio@41220000: registered, base is 235
    SCSI subsystem initialized
    usbcore: registered new interface driver usbfs
    usbcore: registered new interface driver hub
    usbcore: registered new device driver usb
    Switching to clocksource xttcps_clocksource
    NET: Registered protocol family 2
    TCP established hash table entries: 4096 (order: 3, 32768 bytes)
    TCP bind hash table entries: 4096 (order: 3, 32768 bytes)
    TCP: Hash tables configured (established 4096 bind 4096)
    TCP: reno registered
    UDP hash table entries: 256 (order: 1, 8192 bytes)
    UDP-Lite hash table entries: 256 (order: 1, 8192 bytes)
    NET: Registered protocol family 1
    RPC: Registered named UNIX socket transport module.
    RPC: Registered udp transport module.
    RPC: Registered tcp transport module.
    RPC: Registered tcp NFSv4.1 backchannel transport module.
    jffs2: version 2.2. (NAND) (SUMMARY)  © 2001-2006 Red Hat, Inc.
    msgmni has been set to 991
    Block layer SCSI generic (bsg) driver version 0.4 loaded (major 253)
    io scheduler noop registered
    io scheduler deadline registered
    io scheduler cfq registered (default)
    e0001000.serial: ttyPS0 at MMIO 0xe0001000 (irq = 82) is a xuartps
    console [ttyPS0] enabled
    xdevcfg f8007000.ps7-dev-cfg: ioremap f8007000 to e0874000 with size 100
    st: Version 20101219, fixed bufsize 32768, s/g segs 256
    osst :I: Tape driver with OnStream support version 0.99.4
    osst :I: $Id: osst.c,v 1.73 2005/01/01 21:13:34 wriede Exp $
    SCSI Media Changer driver v0.25 
    xqspips e000d000.ps7-qspi: master is unqueued, this is deprecated
    m25p80 spi32766.0: fallback to 3-byte address mode
    m25p80 spi32766.0: maximum accessible size is 16MB
    m25p80 spi32766.0: s25fl256s1 (32768 Kbytes)
    4 ofpart partitions found on MTD device spi32766.0
    Creating 4 MTD partitions on "spi32766.0":
    0x000000000000-0x000000500000 : "boot"
    0x000000500000-0x000000520000 : "bootenv"
    0x000000520000-0x000000fa0000 : "image"
    0x000000fa0000-0x000002000000 : "spare"
    xqspips e000d000.ps7-qspi: at 0xE000D000 mapped to 0xE0876000, irq=51
    libphy: XEMACPS mii bus: probed
    xemacps e000b000.ps7-ethernet: pdev->id -1, baseaddr 0xe000b000, irq 54
    ehci_hcd: USB 2.0 'Enhanced' Host Controller (EHCI) Driver
    ULPI transceiver vendor/product ID 0x0451/0x1507
    Found TI TUSB1210 ULPI transceiver.
    ULPI integrity check: passed.
    xusbps-dr xusbps-udc.0: Controller already in use
    xusbps-dr: probe of xusbps-udc.0 failed with error -16
    Initializing USB Mass Storage driver...
    usbcore: registered new interface driver usb-storage
    USB Mass Storage support registered.
    i2c /dev entries driver
    xadcps f8007100.ps7-xadc: enabled:	yes	reference:	external
    sdhci: Secure Digital Host Controller Interface driver
    sdhci: Copyright(c) Pierre Ossman
    sdhci-pltfm: SDHCI platform and OF driver helper
    mmc0: SDHCI controller on e0100000.ps7-sdio [e0100000.ps7-sdio] using ADMA
    usbcore: registered new interface driver usbhid
    usbhid: USB HID core driver
    TCP: cubic registered
    NET: Registered protocol family 10
    sit: IPv6 over IPv4 tunneling driver
    NET: Registered protocol family 17
    NET: Registered protocol family 40
    VFP support v0.3: implementor 41 architecture 3 part 30 variant 9 rev 4
    Registering SWP/SWPB emulation handler
    Freeing init memory: 6944K
    INIT: version 2.88 booting
    mmc0: new high speed SDHC card at address aaaa
    mmcblk0: mmc0:aaaa SU32G 29.7 GiB 
     mmcblk0: p1
    Starting Bootlog daemon: bootlogd.
    Creating /dev/flash/* device nodes
    Configuring network interfaces... udhcpc (v1.20.2) started
    Sending discover...
    xemacps e000b000.ps7-ethernet: Set clk to 24999999 Hz
    xemacps e000b000.ps7-ethernet: link up (100/HALF)
    IPv6: ADDRCONF(NETDEV_CHANGE): eth0: link becomes ready
    Sending discover...
    Sending select for 172.19.1.113...
    Lease of 172.19.1.113 obtained, lease time 28800
    /etc/udhcpc.d/50default: Adding DNS 172.19.2.60
    /etc/udhcpc.d/50default: Adding DNS 172.19.2.56
    done.
    starting Busybox inet Daemon: inetd... done.
    Starting uWeb server:
    INIT: Entering runlevel: 5
    Stopping Bootlog daemon: bootlogd.
    
     _____       _           _      _
    | ___ \     | |         | |    (_)
    | |_/ / ___ | |_   __ _ | |     _  _ __   _   _ __  __
    |  __/ / _ \| __| / _` || |    | || '_ \ | | | |\ \/ /
    | |   |  __/| |_ | (_| || |____| || | | || |_| | >  <
    \_|    \___| \__| \__,_|\_____/|_||_| |_| \__,_|/_/\_\
    
    PetaLinux v2013.10 (Yocto 1.4) Avnet-Digilent-ZedBoard-2013_3 ttyPS0
    
    Avnet-Digilent-ZedBoard-2013_3 login:
    
  10. As you can see very first in a log is U-boot version and build timestamp: U-Boot 2013.07 (Nov 21 2013 - 18:27:09).
    Loging as 'root'/'root' and check what version of kernel we got. It's 3.8.11 and it built on Thu Nov 21 18:30:11 EST 2013.
  11. root@Avnet-Digilent-ZedBoard-2013_3:~# uname -a
    Linux Avnet-Digilent-ZedBoard-2013_3 3.8.11 #2 SMP PREEMPT Thu Nov 21 18:30:11 EST 2013 armv7l GNU/Linux

  12. Now, let's verify that we can reconfigure and rebuild existing kernel, uboot and rootfs. Run petalinux-config for each one, but don't change any settings yet. Just go thru menus if you like and exit. If you got any errors - most likely your installation missing some packages.
  13. d9@ubuntu:~/Projects/Avnet-Digilent-ZedBoard-2013.3$ petalinux-config
    d9@ubuntu:~/Projects/Avnet-Digilent-ZedBoard-2013.3$ petalinux-config -c kernel
    d9@ubuntu:~/Projects/Avnet-Digilent-ZedBoard-2013.3$ petalinux-config -c rootfs

  14. Clean whatever we may have from previus builds and re-build it.
  15. d9@ubuntu:~/Projects/Avnet-Digilent-ZedBoard-2013.3$ petalinux-build -x mrproper
    d9@ubuntu:~/Projects/Avnet-Digilent-ZedBoard-2013.3$ petalinux-build

  16. This is the build log I got.
  17. INFO: Checking component...
    INFO: Generating make files and build linux
    INFO: Generating make files for the subcomponents of linux
    INFO: Building linux
    [INFO ] pre-build linux/rootfs/fwupgrade
    [INFO ] pre-build linux/rootfs/peekpoke
    [INFO ] pre-build linux/rootfs/uWeb
    [INFO ] build system.dtb
    [INFO ] build linux/kernel
    [INFO ] update linux/u-boot source
    [INFO ] generate linux/u-boot configuration files
    [INFO ] build linux/u-boot
    [INFO ] Setting up stage config
    [INFO ] Setting up rootfs config
    [INFO ] Updating for armv7a-vfp-neon
    [INFO ] Updating package manager
    [INFO ] Expanding stagefs
    [INFO ] build linux/rootfs/fwupgrade
    [INFO ] build linux/rootfs/peekpoke
    [INFO ] build linux/rootfs/uWeb
    [INFO ] build kernel in-tree modules
    [INFO ] modules linux/kernel
    [INFO ] post-build linux/rootfs/fwupgrade
    [INFO ] post-build linux/rootfs/peekpoke
    [INFO ] post-build linux/rootfs/uWeb
    [INFO ] pre-install linux/rootfs/fwupgrade
    [INFO ] pre-install linux/rootfs/peekpoke
    [INFO ] pre-install linux/rootfs/uWeb
    [INFO ] install linux/kernel
    [INFO ] install linux/u-boot
    [INFO ] Setting up rootfs config
    [INFO ] Setting up stage config
    [INFO ] Updating for armv7a-vfp-neon
    [INFO ] Updating package manager
    [INFO ] Expanding rootfs
    [INFO ] install sys_init
    [INFO ] install linux/rootfs/fwupgrade
    [INFO ] install linux/rootfs/peekpoke
    [INFO ] install linux/rootfs/uWeb
    [INFO ] install kernel in-tree modules
    [INFO ] modules_install linux/kernel
    [INFO ] post-install linux/rootfs/fwupgrade
    [INFO ] post-install linux/rootfs/peekpoke
    [INFO ] post-install linux/rootfs/uWeb
    [INFO ] package rootfs.cpio to /home/d9/Projects/Avnet-Digilent-ZedBoard-2013.3/images/linux
    [INFO ] Update and install vmlinux image
    [INFO ] vmlinux linux/kernel
    [INFO ] install linux/kernel
    [INFO ] package zImage
    [INFO ] zImage linux/kernel
    [INFO ] install linux/kernel
    [INFO ] package FIT image

  18. Now, we need to generate BOOT.BIN which includes our hardware implementation bitstream, FSBL and U-boot. Bitstream and FSBL executable are the same, so we will point them to petalinux tool and it will use just built u-boot exec. By default tool will put BOOT.BIN in current directory, but we need it to be in images directory. I will also force to replace file if it exists.
  19. petalinux-package --boot --fsbl pre-built/linux/images/zynq_fsbl.elf --fpga pre-built/linux/implementation/download.bit --uboot --force -o images/linux/BOOT.BIN

    INFO: Generating zynq binary package BOOT.BIN...
    INFO: Binary is ready.

  20. Replace, so called, prebuilt configuration for our PetaLinux project
  21. petalinux-package --prebuilt --fpga pre-built/linux/implementation/download.bit --force

    INFO: Pre-built directory is updated.

  22. Now we are ready to boot our rebuilt images using JTAG. So, reset ZedBoard (with JP13 shorted) or repower and run. Verify that we have same version of U-boot (2013.07) and Kernel 3.8.11, but build date is new.
  23. d9@ubuntu:~/Projects/Avnet-Digilent-ZedBoard-2013.3$ petalinux-boot --jtag --prebuilt 3

    INFO: The image provided is a zImage and no addition options were provided
    INFO: Append dtb - /home/d9/Projects/Avnet-Digilent-ZedBoard-2013.3/pre-built/linux/images/system.dtb and other options to boot zImage
    INFO: Configuring the FPGA...
    INFO: FPGA configuration completed.
    INFO: Downloading FSBL
    INFO: FSBL download completed.
    INFO: Launching XMD for file download and boot.
    INFO: This may take a few minutes, depending on the size of your image.

    U-Boot 2013.07 (Feb 19 2014 - 14:43:34)
    Linux Avnet-Digilent-ZedBoard-2013_3 3.8.11 #2 SMP PREEMPT Wed Feb 19 14:45:59 EST 2014 armv7l GNU/Linux

  24. Now, lets download new versions of U-boot and Linux kernel for Xilinx Git repository. More about Xilinx repo you can read on
  25. sudo git clone git://github.com/Xilinx/linux-xlnx.git /opt/linux-xlnx-git

    Cloning into '/opt/linux-xlnx-git'...
    remote: Reusing existing pack: 3464199, done.
    remote: Counting objects: 102, done.
    remote: Compressing objects: 100% (102/102), done.
    remote: Total 3464301 (delta 55), reused 0 (delta 0)
    Receiving objects: 100% (3464301/3464301), 827.49 MiB | 5.99 MiB/s, done.
    Resolving deltas: 100% (2906448/2906448), done.
    Checking connectivity... done
    Checking out files: 100% (44825/44825), done.

    sudo git clone git://github.com/Xilinx/u-boot-xlnx.git /opt/u-boot-xlnx-git

    Cloning into '/opt/u-boot-xlnx-git'...
    remote: Reusing existing pack: 252804, done.
    remote: Total 252804 (delta 0), reused 0 (delta 0)
    Receiving objects: 100% (252804/252804), 69.40 MiB | 6.19 MiB/s, done.
    Resolving deltas: 100% (201743/201743), done.
    Checking connectivity... done

  26. Let's see what we got.
  27. d9@ubuntu:~/Projects/Avnet-Digilent-ZedBoard-2013.3$ cd /opt/linux-xlnx-git/
    d9@ubuntu:/opt/linux-xlnx-git$ git describe
    xilinx-v2013.4

    VERSION = 3
    PATCHLEVEL = 12
    SUBLEVEL = 0
    EXTRAVERSION =
    NAME = One Giant Leap for Frogkind

    d9@ubuntu:/opt/linux-xlnx-git$ cd /opt/u-boot-xlnx-git/
    d9@ubuntu:/opt/u-boot-xlnx-git$ git describe
    xilinx-v2013.4
    d9@ubuntu:/opt/u-boot-xlnx-git$ more Makefile

    #
    # (C) Copyright 2000-2013
    # Wolfgang Denk, DENX Software Engineering, wd@denx.de.
    #
    # SPDX-License-Identifier: GPL-2.0+
    #

    VERSION = 2013
    PATCHLEVEL = 10
    SUBLEVEL =
    EXTRAVERSION =

  28. So, for what its worth, for Kernel we got Git tag version 2013.4 and Makefile saying its 3.12.0. And for U-boot Git tag is 2013.4 and Makefile 2013.10.
    Now we can copy Linux Kernel and U-Boot sources into our PetaLinux projects, but first we have to create some directories
  29. d9@ubuntu:~/Projects/Avnet-Digilent-ZedBoard-2013.3$ mkdir components
    d9@ubuntu:~/Projects/Avnet-Digilent-ZedBoard-2013.3$ mkdir components/linux-kernel
    d9@ubuntu:~/Projects/Avnet-Digilent-ZedBoard-2013.3$ mkdir components/u-boot

    d9@ubuntu:~/Projects/Avnet-Digilent-ZedBoard-2013.3$ cp -r /opt/linux-xlnx-git components/linux-kernel/
    d9@ubuntu:~/Projects/Avnet-Digilent-ZedBoard-2013.3$ cp -r /opt/u-boot-xlnx-git components/u-boot/

  30. Configure PetaLinux project to include new kernel and u-boot sources. Run petalinux-config.
  31. d9@ubuntu:~/Projects/Avnet-Digilent-ZedBoard-2013.3$ petalinux-config

  32. In a main menu select 'kernel' submenu and then switch from kernel 'xlnx-3.8' kernel to our new 'linux-xlnx-git'.
  33. In a main menu select 'u-boot' submenu and then switch to 'u-boot-xlnx-git'.
  34. In a main menu select 'u-boot config' and then switch to 'other'.
  35. In a main menu select 'u-boot config target (NEW)' and type 'zynq_zed'.
  36. zynq3_001

  37. Save configuration and exit from menus. You can read more about options for Xilinx version of U-boot at , unfortunately not much more.

    I went thru Xilinx Wiki pages and all PetaLinux documentation for 13.10 version and found very little information about u-boot customization options. I also went thru U-boot configuration scripts for PetaLinux and U-boot sources and found no specific different between Zynq_Zed and Zynq_Zc70x targets. Where is no 'MicroZed' target and I'm not sure if Zed or Zc70x will work for it.
    If somebody knows more about Xilinx patches and/or configuration for U-boot - please share information. I'm in particular interesting if I will need to change U-boot configuration to support my custom board, what and how.

  38. Anyway. Now we can rebuild whole thing.
  39. d9@ubuntu:~/Projects/Avnet-Digilent-ZedBoard-2013.3$ petalinux-build -x mrproper
    d9@ubuntu:~/Projects/Avnet-Digilent-ZedBoard-2013.3$ petalinux-build

    INFO: Checking component...
    INFO: Generating make files and build linux
    INFO: Generating make files for the subcomponents of linux
    INFO: Building linux
    [INFO ] pre-build linux/rootfs/fwupgrade
    [INFO ] pre-build linux/rootfs/peekpoke
    [INFO ] pre-build linux/rootfs/uWeb
    [INFO ] build system.dtb
    [INFO ] build linux/kernel
    [INFO ] update linux/u-boot source
    [INFO ] generate linux/u-boot configuration files
    [INFO ] build linux/u-boot
    [INFO ] Setting up stage config
    [INFO ] Setting up rootfs config
    [INFO ] Updating for armv7a-vfp-neon
    [INFO ] Updating package manager
    [INFO ] Expanding stagefs
    [INFO ] build linux/rootfs/fwupgrade
    [INFO ] build linux/rootfs/peekpoke
    [INFO ] build linux/rootfs/uWeb
    [INFO ] build kernel in-tree modules
    [INFO ] modules linux/kernel
    [INFO ] post-build linux/rootfs/fwupgrade
    [INFO ] post-build linux/rootfs/peekpoke
    [INFO ] post-build linux/rootfs/uWeb
    [INFO ] pre-install linux/rootfs/fwupgrade
    [INFO ] pre-install linux/rootfs/peekpoke
    [INFO ] pre-install linux/rootfs/uWeb
    [INFO ] install linux/kernel
    [INFO ] install linux/u-boot
    [INFO ] Setting up rootfs config
    [INFO ] Setting up stage config
    [INFO ] Updating for armv7a-vfp-neon
    [INFO ] Updating package manager
    [INFO ] Expanding rootfs
    [INFO ] install sys_init
    [INFO ] install linux/rootfs/fwupgrade
    [INFO ] install linux/rootfs/peekpoke
    [INFO ] install linux/rootfs/uWeb
    [INFO ] install kernel in-tree modules
    [INFO ] modules_install linux/kernel
    [INFO ] post-install linux/rootfs/fwupgrade
    [INFO ] post-install linux/rootfs/peekpoke
    [INFO ] post-install linux/rootfs/uWeb
    [INFO ] package rootfs.cpio to /home/d9/Projects/Avnet-Digilent-ZedBoard-2013.3/images/linux
    [INFO ] Update and install vmlinux image
    [INFO ] vmlinux linux/kernel
    [INFO ] install linux/kernel
    [INFO ] package zImage
    [INFO ] zImage linux/kernel
    [INFO ] install linux/kernel
    [INFO ] package FIT image

  40. Build BOOT.BIN and refresh Pre-built package using same commands:
  41. d9@ubuntu:~/Projects/Avnet-Digilent-ZedBoard-2013.3$ petalinux-package --boot --fsbl pre-built/linux/images/zynq_fsbl.elf --fpga pre-built/linux/implementation/download.bit --uboot --force -o images/linux/BOOT.BIN
    INFO: Generating zynq binary package BOOT.BIN...
    INFO: Binary is ready.
    d9@ubuntu:~/Projects/Avnet-Digilent-ZedBoard-2013.3$ petalinux-package --prebuilt --fpga pre-built/linux/implementation/download.bit --forceINFO: Pre-built directory is updated.

  42. Reset board and boot using JTAG:
  43. d9@ubuntu:~/Projects/Avnet-Digilent-ZedBoard-2013.3$ petalinux-boot --jtag --prebuilt 3

    INFO: The image provided is a zImage and no addition options were provided
    INFO: Append dtb - /home/d9/Projects/Avnet-Digilent-ZedBoard-2013.3/pre-built/linux/images/system.dtb and other options to boot zImage
    INFO: Configuring the FPGA...
    INFO: FPGA configuration completed.
    INFO: Downloading FSBL
    INFO: FSBL download completed.
    INFO: Launching XMD for file download and boot.
    INFO: This may take a few minutes, depending on the size of your image.

  44. Verify that now U-boot version is 2013.10 and Linux Kernel is 3.12.0
  45. U-Boot 2013.10 (Feb 19 2014 - 15:47:16)

    Linux Avnet-Digilent-ZedBoard-2013_3 3.12.0+ #2 SMP PREEMPT Wed Feb 19 15:49:58 EST 2014 armv7l GNU/Linux

    Congratulations! We got latest Xilinx patched u-boot and kernel version running on our ZedBoard.

    P.S. I tried to download and build vanilla Linux Kernel versions 3.12.11 and 3.13.3 from kernel.org - it builds and boots, but some hardware not working. So, we may need to apply some Xilinx Zynq related patches to vanilla kernel, but this is another topic.

Installing Vivado 13.4 and PetaLinux SDK on Ubuntu 13.10 amd64(64 bit) for ZedBoard.

I will follow Xilinx UG976, UG977 and UG978 user guides v2013.10 revision.

1. Install fresh Ubuntu 13.10 (64 bit edition) in VMWare Workstation10 virtual machine with atleast 80G disk space and 4G of RAM.

2. Go to Xilinx.com and DigilentInc.com and download next files to your 'home/Downloads' directory:

    - Vivado 13.4  All OS'es SDK Full installer.
    - PetaLinux 2013.10 Installation archive for Zynq.
    - PetaLinux 2013.10 BSP for Avnet/Digilent ZedBoard.
    - Digilent Adept 2.15.3 Runtime, X64 Linux
    - Digilent Adept 2.1.1 Utilities, X64 Linux
    - Digilent Plug-in, 64-bit Linux

3. At Xilinx tools license site: https://xilinx.entitlenow.com/AcrossUser/main.gsp?licenseType=&product=&tab=CreateLicense&uuid=& , create a new license file and include both 'PetaLinux Tool Licence' and 'Vivado WebPack License'. Xilinx will email a Xilinx.lic file to you - put it in your home/downloads directory for now.

This is what I got in my home ~/Download directory

d9@ubuntu:~/Downloads$ ls -l
total 7990712
-rw-r--r-- 1 d9 d9 63148594 Feb 4 21:03 Avnet-Digilent-ZedBoard-v2013.10-final.bsp
-rw------- 1 d9 d9 5112946 Feb 8 14:24 digilent.adept.runtime_2.15.3-x86_64.tar.gz
-rw------- 1 d9 d9 33690 Feb 8 14:24 digilent.adept.utilities_2.1.1-x86_64.tar.gz
-rw------- 1 d9 d9 10809690 Feb 8 14:25 libCseDigilent_2.5.2-x86_64.tar.gz
-rwxr-xr-x 1 d9 d9 791339806 Feb 4 21:10 petalinux-v2013.10-final-installer.run
-rw-r--r-- 1 d9 d9 1773 Feb 4 18:25 Xilinx.lic
-rw-r--r-- 1 d9 d9 7312015360 Jan 17 18:46 Xilinx_Vivado_SDK_2013.4_1210_1.tar

4. We will need a serial communication program - I prefer gtkterm. So, lets install and try to communicate with ZedBoard. Open console (search for 'term'), in a console:

d9@ubuntu:~$ sudo apt-get install gtkterm
d9@ubuntu:~$ gtkterm

And we got first error message: Cannot open /dev/ttyS0: Permission denied. Lets figure out why:

d9@ubuntu:~$ ls -l /dev/ttyS0
crw-rw---- 1 root dialout 4, 64 Feb 4 19:12 /dev/ttyS0
d9@ubuntu:~$ groups
d9 adm cdrom sudo dip plugdev lpadmin sambashare

So, /dev/ttyS0 as well as all other serial port devices (including /dev/ttyACM0 which is ZedBoard USB-to-Serial port) belongs to 'root' and 'dialout' groups and our user are not in any of them. So, lets add us into dialout, apply changes, check and run gtkterm. Note: you may reboot to apply changes permanently.

d9@ubuntu:~$ sudo addgroup d9 dialout
sudo password for d9:
Adding user `d9' to group `dialout' ...
Adding user d9 to group dialout
Done.
d9@ubuntu:~$ su d9
Password:
d9@ubuntu:~$ groups
d9 adm dialout cdrom sudo dip plugdev lpadmin sambashare
d9@ubuntu:~$ gtkterm

Now, go to 'Configuration/Port', select ZedBoard serial port '/dev/ttyACM0', set'Baud Rate' to 115200 and save configuration for later use.
Lets reset ZedBoard and verify we can see its output. In my case ZedBoard booted from microSD card with examples from 'ZedBoard CTT' tutorial.

5. Now, lets install Xilinx Vivado 14.3. For Petalinix 13.10 I will use SystemEdition + SDK. Because of the silent error during Vivado installation it must be istalled after we switch Ubuntu's default shell(Dash) to Bash.

So, to switch shell run:

d9@ubuntu:~$ sudo dpkg-reconfigure dash

Select 'No' to use 'dash' as default system shell.

zynw_1_002

And verify we are using 'bash' now:

d9@ubuntu:~/Downloads$ ls -al /bin/sh
lrwxrwxrwx 1 root root 4 Feb 8 17:35 /bin/sh -> bash

Now, install Vivado into default directory 'opt/Xilinx':

d9@ubuntu:~$ cd Downloads/
d9@ubuntu:~/Downloads$ tar -xvf Xilinx_Vivado_SDK_2013.4_1210_1.tar
d9@ubuntu:~/Downloads$ sudo ./Xilinx_Vivado_SDK_2013.4_1210_1/xsetup

Install Vivado 13.4 in default folder '/opt/Xilinx', but don't forget to opt to 'Install Cable Drivers'. Everything went smoothly, except our JTAG driver.

zynq_1_001

Where is no options to select, so click Ok and we will deal with it later.
Next, installer will launch 'License managing tool' and all we need to do is to go to 'Locate Existing Licenses' and point to license file we got from Xilinx. Make sure Petalinux_NoSuport_Eval and Vivado_WebPack in a list and 'green'. Close the License Managment tool - Vivado now installed.

So, lets figure out what is going on with our JTAG. I will try to install Digilent JTAG drivers manually. First, install Adept Runtime and Adept utilities from package directories and use default/proposed locations:

d9@ubuntu:~/Downloads$ tar -xvf digilent.adept.runtime_2.15.3-x86_64.tar.gz
d9@ubuntu:~/Downloads$ cd digilent.adept.runtime_2.15.3-x86_64/
d9@ubuntu:~/Downloads/digilent.adept.runtime_2.15.3-x86_64$ sudo ./install.sh
d9@ubuntu:~/Downloads/digilent.adept.runtime_2.15.3-x86_64$ cd ..
d9@ubuntu:~/Downloads$ tar -xvf digilent.adept.utilities_2.1.1-x86_64.tar.gz
d9@ubuntu:~/Downloads$ cd digilent.adept.utilities_2.1.1-x86_64/
d9@ubuntu:~/Downloads/digilent.adept.utilities_2.1.1-x86_64$ sudo ./install.sh

Second, install 'libftdi2'. Also agree with default/proposed locations:

d9@ubuntu:~/Downloads$ cd ~/Downloads/digilent.adept.runtime_2.15.3-x86_64/ftdi.drivers_1.0.4-x86_64/
d9@ubuntu:~/Downloads/digilent.adept.runtime_2.15.3-x86_64/ftdi.drivers_1.0.4-x86_64$ sudo ./install.sh
FTDI Driver Installer
64-bit operating system detected
In which directory should libraries be installed? [/usr/local/lib64]
Checking to see if libftd2xx.so is already installed....
Existing installation of libftd2xx.so found. Checking to see if this version should be installed.
Version 1.0.4 is currently installed. Version libftd2xx.so.1.0.4 will not be installed.
Successfully updated dynamic loader cache
Successfully installed FTDI Driver

Next install Digilent plugin for Xilinx tools. Unpack plugin archive, create 'Digilent/libCseDigilent' directory in Xilinx SDK plugin folder and copy plugin files in it:

d9@ubuntu:~/Downloads/digilent.adept.utilities_2.1.1-x86_64$ cd ~/Downloads
d9@ubuntu:~/Downloads$ tar -xvf libCseDigilent_2.5.2-x86_64.tar.gz
d9@ubuntu:~/Downloads$ sudo mkdir /opt/Xilinx/SDK/2013.4/lib/lin64/plugins/Digilent
d9@ubuntu:~/Downloads$ sudo mkdir /opt/Xilinx/SDK/2013.4/lib/lin64/plugins/Digilent/libCseDigilent
d9@ubuntu:~/Downloads$ sudo cp libCseDigilent_2.5.2-x86_64/ISE14x/plugin/* /opt/Xilinx/SDK/2013.4/lib/lin64/plugins/Digilent/libCseDigilent/

Lets check JTAG with Digilent 'djtgcfg' util. To do so, connect JTAG-USB if it not connected yet and turn 'on' ZedBoard then type 'djtfcfg enum' if you see Zed device found along with it serial number - we are in good shape:

d9@ubuntu:~$ djtgcfg enum

Found 1 device(s)

Device: Zed
Product Name:   Digilent Zed
User Name:      Zed
Serial Number:  XXXXXXXXXXXXX

6. Petalinux. Before we will start the installer we need to install missing libraries. Good thing is PetaLinux installer checks and inform us about missing staff. In case of 32bit Ubuntu 2013.10 we are missing only 'gawk'. But, for 64bit we need some 64 and some 32bit packages and libraries since PetaLinux and its installer depend on them. So, lets install them in this order:

d9@ubuntu:~$ sudo apt-get install gawk
d9@ubuntu:~$ sudo apt-get install ncurses-dev:i386
d9@ubuntu:~$ sudo apt-get install libstdc++6:i386
d9@ubuntu:~$ sudo apt-get install libselinux1:i386
d9@ubuntu:~$ sudo apt-get install lib32ncurses5-dev
d9@ubuntu:~$ sudo apt-get install gcc

Change permissions for PetaLinux installer and run it:

d9@ubuntu:~/Downloads$ sudo chmod 755 petalinux-v2013.10-final-installer.run
d9@ubuntu:~/Downloads$ sudo ./petalinux-v2013.10-final-installer.run --log petalinux_inst.log /opt

With our license already installed (with Vivado) we can setup and check PetaLinux enviroment settings:

d9@ubuntu:~/Downloads$ source /opt/petalinux-v2013.10-final/settings.sh
PetaLinux environment set to '/opt/petalinux-v2013.10-final'
INFO: Checking free disk space
INFO: Checking installed tools
INFO: Checking installed development libraries
INFO: Checking network and other services
WARNING: No tftp server found - please refer to "PetaLinux SDK Installation Guide" for its impact and solution
d9@ubuntu:~/Downloads$ echo $PETALINUX
/opt/petalinux-v2013.10-final

7. So, let's fix 'tftp' problem. First, check what packages we are missing and install them:

d9@ubuntu:~/Downloads$ dpkg -l xinetd tftp tftpd
dpkg-query: no packages found matching xinetd
dpkg-query: no packages found matching tftp
dpkg-query: no packages found matching tftpd
d9@ubuntu:~/Downloads$ sudo apt-get install xinetd tftpd tftp
Reading package lists... Done
Building dependency tree
Reading state information... Done
The following NEW packages will be installed:
tftp tftpd xinetd
0 upgraded, 3 newly installed, 0 to remove and 1 not upgraded

Second, create file called 'tftp' in '/etc/xinetd.d/' and fill it with:

service tftp
{
        protocol = udp
        port = 69
        socket_type = dgram
        wait = yes
        user = nobody
        server = /usr/sbin/in.tftpd
        server_args = /tftpboot
        disable = no
}

Thirtd, create directory for tftp files '/tftpboot', change permissions and restart services:

d9@ubuntu:~/Downloads$ sudo mkdir /tftpboot
d9@ubuntu:~/Downloads$ sudo chown d9:d9 /tftpboot
d9@ubuntu:~/Downloads$ sudo /etc/init.d/xinetd restart
* Stopping internet superserver xinetd [ OK ]
* Starting internet superserver xinetd [ OK ]

While in a home/download directory create some file for testing, connect locally to tftp and 'get' the file.

d9@ubuntu:~/Downloads$ echo "test1" > /tftpboot/testfile
d9@ubuntu:~/Downloads$ more /tftpboot/testfile
test1
d9@ubuntu:~/Downloads$ tftp 127.0.0.1
tftp> get testfile
Received 7 bytes in 0.0 seconds
tftp> quit
d9@ubuntu:~/Downloads$ more testfile
test1
d9@ubuntu:~/Downloads$ rm testfile

tftp seems to work now.

9. Next, let's install PetaLinux ZedBoard board support package(BSP):

d9@ubuntu:~$ cd ~
d9@ubuntu:~$ mkdir Projects
d9@ubuntu:~$ cd Projects/
d9@ubuntu:~/Projects$ source /opt/petalinux-v2013.10-final/settings.sh
d9@ubuntu:~/Projects$ echo $PETALINUX
/opt/petalinux-v2013.10-final
d9@ubuntu:~/Projects$ petalinux-create -t project -s ../Downloads/Avnet-Digilent-ZedBoard-v2013.10-final.bsp
INFO: Create project:
INFO: Projects:
INFO: * Avnet-Digilent-ZedBoard-14.7
INFO: * Avnet-Digilent-ZedBoard-2013.3
INFO: has been successfully installed to /home/d9/Projects/
INFO: New project successfully created in /home/d9/Projects/

10. Looks like we are successfully installed BSP. Now lets test prebuilt Petalinux v2013.10 image using QEMU:

d9@ubuntu:~/Projects$ cd Avnet-Digilent-ZedBoard-2013.3/
d9@ubuntu:~/Projects/Avnet-Digilent-ZedBoard-2013.3$ petalinux-boot --qemu --prebuilt 3

zynq_1_003

Use 'root'/'root' for username and password and then 'uname -a' to see what we got. To quit from QEMU monitor hit 'Ctlrl + A', then X.

Avnet-Digilent-ZedBoard-2013_3 login: root
Password:
login[780]: root login on `ttyPS0'

root@Avnet-Digilent-ZedBoard-2013_3:~# uname -a
Linux Avnet-Digilent-ZedBoard-2013_3 3.8.11 #2 SMP PREEMPT Thu Nov 21 18:30:11 EST 2013 armv7l GNU/Linux
root@Avnet-Digilent-ZedBoard-2013_3:~# QEMU: Terminated
d9@ubuntu:~/Projects/Avnet-Digilent-ZedBoard-2013.3$

11. Now lets test prebuilt image on ZedBoard using JTAG. Source Vivado SDK settings.

d9@ubuntu:~/Projects/Avnet-Digilent-ZedBoard-2013.3$ source /opt/Xilinx/Vivado/2013.4/settings64.sh

Also, set MIO3, MIO4 and MIO5 jumpers on ZedBoard to 'ground position for JTAG boot. Then power ZedBoard on, run 'gtkterm' program and then:

d9@ubuntu:~/Projects/Avnet-Digilent-ZedBoard-2013.3$ petalinux-boot --jtag --prebuilt 3
INFO: The image provided is a zImage and no addition options were provided
INFO: Append dtb - /home/d9/Projects/Avnet-Digilent-ZedBoard-2013.3/pre-built/linux/images/system.dtb and other options to boot zImage
INFO: Configuring the FPGA...
INFO: FPGA configuration completed.
INFO: Downloading FSBL
INFO: FSBL download completed.
INFO: Launching XMD for file download and boot.
INFO: This may take a few minutes, depending on the size of your image.

I found that JTAG boot works on just powered board and failed to download FSBL if I just reset the board. In order to reset PS and PL all together you have to short JP13 on ZedBoard (Short connects JTAG PROG-RST to PS Reset).

zynq_1_004

12. Now, lets rebuilt PetaLinux kernel and boot updated kernel on ZedBoard using JTAG. So, while in a ZedBoard project directory:

d9@ubuntu:~/Projects/Avnet-Digilent-ZedBoard-2013.3$ petalinux-build
INFO: Checking component...
INFO: Generating make files and build linux
INFO: Generating make files for the subcomponents of linux
INFO: Building linux
[INFO ] pre-build linux/rootfs/fwupgrade
[INFO ] pre-build linux/rootfs/peekpoke
[INFO ] pre-build linux/rootfs/uWeb
[INFO ] build linux/kernel
[INFO ] update linux/u-boot source
[INFO ] generate linux/u-boot configuration files
[INFO ] build linux/u-boot
[INFO ] Setting up stage config
[INFO ] Setting up rootfs config
[INFO ] Updating for armv7a-vfp-neon
[INFO ] Updating package manager
[INFO ] Expanding stagefs
[INFO ] build linux/rootfs/fwupgrade
[INFO ] build linux/rootfs/peekpoke
[INFO ] build linux/rootfs/uWeb
[INFO ] build kernel in-tree modules
[INFO ] modules linux/kernel
[INFO ] post-build linux/rootfs/fwupgrade
[INFO ] post-build linux/rootfs/peekpoke
[INFO ] post-build linux/rootfs/uWeb
[INFO ] pre-install linux/rootfs/fwupgrade
[INFO ] pre-install linux/rootfs/peekpoke
[INFO ] pre-install linux/rootfs/uWeb
[INFO ] install linux/kernel
[INFO ] install linux/u-boot
[INFO ] Setting up rootfs config
[INFO ] Setting up stage config
[INFO ] Updating for armv7a-vfp-neon
[INFO ] Updating package manager
[INFO ] Expanding rootfs
[INFO ] install sys_init
[INFO ] install linux/rootfs/fwupgrade
[INFO ] install linux/rootfs/peekpoke
[INFO ] install linux/rootfs/uWeb
[INFO ] install kernel in-tree modules
[INFO ] modules_install linux/kernel
[INFO ] post-install linux/rootfs/fwupgrade
[INFO ] post-install linux/rootfs/peekpoke
[INFO ] post-install linux/rootfs/uWeb
[INFO ] package rootfs.cpio to /home/d9/Projects/Avnet-Digilent-ZedBoard-2013.3/images/linux
[INFO ] Update and install vmlinux image
[INFO ] vmlinux linux/kernel
[INFO ] install linux/kernel
[INFO ] package zImage
[INFO ] zImage linux/kernel
[INFO ] install linux/kernel
[INFO ] package FIT image
d9@ubuntu:~/Projects/Avnet-Digilent-ZedBoard-2013.3$

Reset(with JP13 shorted) or 'power on' ZedBoard and then:

d9@ubuntu:~/Projects/Avnet-Digilent-ZedBoard-2013.3$ petalinux-boot --jtag --prebuilt 2
INFO: Configuring the FPGA...
INFO: FPGA configuration completed.
INFO: Downloading FSBL
INFO: FSBL download completed.
INFO: Launching XMD for file download and boot.
INFO: This may take a few minutes, depending on the size of your image.

d9@ubuntu:~/Projects/Avnet-Digilent-ZedBoard-2013.3$ petalinux-boot --jtag --kernel
INFO: The image provided is a zImage and no addition options were provided
INFO: Append dtb - /home/d9/Projects/Avnet-Digilent-ZedBoard-2013.3/images/linux/system.dtb and other options to boot zImage
INFO: Cannot detect the ARCH from the image.
INFO: We will get the ARCH from the system config.
INFO: Launching XMD for file download and boot.
INFO: This may take a few minutes, depending on the size of your image.

Login as 'root'/'root' again and check build date - it should be current. Congratulations! Now we got working PetaLinux SDK on latest Ubuntu 13.10.